Scheduled Payments
Setup
The AutoPay module
is included with the standard ATS System so you may schedule payments to be
made on a regular, ongoing basis. This feature is available from the menu from within a claim or from the Selected Claims list
screen after selecting a claim.
The program
displays the following screen. .
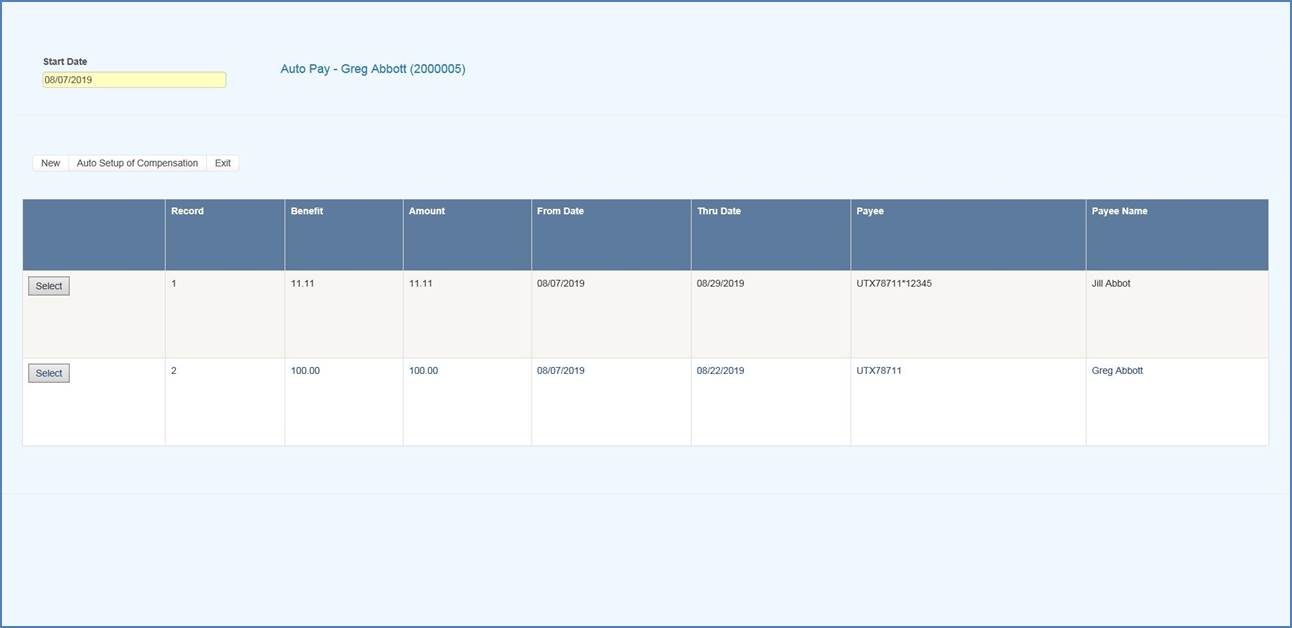
Figure 6‑1: AutoPay Screen
Depending on
how the claim has been set up, the following buttons may be used.
|
Button |
Function |
|
Edit |
Displays
the selected payment record for viewing and/or editing purposes.
If the list is empty, this button will be disabled. |
|
New |
Displays
a blank form so a new record may be entered. |
|
Auto
Setup |
Sets
up a new payment schedule automatically. This button will be
disabled if there is a Start TD or Start PD Date in the claim. |
|
Close |
Exits to wherever you started,
either the claim or the Selected Claim menu. |
There are two
ways of scheduling new payments. Each method will be covered in this section.
Using the
Auto Setup of Compensation Button
The Auto Setup button
is available for setting up the benefit period. It will be enabled for
indemnity claims that have a specific Benefit Rate,
but no benefit payments (i.e. the Start TD and
Start PD Date
fields are both empty).
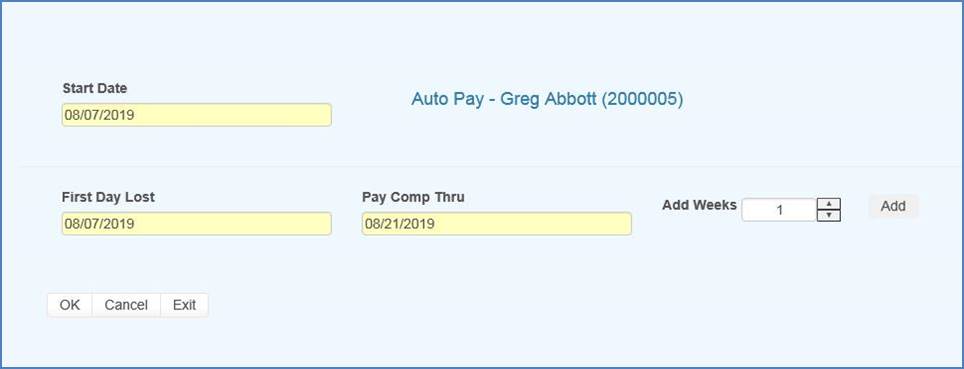
Figure 6‑2: AutoPay Setup
Selecting the
button will prompt for the compensation period. The
First Day Lost will
be displayed if the date exists in the claim record. Enter the date when the
period will end. It can always be changed later. If you don’t know the exact
date, add the number of weeks to be paid and click the Pay Comp Thru field to
update the ending date.
Click OK and
the program will set up the payment schedule as shown in the following example.
In addition to
the information found in the claim record, the program will search the various
tables to find the default values for the Pay Code, State Days, and Waiting Period when
the Auto Setup of
Compensation feature is used. (All of the fields will be covered next.)
If the program
finds all the required information and the Pay Day value for the employer is
set to something besides any day, then the only thing left to do is save the
record. Otherwise, the date for the Next Check must
be entered before the record can be saved.
Using the
New Button to Schedule Payments
If you use the
New button, normally the information on the form will have to be entered
manually. The fields are described as follows:
|
Field
Name |
Description |
|
Record
# |
The default is “1” for the first
payment schedule. Enter “2” to indicate a 2nd one. A
total of nine records may exist at any one time. Records no longer appear on
the list after the last payment has been made. |
|
PMT
Type |
The
payment type
is either checks or
vouchers. If necessary,
a system administrator
may change the default value. |
|
Payee ID |
The payee’s social security or federal
ID number. Enter "C" if the payee is the claimant, "D"
for a dependent receiving alimony or child support, or press
the Ellipsis button for a list of vendors. If
this is a fatality case, we recommend that you enter the individual who will
receive the death benefits as a dependent to make it easier to schedule payments. |
|
Payee |
The
name of the payee will be filled in automatically after reading the social
security number or vendor code in the previous field. |
|
2nd
Payee |
The
name of a second payee if any. For example, if the
employee's check needs to go to a legal firm for disbursement, the c/o name
should be entered here. |
|
Address, City, State, Zip, Phone |
The
address and phone information will be filled in automatically after reading
the record with the specified social security or federal ID number. |
|
RSV
Cat |
The
reserve category to be used. The Auto Setup feature will enter “Indemnity” by default.
Press the Ellipsis button for a list of other categories that are available
on your system. |
|
Pay
Code |
The payment or cost center code. Press the Ellipsis
Button for a list of codes that are available for the specified reserve
category. If
the Auto Setup button is used, the program will use the
Benefit Type code specified in the claim record to look
for the default code set up with the Administer-Configure-Application
Parameters menu. |
|
Rate |
The
employee’s benefit rate. If an amount has been entered in
the claim record, it will be displayed here automatically. (A benefit rate
must have been entered in the claim in order to use the Auto Setup feature.) |
|
Work
Comp From |
When
the Auto Setup of Compensation button is used, the program
will calculate the starting date based on the First Day Lost and the days in the state's waiting period,
otherwise it must be entered manually. In either case, the From Date will be
adjusted as payments are made. |
|
Work
Comp Thru |
The
day benefits should end. The program that batches the payments will generate
"Next to Last Payment" and "Last Payment" diaries to warn
the adjuster that the claim should be reviewed. This date may be modified if the payment period needs to be shortened or extended. |
|
Wait
Period From/Thru |
When the Auto Setup of Compensation button is used, the program
automatically calculates the From and Thru dates based on the Waiting Period and Before Paid values in the record for the
claim's state of jurisdiction. This
feature will not work correctly if the values in the state's record are
incorrect. If for some reason, you do not want the program to calculate the
waiting period payment, zero out
the values for the state. |
|
Pay
Period |
The Auto Setup feature will automatically enter “B”
(bi-weekly) as the Pay Period. Other
valid entries are “W” (weekly) and “M” (monthly). |
|
Benefit Type |
The
benefit type from the claim record, either “TD” (temporary
disability), “PD” (permanent
disability), or “VR” (vocational rehabilitation). |
|
PMT
Periods |
The
total number of payments to be made will be calculated after you have entered
the pay period and from/thru dates. This value can not be modified. It will be updated
automatically as payments are made. |
|
Original
From |
The
Comp Period From Date will be updated as payments
are made, but the original date is displayed here for your information. |
|
Next
Check |
The
date of the next payment. This date
will appear as the first Batch On date on the list of future payments. (See
below for details.) |
|
Prior
Check |
The
date of the last payment that was batched. |
Saving a Payment Schedule
When the
record is saved, the program will check the claim to verify that there are
sufficient reserves to
make the payments. If there aren’t, you will be prompted to increase the
reserves accordingly.
AutoPay creates the payment schedule and displays it on the screen as it
saves the record. This particular example was created
to batch the payments after the pay period (AutoPay Mode set to A) and the
employer’s Pay Day set to any day. (Refer to the Setup Procedure in a later
section.) The Next Check date is used as the first Batch On
date. This is the most typical configuration.
Note the
first payment on the
list is for the waiting period. In the state of jurisdiction for
the claim, there is a 14 day period before those days
can be paid.
Calculating
the Last Payment
Typically,
the Comp Thru Date does not fall at the end of a pay
period so the last payment is
only for a few days. When that happens, the program will check the Scheduled
Hours in the claim record.
If there are
no Scheduled Hours, AutoPay assumes that the individual works a regular
week and calculates the payment accordingly. But,
suppose the employee works Monday and Wednesday through Saturday. (Work days are those which contain a value in the Total field
on the Scheduled Hours dialog.) If the Thru Date falls on a Wednesday, the
program will know that the employee does not work on Tuesday and only pay for
two lost days.
The program
that batches the auto payments will generate a diary to the adjuster when the
next to the last and the last payments are batched.
Batching
Auto Payments
The Autobat program must be run to batch payments according to
their Batch On
date. AUTO will be stored as the user who processed the transaction. Although
the reserves must
be sufficient to schedule the payments, the reserves may have been used up
since then.
Auto payments
will always be batched because of a possible late penalty. When the reserves are
insufficient, the program checks the Stair Step Reserves value
entered with the Application Parameters. If
it is either "Closed" or "All", the reserves will be
automatically increased to cover the payment. Unless Negative Reserves has been set to
“N”, the futures will become negative. In any case, a diary will be sent to the
adjuster.
Auto Batch logs
may be viewed with the Image Files menu. When appropriate, "Next to Last
Payment" and "Last Payment" entries will appear along with a
diary telling the adjuster to review the claim.
The number of
OSHA Days
in the claim is updated as payments are batched against reserve categories 1
and 3 (indemnity and rehab) for pay codes with “TD” in the Grouper field. This number is based
on a calendar week.
Setup
Procedure
The system
administrator must set up AutoPay so
payment schedules are created to meet your particular needs. When the record is saved, the program will
check the Pay Day and AutoPay Mode values as defined below.
|
Item |
Set
In |
Value |
|
Pay
Day |
Employer’s
record |
Sunday
thru Saturday or Any Day |
|
AutoPay Mode |
Application
Parameters |
Standard (sets the first Print Date to
the first Pay Day at the end of the pay period) After (sets the first Print Date to
the first pay day after the pay period ends) |
When the Auto
Setup of
Compensation feature is used and Pay Day is set to a specific day of the week,
the program will ignore the Next Check date,
if one exists, and use the AutoPay Mode
to calculate it and the subsequent Print Dates (displayed with the List
option). Changing the Next Check date will have no effect.