American Technical Services, Inc.
ATS 2021™
USER MANUAL
FOR
ATS/COMP™
WORKERS’ COMPENSATION CLAIMS ADMINISTRATION MODULE
American Technical Services, Inc.
ATS 2021™
USER MANUAL
FOR
ATS/COMP™
WORKERS’ COMPENSATION CLAIMS ADMINISTRATION MODULE
ATS 2019™ User Manual for ATS/COMP™ Workers’ Compensation Claims Administration Module
First Edition October, 2021
© 2019 by American Technical Services, Inc. All rights reserved. No part of this publication may be reproduced or transmitted by any means without the prior written permission of the publisher:
American Technical Services, Inc.
2134 Palm Harbor Blvd, Suite A
Palm Harbor, FL 34683
Phone: (800) 654-7611
Fax: (727) 431-0150
Email: support@atsrmis.com
Web Site: https://www.atsrmis.com
Published and printed in the United States of America.
ATS 2019™ is a trademark of American Technical Services, Inc.
Windows™ is a trademark of Microsoft Corporation.
Word for Windows® is a registered trademark of Microsoft Corporation.
SAP® Crystal Reports® is a trademark of SAP SE, Inc.
Table of Contents
Searching for Existing Records
Adding an Employer’s Report of Injury or a Claim
4. Employer’s Report of Injury
Entering a New Employer’s Report
Batching the Employer’s Report Data
Marking Diary Entries as Reviewed
ISO Claim Search Export Utility
Using the Auto Setup of Compensation Button
Using the New Button to Schedule Payments
The Bundling and Unbundling Feature
Printing the Explanation of Benefits
Marking Diary Entries as Reviewed
Entering the Selection Criteria
Entering the Output Specifications
Reserves/Payment/Recovery Maintenance
SIC – Standard Industry Classification
NAIC – North American Industry Classification System
NCCI – National Council on Compensation Insurance
Table of Figures
Figure 1‑3: Sample Data Input Screen
Figure 1‑5: Claim Search Criteria
Figure 1‑6: Active Claims List
Figure 2‑1: Employee Data Input Page
Figure 2‑2: Employee Search Criteria
Figure 2‑3: Employee Search Result List
Figure 2‑4: Employee Also Known As List
Figure 2‑5: Employee Also Known As Dialog
Figure 2‑6: Employee Dependent List
Figure 2‑7: Employee Dependent Data Input
Figure 3‑1: Vendor Page - General Section
Figure 3‑2: Vendor Page - Finance Section
Figure 3‑3: Vendor Result List
Figure 4‑1: Employer’s Report Page - General Section
Figure 4‑2: Employer’s Report Page - Employer Section
Figure 4‑3: Employer’s Report Page - Detail Section
Figure 4‑4: Employer’s Report Page – Loss Description Section
Figure 4‑5: Employer’s Report Page – Loss Codes Section
Figure 4‑6: Employer’s Report Page – Medical Section
Figure 4‑7: Employer’s Report Page – Administrator Section
Figure 4‑8: Employer’s Report Page – Carrier Section
Figure 4‑9: Employer’s Report Page – Summary Section
Figure 4‑10: Employer’s Report Search Criteria
Figure 4‑11: Employer’s Report Result List
Figure 4‑12: Employer’s Report EDI Batch Dialog
Figure 5‑1: Claim Search Criteria
Figure 5‑2: State of Jurisdiction Dialog
Figure 5‑3: Claim Page – General Section (New)
Figure 5‑4: Claim Page – Details Section
Figure 5‑5: Claim Page – Reserves Section
Figure 5‑6: Reserves Change Reason Dialog
Figure 5‑7: Claim Page – Medical Section
Figure 5‑8: Claim Page – Legal Firms Section
Figure 5‑9: Claim Page – Litigation Section
Figure 5‑10: Claim Page – Rehab Section
Figure 5‑11: Claim Selection Screen
Figure 5‑12: Selected Claims List
Figure 5‑14: Auto Pay Setup Screen
Figure 5‑15: Claim Diaries List
Figure 5‑17: ISO Export Utility
Figure 5‑19: Claim Notes Report Format
Figure 5‑20: Note Entry Dialog
Figure 5‑21: Note Attachment Dialog
Figure 5‑22: Claim Payment History
Figure 5‑23: Claim Recovery History
Figure 5‑24: Claim Reserve History
Figure 5‑25: Claim Letter History
Figure 5‑27: Reserve Worksheet
Figure 5‑29: EFC – Document Manager
Figure 6‑3: Sample Explanation of Benefits
Figure 6‑5: Batch Mode Filters
Figure 6‑9: Rebatch Payments Screen
Figure 7‑1: Claim History - Payments
Figure 7‑2: Claim History - Payment Detail
Figure 7‑3: Claim History - Payment Report
Figure 7‑4: Claim History - Letters
Figure 7‑5: Claim History - Reserves
Figure 7‑6: Claim History – Recoveries
Figure 7‑7: Claim History – Audit
Figure 8‑1: Diary Activity List
Figure 8‑3: Diary Entry Screen
Figure 8‑4: Diary Attachment Dialog
Figure 9‑1: Forms and Letter List
Figure 9‑2: Sample Generated Form
Figure 9‑3: Form Output Options
Figure 10‑2: Reports – Account Selection
Figure 10‑3: Reports – Activity Summary Report Sample
Figure 10‑4: Reports –Activity Summary Parameter Entry Example
Figure 11‑2: Dashboard Designer
Figure 12‑1: Table Maintenance – Table Selection
Figure 12‑2: Table Maintenance – Table Contents List
Figure 12‑3: Table Maintenance – Sample Editor Screen
Figure 12‑4: Organization Maintenance – Level 1 Entry
Figure 12‑5: Loss Maintenance – Cause Code Entry
Figure 12‑6: Payment Maintenance – Cost Center Code Entry
This chapter covers the common features in ATS 2019. It explains how to use the various items you see in the main window, the ATS input screens, and the selection dialogs. Other chapters will guide you through the specific tasks you will be performing.
The ATS Workers’ Compensation Claim Administration module (ATS/COMP) is one of the most powerful applications on the market for administrating workers’ compensation claims, yet it’s easy to use. Data entry screens have been tailored to meet your requirements. On-line help is available if you have a question. Whatever your job entails, you will find that the system streamlines your workflow so that tasks get done quickly and efficiently.
This manual provides a complete description of the tasks that you can perform in the ATS/Comp system. Use it as a reference when you want to know how to use a specific feature. Technical information for the system administrator is documented separately.
The ATS manuals are designed to help you learn how to use the system quickly and efficiently. Each chapter begins with a brief overview of its contents. The remainder of the chapter discusses the features in depth.
The following conventions are used to identify special information:
|
Italics |
Specialized terms and titles of other books, chapters or sections in this manual. |
|
Arial |
Specific names of pages and dialogs. |
|
Open |
Specific names of buttons. |
|
New Claim |
Specific menu item selections, dialogs . |
|
<Ctrl>+X |
Keys that are used together as shortcuts to perform a specific operation. For example, <Ctrl>+P means hold down the Control key while pressing P. |
|
<Key> |
Special keys such as the Tab key which is shown as <Tab>. |
|
|
Important information related to the current topic. |
ATS/COMP is a browser-based application so you can launch the system by selecting the option from your list of Favorites in your browser or double-clicking the ATS 2019 icon on your desktop.
The ATS Login page provides secure access to the system. Each user must enter a Username and Password to gain access. In addition, if your organization has multiple instances of ATS 2019 running, you will need to select the Server too.
When all items are entered or selected, clicking the Log In button will validate your credentials and, if valid, log you into the system and will usually display the Console page. If your system is configured to require password changes on a regular basis, you may be directed to a password change page when you log in.
|
|
It is important to note that your login account could be configured to bypass the Console and display a different page. |
The main window that appears after login is referred to as the ATS Console because console is a synonym for "control panel". Regardless of whether you use one or all of the ATS products, the ATS Console will appear as the primary access point for the system.
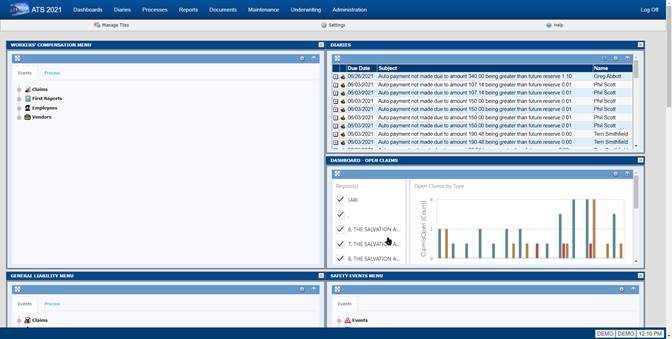
The Console page consists of four (4) major components; the Menu Bar, the Toolbar, the Work Area, and the Status Bar.
The Menu Bar is located at the top of the page and provides access to major sections of the system, depending on your security settings.
The available menu options are as follows:
|
Menu Option |
Description |
|
Dashboards |
Provides access to interactive dashboards that provide analytical information about the contents of the database(s). |
|
Diaries |
Displays the workflow diary items for the user and, if a supervisor, the diary items of subordinates. |
|
Processes |
The functions that generally affect multiple claims simultaneously, such as reviewing payments in batch and/or printing them. |
|
Reports |
Provides access to a wide variety of reports that include claims analysis, statistical, financial, and more. It also provides access to a general purpose tool for performing ad hoc queries against the ATS database(s). Knowledge of SQL is required to use this feature. |
|
Documents |
A repository for documents related to claims, incidents, first reports, etc. Documents can be in a wide variety of formats, such as; Word (.doc/.docx), Excel (.xls, .xlsx), Adobe (.pdf), Text (.txt), Graphics (.jpg, .gif, .png, etc.) and many more. |
|
Maintenance |
Allows users to maintain the look-up tables that the system uses for organization codes, loss codes, etc. |
|
Administration |
The features that allow administrators to configure the system-wide options that affect how the system will look and function, and features that are used to maintain the security settings for Users and Groups. |
When you click any of the options on the Menu Bar it will open a new tab or window (depending on your settings) with the selected component.
Toolbars in ATS 2019 contain tools, represented by icons and/or text, that provide access to processes and features associated with the current page or that act upon a selected item on the current page. The name of the current page is also displayed on the left side of the toolbar.
The following tools are available on the Console toolbar:
|
Icon |
Tool |
Purpose |
|
|
Manage Tiles |
Opens the tile selection screen to add or remove tiles from the work area. |
|
|
Settings |
Opens the settings dialog for the current screen. |
|
|
Help |
Opens the Help file associated with the current page. |
The Work Area of the Console page displays one or more Tiles. Each tile provides access to different information and functionality, such as; menus, claim lists, recently accessed items, diaries, email, system notices, graphs, statistics, and more.
The Work Area is fully configurable and you can modify it to meet your specific work requirements. The layout of the Work Area is like a grid. It can have from one (1) to five (5) columns and any number of rows. You can also set the width of each column.
The Status Bar displays messages on the left side. The right side displays the name of the database that you are connected to and the name of the user that logged in.
 A Tile is a small window that provides access to a
particular set of functions. For example, Menu Tiles contain menu options that
allow you to easily access a particular feature, such as entering a New Claim
record or running a report. All tiles can be expanded to a full screen for
easier viewing and, in some instances, additional capabilities.
A Tile is a small window that provides access to a
particular set of functions. For example, Menu Tiles contain menu options that
allow you to easily access a particular feature, such as entering a New Claim
record or running a report. All tiles can be expanded to a full screen for
easier viewing and, in some instances, additional capabilities.
The following lists various Tiles available with ATS/COMP that are available at the time of this writing; however, new Tiles are being developed as time goes on.
|
Tile |
Tile Description |
|
|
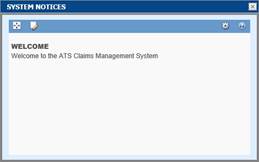
The System Notices Tile displays general interest messages that have been created by authorized users and/or informational messages from the system, such as workflow task assignments and other reminders. The expanded page allows you to view all recent messages or notifications. |
|
|
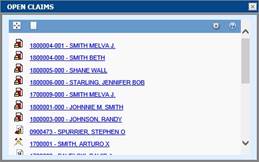
The Open Claims Tile shows a list of all open claims that are assigned to the current user. Clicking on an item will open the associated claim record. The number of entries displayed can be set by the user. The expanded page shows the entire list of open claims assigned to the user. |
|
|
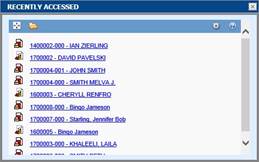
The Recently Accessed Tile shows a list of the most recently opened claims for the current user, in reverse chronological order. Clicking on an item will open the associated claim record. The number of entries displayed can be set by the user. The expanded page shows the entire list of recently accessed claims. |
|
|
The WC Reserves Dashboard Tile provides a quick view of the overall reserves set for the Workers’ Compensation claims in the system. The expanded page displays an interactive graphical dashboard that provides more specific information on the reserves. |
|
|
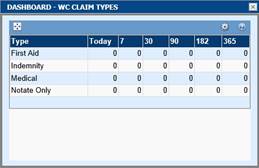
The WC Claim Types Dashboard Tile provides a quick view of the breakdown of claims by type for the Workers’ Compensation claims in the system. The expanded page displays an interactive graphical dashboard that provides more specific information for each claim type. |
|
|
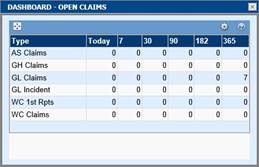
The Open Claims Dashboard Tile provides a quick view of the overall number of currently open claims in the system, of each type. The expanded page displays an interactive graphical dashboard that provides more specific information on the breakdown of each type of claim. |
|
|
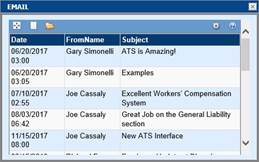
The Email Tile integrates with your email system to provide a list of current items in your inbox. Individual items can be opened and read. New email messages can also be created. The expanded page provides access to a fully functional email manager that includes a calendar, task list and more. |
|
|
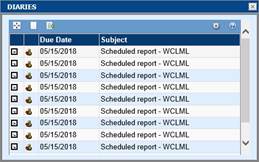
The Diaries Tile provides a list of Diary/Workflow entries that are assigned to the current user. Entries are listed in chronological order by due date. Diaries can be opened, reviewed, marked as complete from the tile and new Diary entries can be created. The expanded page provides a complete list of all diaries for the current user and, if authorized, show diaries for members of a group. |
|
|
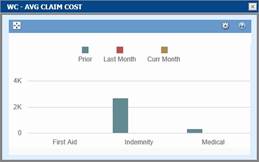
The WC Average Claim Cost Tile displays a graph that compares current, recent and historical cost data. The expanded page shows a larger view of the graph. |
|
|
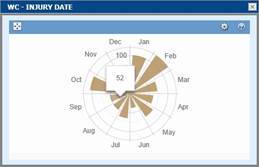
The WC Injury Date Tile displays a graph that shows the frequency of injuries by month. The expanded page shows a larger view of the graph. |
|
|
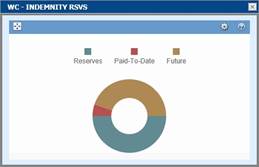
The WC Indemnity Reserves Tile displays a graph that compares Reserves, Paid-to-Date, and Future Reserves for all open claims. The expanded page shows a larger view of the graph. |
|
|
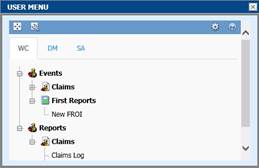
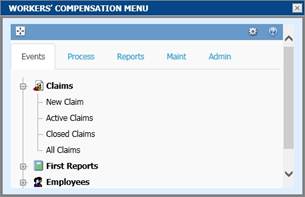
The User Menu Tile allows you to create a menu that contains only the menu items you select. You can add as many or as few items as you choose, in order to make your job as efficient as possible. The expanded page displays the menu in a larger area. |
|
|
The Workers’ Compensation Menu Tile contains all available menu items for the module. The expanded page displays the menu in a larger area. |
|
|
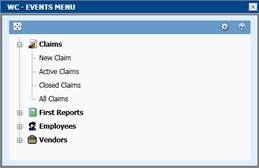
The WC Events Menu Tile contains only those menu items that are located on the Events tab of the Workers’ Compensation menu. The expanded page displays the menu in a larger area. |
|
|
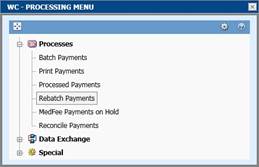
The WC Processing Menu Tile contains only those menu items that are located on the Process tab of the Workers’ Compensation menu. The expanded page displays the menu in a larger area. |
|
|
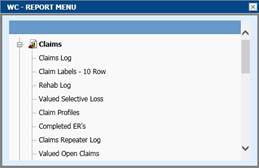
The WC Report Menu Tile contains only those menu items that are located on the Reports tab of the Workers’ Compensation menu. The expanded page displays the menu in a larger area. |
|
|
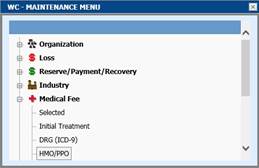
The WC Maintenance Menu Tile contains only those menu items that are located on the Maint tab of the Workers’ Compensation menu. The expanded page displays the menu in a larger area. |
|
|
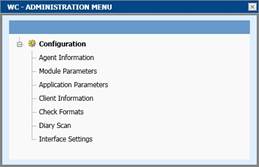
The WC Administration Menu Tile contains only those menu items that are located on the Admin tab of the Workers’ Compensation menu. The expanded page displays the menu in a larger area. |
ATS products are ADA compliant so the menu options can be selected using the keyboard instead of the mouse. The list of keys available in the current window may be displayed with the Key Map button in the right pane by pressing <Ctrl>+K. There are actually two lists.
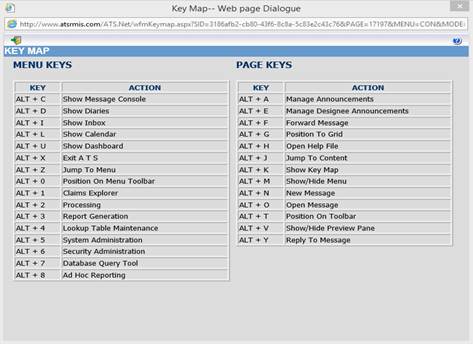
The first one lists the keys that may be used to access the options in the Navigation pane. The Page keys are the ones that may be used in the Selection pane. Since the items on the screen change depending on where you are in the system, the keys on the list will also change. Those listed below are available from the Explore window.
Some menus and commands appear only in certain parts of the system. The options on the menus that are unique to the Navigation pane in ATS .Net are described below.
This section will cover the common features found in the ATS .Net input screens. The sample below is the standard screen used to enter Vendor information. Since ATS screens may be customized, there will be times when the screen on your system looks different than the one in this manual
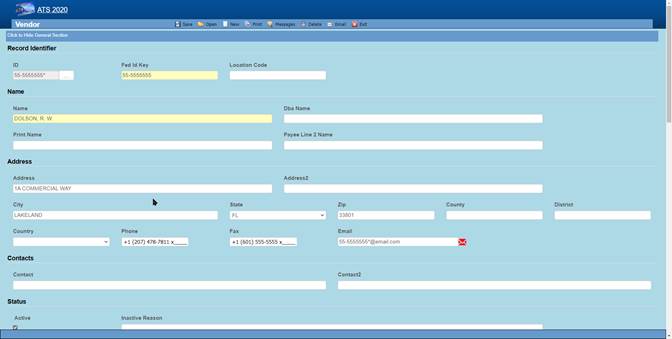 Figure 1‑3: Sample Data Input Screen
To move through the fields or edit boxes on the screen, use the <Tab> or <Shift>+<Tab> keys or go directly to a specific field by clicking it with the mouse. Screens with multiple sections will have a special banner for each section to assist you in finding and/or entering information. To move to a specific section, scroll up or down the page or press <Alt>+<n> where n is the number of the section.
Normally, the input fields appear as white boxes on the screen. The majority of these are text fields such as those used to enter an address. Any printable character is considered valid. Depending on the field’s properties, letters will either appear as they are typed or transformed to upper case.
Numeric fields such as the employee’s wage will only accept numbers, commas, and periods (decimal points). All other characters are ignored.
Dates may be entered in a MMDDYY or MMDDYYYY format. Typically, the program will assume dates in the MMDDYY format are in the 21st century unless the date would be more than 25 years in the future. The slashes are automatically displayed as you enter the date. You may also click the key next to the field to pick the desired date from a calendar.
When phone or fax numbers are entered as ten digits such as 4101234567, the program will automatically display the formatted number as 1+ (410) 123-4567 where “1+” is the international dialing code for the United States. Enter the appropriate code if the number is for a foreign country.
ATS programs will recognize zip codes in the United States and fill in the corresponding city, county, and state.
Check boxes have replaced the Yes/No fields. Simply click the box to check it and indicate “Yes”.
Since data entry speed and accuracy is important, selection lists are provided when a code is to be entered. Click the button next to the field to display a selection list like the one for cause codes shown below. The list will display the name/description of the item on the screen, followed by the code in parentheses. (It’s the code that is saved, not the description.) (Pages for maintaining lookup tables are accessible through the Maintenance option on the Menu Bar.)
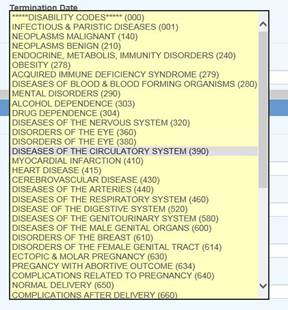
Figure 1‑4: Cause Code List
Normally, required fields are displayed in yellow or red. In the sample input screen, the vendor’s search name field is required. A message will appear in the title bar if the name is missing when you try to save the record.
In some cases, the program will update certain fields on the screen. These are referred to as read- only fields. There are some of these on the Vendor’s Detail page. If you use ATS to produce the MISC-1099 forms, the program will write the amounts paid in the claim. Users can not modify these values.
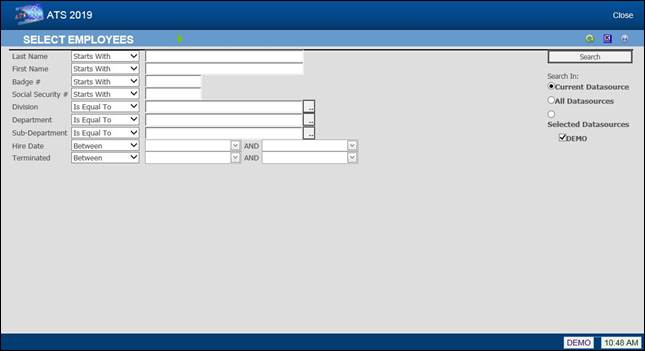
Note the Search In section on the right side of the screen shown below. If you have multiple data sources, this feature allows you to indicate the one(s) you want to use. When “All Data sources” is selected and you pick a claim (on the list of possible matches), the program will automatically make the data source active that is associated with the claim. Only one data source (DEMO) has been activated in our example.
|
|
Your company’s hierarchy may be divided into regions for tracking and reporting purposes. In that case, you may only have the right to access the claims in one or more of them. The program will display “Region Restrictions”. |
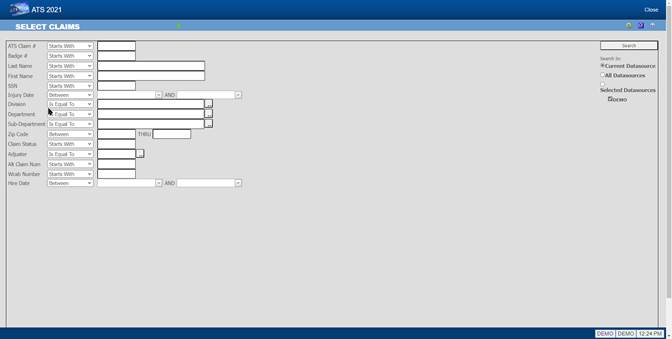
The ATS .Net system provides you with a variety of ways to find an existing record. The screen below illustrates how you might enter the criteria to search for a claim. Each item has a drop-down list of operations that can be used to qualify your search criteria. For example, selecting Starts With from the drop-down and entering the letter “A” in the Claimant Name field will return a list of all claimants with names that begin with the letter “A”. However, if you had selected Contains from the drop-down will list all claimants that have an “A” anywhere in their name. Note that the more criteria you use, the shorter the list of matches is likely to be.
 Figure
1‑5: Claim Search Criteria
Figure
1‑5: Claim Search Criteria
When you are ready, click the Search button or press <Enter>. Unless you have entered a specific claim number, the program will display a list of choices that match your search criteria.
You can look up existing records by entering:
1. A specific value for an item. Selecting “Is Equal To” and typing “ATS” as the adjuster will display a list of claims for that user.
2. Characters that start, end, or exist somewhere in the data.
3. A wildcard. The percent symbol (%) may be used to indicate one or more characters. For example, entering “%” as the claimant name will list all claims regardless of the name. The underscore (_) represents a single character. For example: M%N will search for names that start with M and end with N; however, M_N will look for names that begin with M and end with N with one character in the middle.
4. A loss between two dates as shown above.
The program will search through the data source(s) using the selection criteria and display a list of records that match your specifications as illustrated by the example shown below.
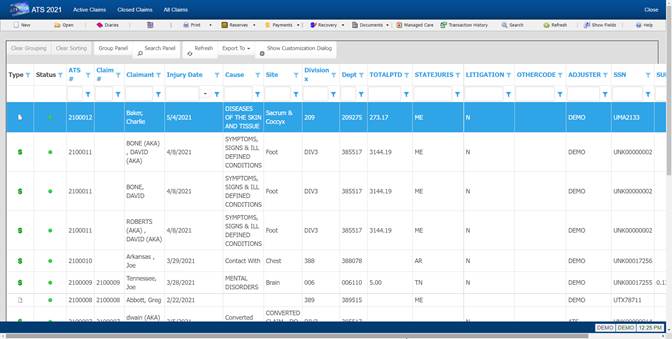 Figure 1‑6: Active Claims List
The arrow keys underneath the File menu allow you to look at other pages of possible matches when there is more than one. This snapshot shows that you are on page one of sixteen.
Click on any of the column headings to sort the list by the data in that column.
You can enter a value into the textbox at the top of a column to filter the records. Only records that match the value entered will be displayed.
Page navigation controls are located at the bottom of the page. You can go to the next or previous page by clicking the buttons on either side of the page numbers or you can click on one of the page numbers to go directly to that page.
You can use the Page Size control to set the number of entries to display on a page.
The employee must have a record in the ATS System before a claim or an employer’s report of injury can be entered for the individual. The Employee program is available after selecting the Explore menu and clicking the Employee tab on the Worker’s Compensation menu.
Note that if your company has another software package that tracks employee information, a custom interface may be provided to import relevant data into the ATS System in order to save time and ensure that the data is accurate.
![]() Users with appropriate access rights may enter employee records. You can use the New Employee item on a menu or the Open
button on the Employee
List to open the Employee data input page.
Users with appropriate access rights may enter employee records. You can use the New Employee item on a menu or the Open
button on the Employee
List to open the Employee data input page.
The standard screen used to track employee information is shown below with a sample record. Since the ATS System allows screens to be tailored to meet your organization’s requirements, your screen may look slightly different.
Note the fields related to the direct deposit feature will be hidden unless the user has the authority to use this feature.
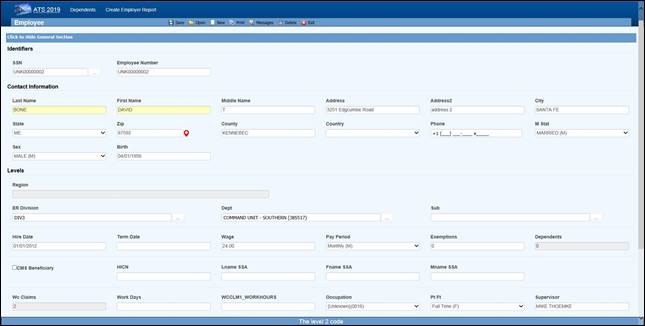 Figure 2‑1: Employee Data Input Page
The individual fields on the form are described as follows. Note that as soon as you enter the SSN, the program will search for an existing record with that SSN and display “Processing” at the top of the screen. If one is found that record will be displayed.
|
Field Name |
Description |
|
SSN |
This is a required field. New employees will automatically be assigned a number such as UNK00000028. When you type over this number, the program will insert dashes, if necessary, check to see if a record with that SSN already exists and, if so, display it on the screen. If you are not sure of the SSN, we recommend that you use the “UNK” number and edit the record when you have the information. Any existing claims will be updated when the record is saved. Note that during a data conversion, a “UNK” number is assigned when the SSN is missing or invalid. This feature makes it easy to find the records that need to be updated. |
|
Last Name |
The employee’s first and last names are required. This should be the name the person is known as. There are other fields for their legal name. |
|
First Name |
If a person changes his or her name, use the AKA feature to keep track of the previous name(s) so the claim and employee records can be looked up by either one. For details, refer to the AKA section. Note that is feature is in development so it may not be available in your current version. |
|
Middle |
A middle initial if any. |
|
Address |
Enter the address and the zip code. The program will automatically fill in the correct city, county, and state if the zip code is in the United States. |
|
Phone |
Phone numbers entered as 10 digits such as 4101234567 will be displayed as 1+ (410) 123-4567 where the “1+” is the international dialing code for the United States. |
|
Birth Date |
The employee’s date of birth. Enter the date in an MMDDYYYY format. The program will insert the slashes. |
|
Sex |
The employee’s gender. |
|
Marital Status |
The employee’s marital status may be selected from the drop-down list or entered using the appropriate code where M=married, S=single, D=divorced, and W=widowed. |
|
Hire Date |
The date of employment. |
|
Term Date |
The employee’s termination date if any. |
|
Last Transaction |
The ATS system will track changes made to fields in the employee record if a system administer has set them up as transactional. The program will display the last date one of the transactional fields was changed for informational purposes. |
|
Wage |
The employee’s wage during the specified pay period. |
|
Pay Period |
The employee’s pay cycle may be selected from the drop-down list or entered using the appropriate code where H=hourly, D=daily, W=weekly, B=bi- weekly, M=monthly, and A=annual. Note: When a claim or First Report of Injury is entered for the employee, the program will calculate the average weekly wage and write it into the record so it can be used to determine the employee’s benefit rate. |
|
Exemptions |
The number of exemptions is an optional field used to calculate any taxes withheld when making benefit payments in the A&S Disability product. (The same employee screen is used for both.) |
|
Dependents |
The ATS System will update this field and display the total number of dependents for the employee as records are added and/or removed. The number may not be edited. (See the Dependents section.) Note: The Dependents module may be used when 1. The employee's wages have been garnished and a lien needs to be set up (e.g. child support). 2. The number of dependents affects the Workers' Comp benefit rate. 3. There is an additional claimant for a Medicare beneficiary who is deceased. |
|
# Claims |
The program will increment this value as claims are entered for the employee. This field may not be edited. |
|
CMS Beneficiary |
A check in this box indicates that the employee is a Medicare beneficiary. Normally, the check is entered by the program that processes the CMS Query Response file. |
|
HICN |
The Medicare health insurance claim number will be filled in with the data in the CMS Query Response file. |
|
Last Name (SSA) First Name (SSA) Middle Initial |
The employee’s name as known by the Social Security Administration if it’s different than the one used in the rest of the Worker’s Compensation system. If the employee is a Medicare beneficiary, this name will be sent when submitting a report to the CMS (Centers for Medicare and Medicaid Services). |
|
Division Dept Sub
|
The levels that indicate where the employee works within the company’s hierarchy are called Division, Dept, and Sub by default. These labels have probably been changed on your screen. Levels may be entered in the following ways depending on how your system has been set up: 1. Pressing the Ellipsis button in any level field will display a list of all the available entries. This is the default. 2. If the Level 1 and 2 fields are blank, you may be able to enter a Level 3 to have the program automatically fill in the associated levels. |
|
Occupation |
The employee’s occupation. Press the Ellipsis button for a list of choices. |
|
Employment Type |
The employee’s status such as full-time and part-time. Press the Ellipsis button for a list of choices. |
|
Employee # |
The number assigned to the employee by the company. It may be entered in the Employee Selection dialog to look up a record. This ID number may be used to ‘identify’ the employee in certain cases where the SSN may not be displayed for privacy reasons. |
|
Supervisor |
The name of the employee’s supervisor. |
|
Notes |
A short note pertaining to the employee. For example, “Employee hired for project number J3466”. |
|
Direct Deposit |
Direct deposit is an optional, add-on module. A check in this box indicates that the employee wants his/her benefit payments deposited directly in the bank. Depending on the user’s security settings, these fields may not be visible. |
|
Routing Number |
The bank’s routing number. |
|
Bank Account |
The employee’s bank account number. |
The program will display a message indicating that the record has been saved successfully. At that time, the employee’s name and SSN or ID will be displayed in the window’s title bar. If you have skipped over any of the required fields, the “Required fields missing” message will appear. Enter the data. When you are done, save the record again.
The Employee menu provides a number of options to find the record you want to view and/or modify. The first option, the Selected Employees search, lists a variety of criteria you can use to quickly find the record. The standard list is shown below. The criteria on your system may be different.
 Figure
2‑2: Employee Search Criteria
Figure
2‑2: Employee Search Criteria
There are other ways to look up records. The options are as follows:
|
Menu |
Function |
|
Claimants |
Lists all claimants with claims where the Adjuster is the current user. Current Employees Lists all employees that are currently working for the organization. |
|
Current Employees |
Lists all employees that currently work for the organization. |
|
Inactive Employees |
Lists all employees that have left the organization (i.e. a Termination Date exists). |
|
All Employees |
Lists all employees whether or not they are currently working for the organization. |
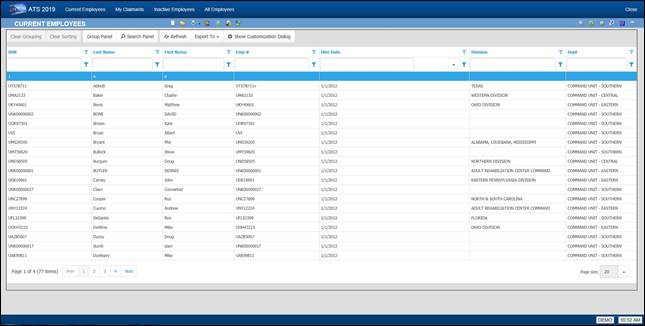 Figure 2‑3: Employee Search Result
List
Figure 2‑3: Employee Search Result
List
Note that if the Region by Level feature has been implemented and Region View has been set, you will only be able to see a list of the employees in your specific region.
However, you find the employee, make the desired changes. When you are done, save the record and exit the program.
If a system administrator has set the Query Employee Changes flag using the Module Parameters screen, the program will check the employee’s name, address, phone, supervisor, birth, and/or termination date. If any information has changed, you will be asked if the individual’s claims and reports of injury should be updated.
|
|
When an employee’s social security number is changed, all the appropriate tables will be updated automatically. |
![]() Some employees sustain a
number of injuries while they work for a company. If you need to enter a
report for a person that already has an existing employee record, we recommend that you edit the record to make sure that the information is
current. When you are finished, you may use the New Employer’s Report button to continue.
Some employees sustain a
number of injuries while they work for a company. If you need to enter a
report for a person that already has an existing employee record, we recommend that you edit the record to make sure that the information is
current. When you are finished, you may use the New Employer’s Report button to continue.
![]() The same suggestion
applies when you need to enter a claim. When you are finished verifying that
the employee’s data is up to date, you may use the special New Claim button
to continue.
The same suggestion
applies when you need to enter a claim. When you are finished verifying that
the employee’s data is up to date, you may use the special New Claim button
to continue.
People are often known by more than one name. The name in the employee’s record and their open claim(s) should be the same as it is the one that will appear on all payments issued to the employee.
Any other name the employee uses should be entered as an alias using the AKA feature. For example, a woman often takes her husband’s name when she gets married. In that case, you should enter her new name in the Last Name field and her maiden name as the alias. After that you will be able to find the employee and the associated claim records using either name. This is done automatically by the system.
There are a number of reasons for creating dependent records. Some of them are:
1. The employee was a Medicare beneficiary and is now deceased. Dependent records must be entered for any “Additional Claimants” that need to be submitted to the CMS (Centers for Medicare and Medicaid Services).
2. The individual wants to attach a lien to the employee’s payments or be considered when calculating the benefit amount for a claim.
3. The individual is the employee’s beneficiary and entering the person as a dependent will simplify the payment process for a fatality claim.
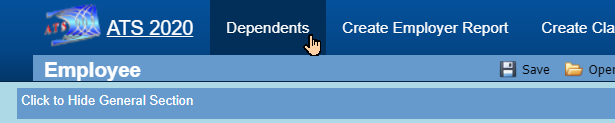 To
enter a new record or modify an existing one, click the Dependents button
to display the Dependents
List.
To
enter a new record or modify an existing one, click the Dependents button
to display the Dependents
List.

Figure 2‑6: Employee Dependent List
Click on the new button. The following screen will appear. Enter all pertinent data and then click Save. The dependent record is now available to use.
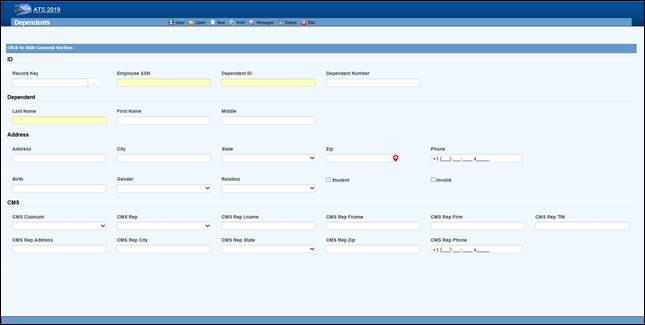 Figure 2‑7: Employee Dependent Data Input
The fields on this screen are described as follows:
|
Field Name |
Description |
|
SSN |
A valid SSN should be entered for the individual. |
|
Last Name First Name M.I |
The complete name if the dependent is an individual. If the dependent is an estate, enter “The Estate of <employee>”, “the Family of <employee>” or “The Trust of <employee” depending on the entry in the Relationship field. In any case, leave the other name fields empty. |
|
Address |
The individual’s address, city, state, and zip code |
|
Phone |
The individual’s phone number. |
|
Birth Date |
The individual’s birth date is important if the state of jurisdiction for the employee’s claim has an age limit for tacking deductions for dependents (when calculating the benefit rate). |
|
Gender |
The individual’s gender if relevant. |
|
Relationship |
The dependent’s relationship to the employee. The valid options are: F = Family Member, Individual Name Provided O = Other, Individual Name Provided X = Estate, Entity Name Provided (e.g. "The Estate of John Doe") Y = Family, Entity Name Provided (e.g. "The Family of John Doe") Z = Other, Entity Name Provided (e.g. "The Trust of John Doe") |
|
Student |
A check indicates that this individual is a student. |
|
100% Dependent |
A check indicates that the dependent is to continue being on a claim’s eligible list regardless of age. |
|
Additional CMS Claimant |
This number from C1 to C4 must exist in the record in order for the dependent’s data to be submitted to the CMS. |
|
Type of Rep |
The type of representative for the dependent. Valid choices are: · Guardian/ Conservator · Attorney · Power of Attorney · Other |
|
Name Address... |
The rest of the fields for the representative are self-explanatory. |
Saving a new record (or deleting an existing one) will update the # of Dependents for the associated employee.
Any individual or company that provides a service associated with a claim is considered a vendor in the ATS system. If you use some other software package that tracks vendors, your system may be customized to import the relevant data to save time and ensure accuracy.
Operators with the appropriate access rights may use the Vendor tab to enter a new record. The first of the two sections is shown below.
 Figure 3‑1: Vendor Page - General Section
The first section (General) contains general information on the vendor. The fields are described as follows:
|
Field Name |
Description |
|
Tax ID |
Although any code may be entered for tracking purposes, a valid federal ID or social security number must be entered if a 1099 will be filed. The ATS system often refers to a vendor code which is the tax ID, an asterisk, and the location code if any. In the example above, the vendor code is 77-7878787* since the location code is blank. |
|
Location Code |
A code should be entered when a vendor has multiple locations that use the same tax ID. For example, a medical clinic with several offices may have one tax ID and a unique location code for each office. When looking up an existing record, enter the tax ID into the Vendor Selection dialog and all of the locations with that number will be listed. Note: This field is also referred to as the Alternate Vendor Code. |
|
Search Name |
The name to be used for lookup purposes. If the vendor is an individual such as John Brown, we recommend entering a Search Name as “Brown, John” so that the record is easier to find. In that case, the person’s real name should be specified as the Print Name to be displayed on a check or voucher. |
|
Address |
The complete mailing address. A second line may be used if necessary. |
|
City |
The vendor’s city. |
|
State |
The vendor’s state code. |
|
Zip |
The zip or postal code. |
|
District |
The district or region where the vendor is located. |
|
Country |
The code for the country where the vendor is located if outside the US. |
|
Phone Fax |
The vendor’s phone and fax numbers. Enter 10 digits such as 4101234567 and the program will display 1+ (410) 123-4567 for a US number. |
|
|
The vendor’s e-mail address. |
|
Contacts |
The name of a contact person or two. |
|
Active |
A check indicates that the vendor is active. If the box is unchecked, the Payment program will not allow payments to be issued to the vendor. Since vendor records are normally kept in the system for historical purposes, we recommend that you use this feature to indicate that the vendor is inactive instead of deleting the vendor’s record. |
|
Reason |
The reason why the vendor is considered inactive may be entered when needed. |
|
Rsv Category Pay Code |
The default reserve category and pay code to use when making payments to the vendor. For example, if the vendor is a hospital, enter “2” or Medical as the reserve category and the appropriate pay code. The fields will be automatically filled in when making payments to the hospital. |
|
Filter |
The Claims program will use this code to generate the lists that appear when selecting vendors. If an “A” (attorney) is entered, the vendor will only appear when selecting a legal firm for the claimant or defense. When an “P” is entered, the vendor will only be listed as a medical or rehab provider. |
|
NPI |
The National Provider Identifier assigned to medical care providers. |
|
Biller ID |
A code or number assigned to the vendor by the accounting department. |
|
DBA Name |
The “doing business as” name should be entered for vendors classified as individuals for 1099 reporting purposes. |
|
Print Name |
The name to be printed on payments made to this vendor. If this field is empty, the Search Name will be used. |
|
State/Federal Levy |
Check the box if the Payment program should display a message indicating that the vendor has a state or federal lien. |
|
Specialty |
Press the Ellipsis button to select from a list of available codes. |
|
Examiner # |
The medical examiner number required in certain states such as Florida. |
|
Work Status |
A special field used in the PERI Interface. If this data is required by the PERI Data Exchange, press the Ellipsis button to select from a list of available codes. |
|
Direct Deposit |
Check this box if the vendor is to receive payments electronically. |
|
Routing Number |
The routing number for the vendor’s bank. |
|
Bank Account |
The vendor’s bank account number. |
The second screen contains the information needed to produce the 1099-MISC returns. The rest of the fields are used in the optional Medical Fee - Bill Review module.
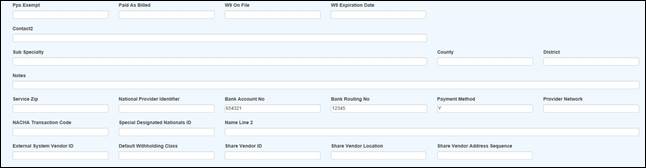 Figure 3‑2: Vendor Page - Finance Section
The fields in the Finance section of the page are described as follows:
|
Field Name |
Description |
|
W-9 on File |
Check this box if the W-9 is on file. |
|
W-9 Expiration |
The date the current W-9 expires. |
|
Class |
Exempt indicates that the vendor should not receive a 1099. If you file your 1099s electronically, enter Individual if the vendor's tax ID is a social security number, otherwise it will be reported as a federal ID. In either case, the program will strip out all dashes and report a nine digit number. |
|
Primary Vendor |
If there is more than one vendor with the same tax ID but different location codes, use this field to indicate the Primary Vendor that should get the 1099. |
|
Name Control |
Filing Electronically: The name control should be the first four significant letters of the name excluding spaces and titles such as Mr. and Dr. |
|
2nd TIN Notice |
A check indicates that you have received two notices within three years stating that the vendor's tax ID is incorrect. The 1099 program will also check this box on the form so the IRS will not send any further notices regarding this vendor. |
|
Special Data |
Filing Electronically: This field may be used to enter special data to be included when using the 1099 Combined Federal/State Filing program. |
|
1099 Year |
The 1099 Accumulation program will enter the year to be reported. |
|
1099 Other 1099 Legal 1099 Med 1099 Misc |
The 1099 Accumulation program will update the 1099 Other (Income), Legal, Medical and Misc (Non-employee Comp) fields with the payments for pay codes that have 3, C, 6, or 7 as the 1099 Type value. Refer to the 1099 Reporting Information below to find out which record gets updated when there is more than one vendor with the same tax ID. |
|
Service Zip |
The zip code where the vendor provides service. |
|
HMO/PPO Info |
Press the Ellipsis button for a list of valid HMO/PPO providers. Selecting a code will automatically display the description and the range of dates when valid. Up to four may be used when making payments to the vendor with the Medical Fee module. The program will check to see if there is an HMO/PPO that covers the From Date in the payment record. If so, the program will use the alternate rate table for the HMO/PPO when reviewing the billed items. |
|
Facility |
The type of facility when it affects the repricing of medical bills. |
|
Vendor Type |
The type of vendor to use for DOH filing purposes. |
|
PPS Exempt |
Check this box if the vendor is exempt from PPS. |
|
Paid as Billed |
Check this box if medical bills should NOT be reduced for some reason (e.g. the vendor is under the Maryland Health Services Cost Review Commission). |
|
Notes |
Any notes regarding the vendor. |
A medical clinic with several offices may use one tax ID and a unique location code for each office. When the 1099 Accumulation program is launched with the Combine Vendor option, the first record for the vendor is normally used by default. In this example, the one with the blank Location would be considered the primary vendor to receive the 1099. (When sorted, numbers come before letters.)
|
Tax ID |
Location |
1099 |
|
94-1234567 |
|
YES |
|
94-1234567 |
110A |
NO |
|
94-1234567 |
ABC |
NO |
If the primary vendor is not the first record, check the Primary Vendor box so it will be updated by the 1099 Accumulation program.
The Vendor menu provides a number of standard options that will return pre-defined results lists based on the value of the Filter field on the Vendor record or some other criteria.
· Medical Providers (Vendors with a Filter = “P”)
· Attorneys (Vendors with a Filter = “A”)
· Pharmacies (Vendors with a Filter = “R”)
· Other Vendors (Vendors with a Filter = “O”)
· All Vendors (Vendors on claims where the current user is the adjuster)
Optionally, Selected Vendors can be used to locate the record you want to view and/or modify. The Selected Vendors page displays a number of fields for input of search criteria that will be used to find matching records. By default, the system looks for active vendors. If you need inactive vendors, change the active filter in the list to “NO”.
Note that the following example uses the standard result list. The one on your system may be different. The search and filter features on the results list page can be used to further narrow down the results.
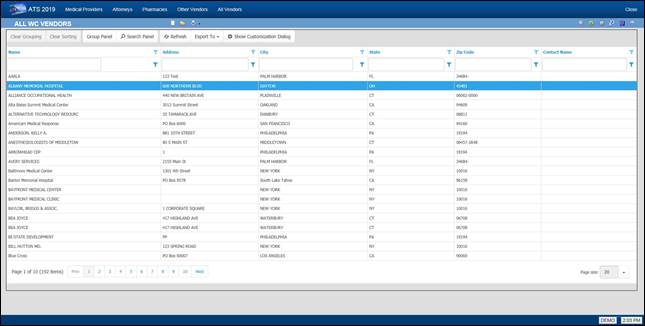 Figure 3‑3: Vendor Result List
If the Tax ID or Location is changed, every payment made to the vendor will be updated for (1099) reporting purposes, even those that are still in batch. Any batched payment will also be updated when the address is modified. In that case, the historical payments will not be changed.
The Employer’s Report of Injury module is an optional, add-on module designed to assist you in filing a First Report of Injury (FROI) with the State. The module allows you to:
· Create a new report according to the state’s current specifications and format.
· Print the report and/or write selected fields to an export file to be sent electronically to the state.
· Determine whether adequate safeguards and equipment were provided and if the employees used the safety measures.
· Promote the report when a claim has been filed to eliminate having to retype the relevant information.
Creating a report is a simple process. To begin, select New FROI from a menu or click the New button on the Employer’s Report result list. When the Select Employee screen appears, use any of the lookup options to find the desired record.
A record for the employee must exist before a report of injury can be entered. If a record is not found, the Employee must be added.
The next step is to indicate the state of jurisdiction. The employee’s state is selected by default, but you may change it to that of the employer or choose another state from the list.
Click Select to display the screens for the specified state. Although every state has its own form for filing purposes, much of the information is the same. To simplify the input process for those companies that deal with multiple states, ATS has used the same general layout for the screens regardless of the state.
For documentation purposes, we have selected the screens for Illinois since that state uses the IAIABC form which is considered the standard. The General section is shown below with the personal information such as the address, phone number, date of birth and hire date read from the employee’s record. The employee’s name is displayed in the title bar for your convenience.
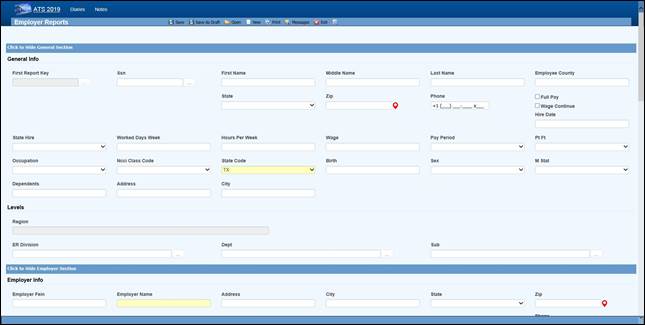 Figure 4‑1: Employer’s Report Page
- General Section
Figure 4‑1: Employer’s Report Page
- General Section
Typically, you will be asked to enter the additional information described below. Other fields may be provided depending on the state of jurisdiction.
|
Field Name |
Description |
|
State of Hire |
The state in which the employee was hired. |
|
Days per Week |
The average number of work days/week. |
|
Hours per Day |
The average number of hours worked/day. |
|
Day of Injury Paid |
A check indicates that the employee was paid for the day on which the injury/illness occurred. |
|
Salary Continued |
A check indicates that the employee is receiving his/her regular salary in lieu of worker’s compensation benefits. |
|
Wage |
The program calculates and displays the employee’s weekly salary. |
|
Period |
The pay period is always “Weekly”since the State wants to know the AWW. |
|
NCCI Class Code |
The NCCI classification code may be required if it’s on the state’s FROI. |
Press <Alt>+2 or scroll down to position to the Employer section that contains the employer and level information. Note the Dept, Division, and Sub in the following example. The labels used to identify the levels will vary depending on how your system has been set up with the Administration- Configuration-Application Parameters menu.
Any information that is not required by the IAIABC will have to be entered manually, but the standard information in the following example will be displayed automatically if it exists.
 Figure 4‑2: Employer’s Report Page
- Employer Section
Figure 4‑2: Employer’s Report Page
- Employer Section
|
|
It is important to understand how the program searches for the person’s employer in case some information is missing. First, it looks at the levels specified for the employee to find a record where the Employer box is checked. If one is not found, the program will see if the employee’s region or state is marked as the employer. The client is assumed to be the employer if no other one is found. |
|
|
· Level 3 (starting with Sub 3 and Sub 2 if used) · Level 2 · Level 1 · Region · State · Client |
Information about the injury or illness should be entered in the Detail section. Since each State form is different, the fields will vary. The ones on the IAIABC form are shown below.
 Figure 4‑3: Employer’s Report Page
- Detail Section
Figure 4‑3: Employer’s Report Page
- Detail Section
The following fields are on the IAIABC form. Depending on the state, the program may prompt you to enter additional information.
|
Field Name |
Description |
|
Injury Date |
The date of injury is required. A dialog will appear if there is an existing report for the person on the same date. Depending on what you see, continue entering the new report or exit the program. |
|
Time Began Work |
The (military) time the employee started to work (e.g. 1430) on the day of the injury. The colon will be inserted for you. |
|
Time of Injury |
The time of injury in a military format. |
|
Last Work Date |
The last day the employee was at work. |
|
Knowledge Date |
The date the employer learned of the injury. |
|
Disability Start Date |
The date disability payments began (i.e. the first day lost due to the injury or illness). |
|
Report Purpose Code |
The state’s code that describes the reason for submitting the report. |
|
Location/Dept. |
The location where the injury or illness occurred. |
|
County |
The county where the injury occurred. |
|
Employer’s Premises |
A check indicates that the injury/illness occurred at the work place. |
|
Safeguards/safety equipment provided |
A check indicates that the employer provided safety measures. |
|
Safety Measures Used |
A check indicates that the employee used the safety measures that were provided. |
|
Returned to Work |
Check the box and enter the date if the employee is back at work. |
|
Fatal Injury |
A check indicates that the employee died as a result of the injury/illness. If so, enter the date of death. |
|
|
The fields in the Details section that indicate whether safety measures were provided and/or used may not be required by the State, but ATS considers these standard fields since they can provide valuable information for reporting purposes. |
All States require you to describe the incident in detail. The fields in the Loss Description section indicate where the information should be entered so the Report of Injury will be filled out correctly.
 Figure 4‑4: Employer’s Report Page
– Loss Description Section
Figure 4‑4: Employer’s Report Page
– Loss Description Section
The Loss Codes section allows you to enter more details about the injury. The screen shown below will appear regardless of which state was specified.
Although a state may not request this information on the report, the loss codes you enter will be transferred along with other pertinent data if the report is promoted to a claim. These fields may also provide valuable information for reporting purposes.
 Figure 4‑5: Employer’s Report Page
– Loss Codes Section
Figure 4‑5: Employer’s Report Page
– Loss Codes Section
The Medical section is provided so you may enter information on the initial treatment that was provided along with the physician, hospital, or off-site facility that was involved.
The information on the screen shown below is requested on the IAIABC form. Since more and more states are adopting this form, the Medical tab will display this screen regardless of which state you have specified.
Also note the Initial Treatment code. If this is required, someone with the authority to maintain the Loss Codes must enter these codes before they can be used in a report of injury.
 Figure 4‑6: Employer’s Report Page
– Medical Section
Figure 4‑6: Employer’s Report Page
– Medical Section
The Admin section is shown below. Many states request information on the company which will be handling the injury report. This is your company if you are adjudicating your own claims or doing business as a third-party administrator (TPA). In either case, the program will automatically fill in the information if it has been entered in the Agent record. A sample screen is shown below.
If required, the Date Notified may be interpreted differently on your state form. Although this is usually the date the claim administrator or insurance carrier received the First Report of Injury, in Massachusetts it is the date the injury or illness was reported as work related. Please refer to the help message when in doubt as to what to enter.
 Figure 4‑7: Employer’s Report Page
– Administrator Section
Figure 4‑7: Employer’s Report Page
– Administrator Section
All of the insurance carrier information on the IAIABC form may be entered in the Carrier section. If your company is self-insured in the state or has only one carrier, a system administrator may use the Field Properties feature to enter the pertinent information as default values so it does not have to be typed into each new report.
If the Policy module is in use, one may be attached after the report of injury has been saved.
 Figure 4‑8: Employer’s Report Page
– Carrier Section
Figure 4‑8: Employer’s Report Page
– Carrier Section
The special fields on this screen are described as follows:
|
Field Name |
Description |
|
Self-Insured |
A check will indicate that carrier is the self-insured employer. |
|
Policy |
The carrier's policy that will used, if the report becomes a claim, plus the dates it is valid. |
|
Agent |
The agent’s code and name. |
|
Insured’s Number |
The insured’s report number to display on the FROI if necessary. |
|
OSHA Case Number |
The OSHA case number, if it is different than the ATS claim number. |
|
State Claim Number |
The claim number assigned by the state of jurisdiction. |
The last section, Summary, contains the information shown in the example below.
 Figure 4‑9: Employer’s Report Page
– Summary Section
Figure 4‑9: Employer’s Report Page
– Summary Section
The fields on the screen are described as follows:
|
Field Name |
Description |
|
Promoted to Claim |
The program will check this box if the report is promoted. (See a later section.) |
|
Claim Number(s) |
The claim number assigned when the report is promoted. Depending on how your system has been set up, an alternate claim number may be assigned at the same time. |
|
EDI Date |
The date the record was batched for transmission to the State. This may not be the date it was actually transmitted. |
|
Completed By |
The name of the person submitting the Employer’s Report to the State. (Required) |
|
Title |
The title of the person submitting the Employer’s Report. |
|
Phone |
The phone number of the person submitting the Employer’s Report. |
|
Date |
The date the Employer’s Report was completed. |
After entering the relevant information, click the Save button. If the “Required Fields Missing” message appears in the title bar, enter the data and click Save again.
|
|
Although a State may require certain information on the reports, there are very few required fields on the ATS screens because we realize that an operator may not have all the information at the time the report is created. We don’t want to create a situation where contrived information might have to be entered in order to save the record. |
After the report has been saved, the employee’s masked SSN (with the last four digits), an asterisk, and a counter to indicate the number of injuries the person has reported will be displayed in the window’s title bar. For example, “XXX-XX-8987*0004” is the employee’s fourth report of injury.
At this time, the Print buttons have been activated. The EDI Export feature is also available. These topics are covered separately.
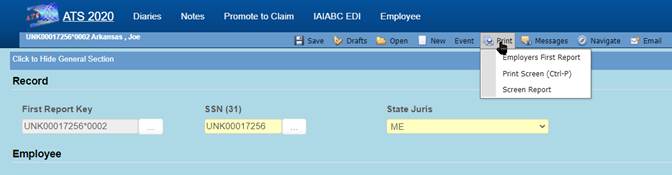
The ATS Diary and Notes features may be accessed using the associated toolbar buttons. Please refer to the Claims chapter for details on using the Notes feature. The Diary is covered in a separate chapter in this manual.
The New button on the toolbar or <Alt>+N will display the Select Employee screen so you can create a new report without returning to the Console or Result List.
The Open button on the toolbar or <Alt>+O will display the Select FROI criteria so you can look up an existing Report of Injury without returning to the Console or Result List. The search criteria screen is the same as in the snapshot shown below.
Authorized users may view and/or edit Reports of Injury. The Selected FROIs menu item opens the Employer’s Report Search Criteria page that provides you with a wide variety of search options.
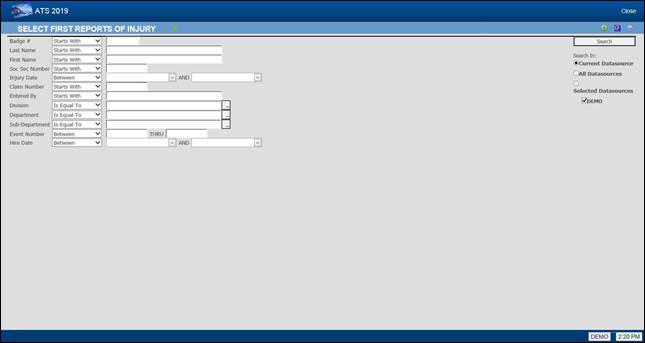 Figure 4‑10: Employer’s Report Search Criteria
The following list shows employees whose last names start with the letter “S” and have filed a report for an injury that occurred between January 1, 2015 and December 31, 2015.
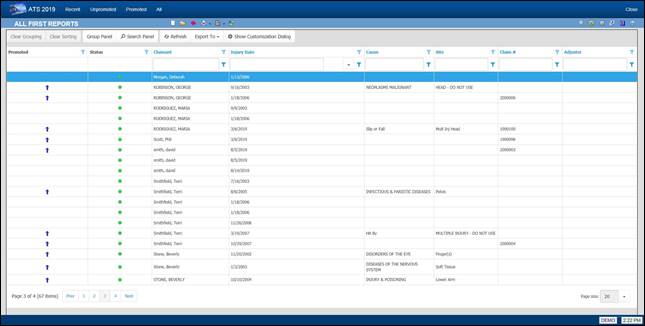 Figure 4‑11: Employer’s Report Result List
Note that if the Region feature has been implemented and Region View has been set in your user record, you will only be able to see a list of employees who have filed a Report of Injury in your assigned region(s).
Other menu options provide you with additional ways of looking for First Reports you have created.
They are:
|
Menu Option |
Function |
|
Recent |
Lists the First Reports completed in the last seven days. |
|
Unpromoted |
Lists the First Reports that have not been promoted to a claim. All but three have not been promoted on the above list, |
|
Promoted |
Lists the First Reports that have been promoted. Note the blue arrow is used to identify the promoted claim. |
|
All |
Lists all the First Reports with the most recent at the top of the list. |
Once you have selected the desired report, the program will display the record so the required changes may be made.
All the operations covered in the next sections can be performed as the report is created. With the exception of changing the State of Jurisdiction, which can be done at any time, the features will become available after the Employer Report is saved.
After saving the Employer’s Report, the EDI Batch menu option may be used to write selected data to a text file for export purposes. This dialog will appear so you can indicate the type of report you wish to send. The data will vary depending on which report (MTC) code is chosen.
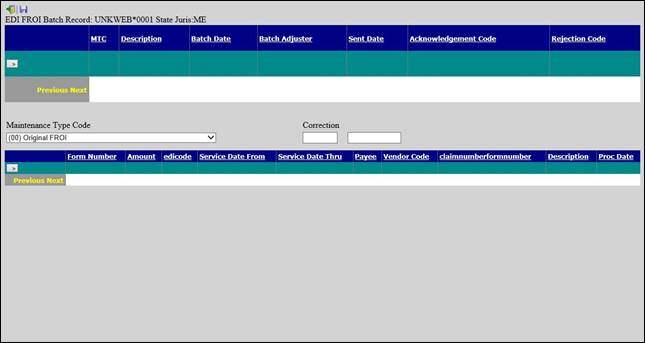 Figure 4‑12: Employer’s Report EDI Batch Dialog
The EDI process varies by state. Please refer to the separate EDI Export Utility document for details.
Many of the incidents that are reported never result in a claim action. If the employee does file a claim, the report may be promoted to claim status, so the pertinent data does not have to be retyped.
To promote an Employer’s Report of Injury to a claim use the Promote button after the report has been saved.

The program will:
1. Attach a policy (optional) and assign a claim number.
If the Policy module
is in use, there must be a policy that covers the Injury Date.
The program will check the From/Thru Dates for the policies and display a
message if one does not exist. Otherwise, select a policy from the list of
those that are available.
The program will automatically assign a claim number based
on the value of the Next Claim Number,
set using the Application Parameters page. If the Next Claim Number field contains
a number (not all zeroes), the program will assign it to the claim. Otherwise,
the program will use the Fiscal Year from the client’s record and the Injury
Date in
the employer’s report to determine which year code to use at the beginning of
the claim number. For example, if the Fiscal Year is “0701” and the Injury Date
is “09/01/2010”, the claim number will start with “11”.
Retired people can develop an illness such as hearing loss and asbestosis
related to the work they did. If that situation exists in your company, you may
choose to base the first two digits of the claim number on
the Open Date instead
of the Injury Date by
entering “OPEN” in the Next Claim Number field.
If policies are used, the first two digits of the number may be overwritten by
the policy’s Claim Number Prefix,
if one exists.
2. Create a claim with the pertinent information from the Employer’s Report. The program will transfer any relevant information to the new claim.
3. Write the claim number(s) on the Summary section of the report along with a check in the Promote to Claim field. Also display the new claim number in the title bar.
4. A warning message will appear if there is already a claim for the employee with the same date of injury.
|
|
All reports are promoted with a Claim Type of “N” for notation. The claims adjuster will need to decide whether the claim is a medical or indemnity case and update the Claim Type accordingly. |
This chapter describes the ATS features that are provided to help you manage claims as easily and efficiently as possible. Since keeping notes is an integral part of the job, this feature is also covered in this chapter.
Users with the appropriate access rights may use the New Claim item from a menu or click the New button on a Claim Result List to begin entry.
The system will first ask you to select an employee. Entering a last name that starts with “smith” will generate a list of employees with names like Smith, Smithy, Smithies, and Smithers. A first name or any of the other options may be entered to limit the choice list.
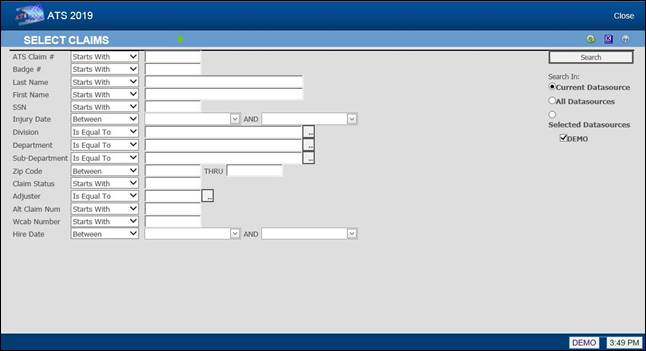 Figure 5‑1: Claim Search Criteria
A record for the employee must exist before you can enter a claim. If one cannot be found, click New. When you Save and Close the Employee data entry page, you will be automatically returned to the Claims page and asked for the State of Jurisdiction for the claim.
Click the Select button and the Claim data input page will appear. The screen shown below is the standard one provided by ATS. It contains all of the fields necessary to submit subsequent Reports of Injury to the State of Jurisdiction for both IAIABC Release 1 and 3.
The required fields appear in yellow by default. A system administrator may have set others as required. The default labels for the levels in your company’s hierarchy are Division, Dept and Sub. Those on your screen have probably been changed using the Application Parameters page.
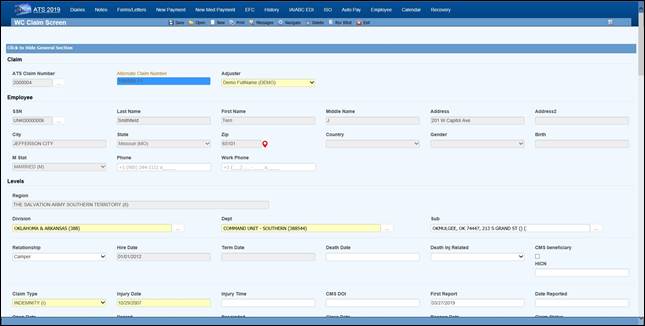 Figure 5‑3: Claim Page – General Section (New)
|
|
All of the information displayed above was taken from the employee’s record. The personal information may not be edited from within the claim. If you need to make a change, click the Ellipsis … button next to the Last Name. |
It is important to note that the name the employee is known as in the ATS system may not be the person’s legal name. If that is the case, be sure to enter the name as known by the Social Security Administration in the employee record when the claim will be submitted to the CMS.
The fields in the General section that are not read from the employee’s record are described as follows.
|
Field Name |
Description |
|
Adjuster |
The user entering the claim is assigned as the adjuster by default. |
|
Claim Type |
Valid claim types are indemnity, medical, first aid which is treated as a medical claim on most reports, and notation which may be used to track an incident that has not become a claim. (Notations are not included in the standard ATS reports.) If there are indemnity reserves, the claim type will be changed to “INDEMNITY” when the claim is saved. |
|
Injury Date |
The date the injury or illness occurred is required. A warning is displayed if the date is over six months ago. When there is an existing claim for that date, review the pertinent information on the other claim to determine whether you are entering a duplicate claim. If the Policy module is in use, the program will search for one that covers the fiscal year in which the injury occurred. When the Administer-Configuration- Module Parameters menu has been used to enter a Policy Form, but the Policy Format field is empty, the program will search for a policy for a specific level, starting with the employee’s level 3 through 1, that covers the date the injury occurred (e.g. L101-2010). If a policy is not found for a level, the program will attach the first one it finds that covers the date. The Tools-Policy menu may be used to select a different one if necessary. The following Policy Formats may also have been used to specify which policy should be assigned to the claim: 1. @YR-L1 or @L1-YR: Searches for a policy for the specified year and level 1 (e.g. 2010-L101). 2. @ST-YR<L#: Uses the state code from the specified level (1 thru 3) and the year to search for a policy (e.g. FL-2010). 3. @ST-YR: Uses the code for the state of jurisdiction and the year to search for a policy. When a policy is found, the program will display the code in the window’s title bar and write the Deductible on the Financial page. If a policy is not found, a message will appear to indicate that the claim cannot be saved. |
|
Injury Time |
The (military) time the injury occurred in an HHMM format. This data is not required, but if it is entered a special claim analysis may be run from the Reports-Statistical menu. |
|
CMS Date of Injury |
The CMS expects the date of accident or the first exposure, ingestion, or implant. This may not be the date after which you are legally responsible. The CMS needs the actual date for any recovery claims. An approximate date is OK as long as it’s before the person’s date of entitlement to Medicare. If this field is empty, the program will automatically export the Injury Date. |
|
First Report |
The date the employer submitted the First Report of Injury. |
|
Report Date |
The date the employer was notified of the injury. This is usually referred to as the knowledge date. |
|
Death Date |
The date of death should be entered when relevant. Note that in fatality cases, we recommend that the employee’s beneficiary be set up as a dependent to facilitate the payment process. |
|
Cause of Death |
Indicate if the death was due to the injury, not related to the injury or unknown. |
|
Full Denial Date |
The date the claim was denied. This date is required when submitting a SROI for a full denial to the state. |
|
Denial Rescinded |
The date the denial was rescinded. |
|
Open Date |
The date the claim was opened is a required field. By default, the program will enter the current date. |
|
Closed Date |
The date the claim is closed. Refer to the Closing a Claim section for details on using this feature and how the reserves are affected. |
|
Reopen Date |
A closed claim may be reopened by deleting the Closed Date and saving the record. The current date will automatically be displayed as the Reopened Date. |
|
Start TD |
The program will determine the date of compensation from the first indemnity or rehab payment where the Grouper contains TD. The date will be adjusted if the payment is voided later. This date cannot be edited as it may be used in determining the number of lost days to report on the OSHA log. If you plan on entering TD payments manually instead of using the AutoPay module, the Administer-Configuration-Diary/Scan menu may be used to set up diaries to let the adjuster know when the payments are due. |
|
Stop TD |
The date temporary disability benefits end. |
|
Start PD |
The date of the first indemnity payment where the Grouper contains “PD”. The date will be adjusted if the payment is voided later. If PD payments are issued manually, the Diary Scan utility may be used to set up diaries to notify the adjuster when they are due. |
|
Stop PD |
The date permanent disability benefits end. |
|
Dependents |
The number of dependents added to the claim with the Tools-Dependents menu is displayed for informational purposes. Since this feature is used in states where dependents affect the benefit rate, the Benefits dialog will appear whenever this number changes so the rate may be adjusted accordingly. |
|
Basic Pay |
The employee’s salary without any fringe benefits. |
|
Average Weekly Wage
|
The program will calculate and display the average weekly wage based on the information in the employee's record. The Wage View flag may have been set with the Administer-Configuration- Module Parameters menu to hide either the wage for all claims or all except for indemnity. |
|
Wage Effective |
The date the specified wage became effective. This may be a required field when submitting a SROI in IAIABC Release 3. |
|
Benefit Type |
This value determines which rate table is used to calculate the benefit. Typically, the choices are TD (temporary disability), PD (permanent disability) or VR (vocational rehabilitation), but others may be available depending on the state of jurisdiction. If blank, TD benefits are calculated by default. Note that this field is required in order to use the auto feature when making a new payment. |
|
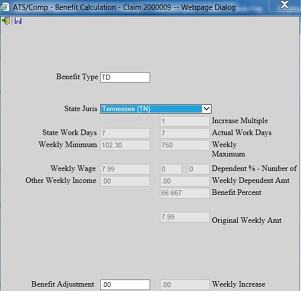
Benefit |
The weekly comp benefit rate for the state of jurisdiction may be entered manually or calculated by clicking the button to display the Benefit Calculator. Items such as the number of dependents entered with the Tools- Dependents menu, Other Income, the COLA amount, and the Benefit Adjustment are taken into consideration depending on the state’s guidelines. (See the Benefit Type description for more information.) In some states such as Virginia, a COLA
Requested box will appear in the top, right-hand corner. If the box is
checked to indicate that the employee wants COLA to be included in the benefit
payments, you may redisplay the dialog to see the date it was requested by
clicking the Ellipsis button. The following illustrates how the calculations are made: Original Weekly Amt = Weekly Wage x Benefit rate 587.48 = 766.28 x 76.667 Final Weekly Amt = Original Weekly Amt x Increase Multiple 613.92= 587.48 x 1.048 Weekly Increase = Final Weekly Amt - Original Weekly Amt 26.44 = 625.68 - 587.48 |
|
Alternate Claim Number |
When you save a claim for which auto payments have been scheduled and the benefit rate has been adjusted, you will be asked if those payments should be changed. If so, use the Tools-AutoPay option and adjust the amount. When the state’s benefit rates change, you may run the BENFITUP program to update the claim and payments scheduled with AutoPay accordingly. This field may contain a claim number that was used in a prior workers' compensation package. ATS refers to it as the alternate claim number which is available for lookup purposes. |
|
Medicare Beneficary |
A check will indicate that the employee is a Medicare beneficiary. Note that this box may be checked while processing a Query Response from the CMS. |
|
HICN |
Medicare’s health insurance claim number. |
|
ORM Assumed |
A check indicates that the Responsible Reporting Entity (RRE) has assumed ongoing responsibility for medicals (ORM). It’s important to understand the reference to "ongoing" is not related to "ongoing reporting" but rather the RRE’s responsibility to pay on an ongoing basis for the injured party’s medicals associated with the claim. This typically only applies to no-fault and workers’ compensation claims. You will not have this box on your screen if all your claims are adjudicated in a state such as New York that mandates that employers assume ORM for the claimant’s lifetime. (The CMS Export program will check the state record to determine if ORM applies to all claims in that jurisdiction.) Note: Once a claim with ORM has been submitted, the box must remain checked when sending subsequent reports. |
|
ORM Terminated |
The date when ALL responsibility for medicals has ended and there is no possibility that the claimant will submit/apply for payment of additional medicals related to the claim. See Sections 11.8 and 11.9 of the CMS User Guide for information concerning extensions/exceptions regarding reporting ORM. Note that future dates will be accepted, but the date must not be more than six months from the date of injury. A claim with ORM may be closed in the ATS system, but CMS regards it as still open until an update report is sent with the ORM Termination Date. Normally, you would need to continue to monitor claims when the state of jurisdiction mandates ORM benefits for the claimant’s lifetime, but the CMS will recognize a statement from the treating physician stating that no further medicals are expected. In that case, the ORM claim can be terminated. |
|
CMS Batched |
ATS keeps a history of all reports that have been batched and/or sent for a claim. This history can be viewed from the CMS Batch option on the Bridge menu. This check box is only on the screen for your reference. |
The standard Details section is shown below with a sample record. Although your screen may have been tailored to meet your needs, most of the fields will probably be the same.
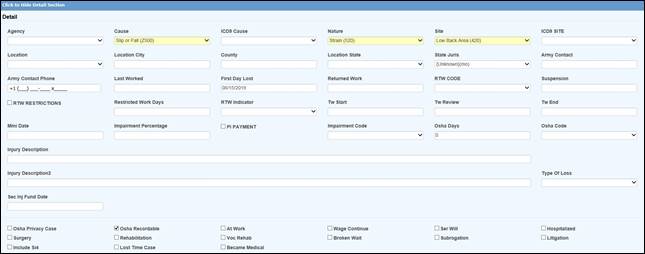 Figure 5‑4: Claim Page – Details Section
Normally, the Cause, Nature and Body Site fields are the only ones that are required since the information is needed on many state-mandated forms. (The labels for the loss codes may have been changed on your screen using the Application Parameters screen.)
|
|
If the Employer’s Report module is in use, some of this information such as the loss codes and the county/state where the injury or illness occurred will have been transferred when the report of injury was promoted to a claim. |
The fields on this screen are described as follows. It should be noted that a number of fields on the page pertain to the OSHA 300 log. A document that covers this feature in detail is available from ATS support.
|
Field Name |
Description |
|
Agency |
The source of the injury or illness such as slippery floor. This data is not required, but may be entered to break down the injury in more detail. |
|
Cause |
The cause or reason for the injury such as slip and fall is normally required. |
|
ICD-9 Cause |
This is the ICD-9 classification code for the cause of injury. There is a very detailed list with more than 1,200 codes from which to choose. Since we can’t make it shorter, we suggest that you contact ATS support, request a copy of the list, find the codes you normally use, and make a quick reference chart. This code is required when reporting to the CMS after January 1, 2011. |
|
Nature |
The nature of the injury such as sprain or fracture. |
|
Body Site |
The FIRST part of the body that was injured. Use the Multi Body Parts button to enter additional body parts. |
|
ICD-9 Diagnosis |
This is the ICD-9 diagnosis code for the first body part that was injured. Up to 19 codes may be exported. Use the Multi Body Parts feature to enter the other parts and the associated ICD-9 diagnosis codes. Note that only the Site and ICD-9 codes will be exported. The nature and impairment percentage is optional. <<GRAPHIC: Multiple Body Parts Dialog>> To modify an entry, highlight it, update the data, and click Save to move the item back to the grid. To remove an entry, highlight it, and click the red X. |
|
PERI Cause Code |
There are up to four elements in a PERI cause code. If you are a public entity that uses this feature, click the Ellipsis button to enter the codes in order: level 1 through level 4. |
|
Location |
The code for the location of the accident may be selected from a list of items entered with the Maintain-Industry-Location menu. (This is the Location that appears in one of the columns on the OSHA 300 log.) |
|
County / State |
The county and state where the injury or illness occurred. Note that the State is required when using the ISO Export utility. |
|
Last Worked |
The last day the employee worked before the current disability began. |
|
Current Disability Started |
The first day the employee was off work due to the injury or illness. This date will be read when using the Auto Compensation button to schedule payments with the AutoPay module. This date and the RTW date will also be used to determine the number of lost OSHA days for medical only claims and time loss cases where the employee returned to work before the waiting period ended (and payments would have been issued). |
|
RTW Date |
The date the employee returned to work. (See the OSHA note above.) |
|
RTW Type |
Valid entries are actual or return to work to indicate whether the RTW Date is the actual date the employee returned to work or was released to return to work. |
|
RTW with Restrictions
|
A check indicates that the employee returned to work with restrictions. |
|
Restricted Work Days |
The number of restricted or light duty days may be entered using the Tools- Restricted Work Days menu option. Save the details in the dialog and the program will update this field automatically. (This feature is covered in the Tools Menu section.) Note that according to the OSHA 300 guidelines, all restricted work days are recordable. Transfers to another job due to the injury or illness must be added to the restricted days for reporting purposes. Although a first job transfer may be recorded in the TW Start and TW End fields, the Tools- Restricted Days menu should be used to enter any subsequent period(s) in the From/Thru Dates with “Job Transfer” as the Restriction. |
|
Suspension Effective Date |
The date the suspension became effective will be exported to the state when reporting a suspension. |
|
Suspension Reason |
The reason for the suspension. |
|
MMI Date |
The maximum medical improvement (MMI) date is required when using some of the MTC codes in the EDI export file to be transmitted to the state. The MMI date is also a statutory requirement in some states such as Florida. When this date is reached, a popup message will appear when saving a new payment for the claim. If you click "Yes" to continue, a $10 copayment should be applied to doctor's visits paid to the employee on or after the MMI date. If "No" is selected, the operator will be returned to the check payment form. |
|
P. I. Percent |
The percentage the employee is permanently disabled. Some screens may also allow you to enter the date the employee became permanent and stationary. |
|
P. I. Minimum |
A check indicates that payments are made for a minimal amount if a final rating is not available. |
|
TW Start |
The date the employee started transitional work should be entered if the person was transferred to another job due to the injury or illness. If the employee has had multiple job transfers, use the Tools-Restricted Days menu to enter the subsequent period(s) in the From/Thru Dates with a note such as “Job Transfer” as the Restriction. Note that according to the OSHA 300 guidelines, the number of days doing transitional work will be added to the restricted work days for reporting purposes. |
|
TW Review |
The date to review the transitional work. |
|
TW End |
The date that the transitional work ended. |
|
OSHA Days |
Since the OSHA 300 was implemented, both OSHA Days restricted days are based upon calendar days. The OSHA Days field will always be empty in medical only claims or when the employee returned to work before the waiting period expired. In those cases, the days lost are calculated using the employee’s Current Disability Began (First Day Off) and Returned to Work dates. (A technical note on producing the OSHA 300 is available from ATS support.) The number of lost OSHA days for an indemnity claim are normally updated as payments are made against reserve categories 1 and 3 (indemnity and rehab) for pay codes with “TD” in the Grouper field. If the claim is in a state or federal jurisdiction that tracks loss of earning power, temporary disability payments will need to be made with a pay code that contains I08 (wage loss) so the days will be ignored when reporting lost days to OSHA. For example, someone working another job or the same job with a restriction that pays less than their usual salary would get a comp payment to make up the difference. If this feature is not used, the days would be counted as both restricted and lost time on the report. Note: Auto payments will not update this value until the payments are batched. |
|
OSHA Code |
If the claim is for an occupational illness or disease, enter the appropriate OSHA code for reporting purposes. |
|
Privacy Case |
A check in this box indicates that the employee’s name should not be displayed on the OSHA 300 Log. |
|
Recordable |
By default, all claims must be reported to OSHA. Remove the check from this box if the employer has determined that this claim is not recordable and should not appear on the log. |
|
Injured at Work |
A check in this box indicates that the accident or illness occurred on the employer's premises. Although this information is not required, it may be useful in custom management and/or safety reports. |
|
Wage Continued |
A check in this box indicates that the employee is receiving his/her payroll in lieu of worker’s compensation benefits. |
|
Serious & Willful |
A check will indicate that the accident is considered serious and willful. |
|
Hospitalized |
A check will indicate that the employee is/was hospitalized due to the accident or illness. |
|
Rehabilitation |
A check will indicate that the employee is/was receiving vocational rehabilitation services. |
|
Broken Waiting Period |
A check will indicate that the waiting period was broken. An option on the Tools menu may be used to track the time missed. Your screen may have been customized to display this value. Please refer to the Using the Tools Menu section for details on how to use this feature. |
|
NCCI Injury Code |
The type of injury code related to the injury or illness is required for some state reports. Click the Ellipsis button to list the codes that have been entered with the Maintain-Carrier Tables-NCCI Type of Loss menu. |
|
Subrogation |
A check in this box indicates that the claim is in subrogation or that the possibility for recoveries exists. |
|
Litigation |
A check in this box indicates that the claim is or may be in litigation. This box will automatically be checked when a legal firm has been entered for either the claimant or the defense. These claims will be identified as "LEGAL" on some of the standard reports. |
|
Longshoreman Act |
A check in this box indicates that this is a federal claim covered under the Longshoreman Act. |
|
Include on SI-4 |
A check indicates that this claim should be included on New York’s SI-4 report. |
|
Became Lost Time |
This box should be checked if the claim was initially medical only before becoming a lost time case. |
|
Second Injury Fund Date |
The last day to apply for reimbursement from the state’s second injury fund if applicable. |
|
Injury Description |
The description of the injury. Note that the first fifty (50) characters of the description will be exported to the CMS for Medicare beneficiaries. It should describe the cause of the incident and the body parts that were injured. The description is required through December 31, 2010 if no ICD-9 cause and diagnosis codes are provided. |
The Reserves section is used to track the amounts reserved, paid, and outstanding. In addition, the fields in the lower portion of the screen may be used to enter the name and address of the party involved in subrogation. Later, this information can be retrieved when making a recovery using Finance features.
The standard screen shows six categories, but the last two are optional. The number of categories is set with the Application Parameters menu. The names of the categories and the default reserve values for new indemnity and/or medical claims are entered on the Reserve Types maintenance page.
![]() Normally, reserves may either be entered manually in the
Incurred fields or by selecting the Reserve Worksheet button
to display a special worksheet that calculates reserves based upon making
specific payments. Depending on how your system has been set up, you may only
be able to use the worksheet. (See the Reserve Worksheet section later in this
chapter for details.)
Normally, reserves may either be entered manually in the
Incurred fields or by selecting the Reserve Worksheet button
to display a special worksheet that calculates reserves based upon making
specific payments. Depending on how your system has been set up, you may only
be able to use the worksheet. (See the Reserve Worksheet section later in this
chapter for details.)
A worksheet is also available if you use the Stanford Reserve Estimate which calculates the reserves based upon the Nature and Body Site codes in the claim. (Stanford Reserves are entered using the User Tables maintenance page.)
When a payment is made, the amount Paid is updated and subtracted from the Incurred. The Future Reserves and Totals are adjusted accordingly. Credits and voids will be subtracted from the amount paid, but recoveries won’t be. Any Recoveries are recorded separately.
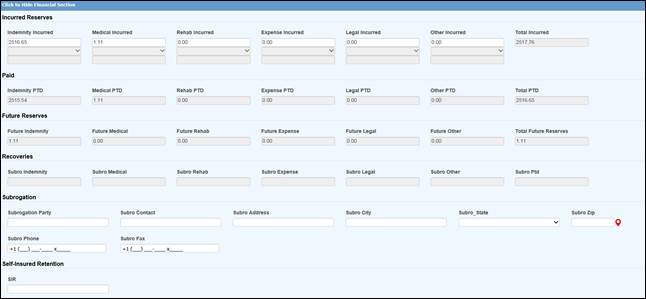 Figure 5‑5: Claim Page – Reserves Section
When you save a claim, the program will check for any changes to the reserves. If any have been made, a dialog will be displayed so you can indicate the reason for making the change(s). The sample change codes shown below were entered with the Reserve Change option on the Reserve/Payment/Recovery maintenance page. After the record has been saved, the amounts on the screen will be updated. Later, these transactions may be viewed with the Reserves History button.
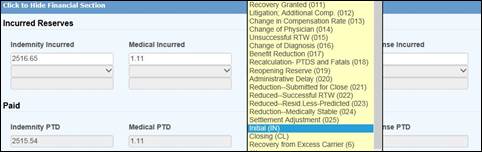
Figure 5‑6: Reserves Change Reason Dialog
|
|
Note that the Claim Type will automatically be changed to “INDEMNITY” if there are any indemnity reserves. If any other type of reserves is entered and the Claim Type is “NOTATE ONLY”, it will be changed to “MEDICAL. |
The Medical section displays the following screen. Note the grayed-out fields below. You cannot type in the information. After the claim has been saved, an unlimited number of medical providers may be added to a claim using the procedure described below. The information on the primary care provider (i.e. the first one on the list) will appear in the Medical section. Other details may be supplied as needed.
 Figure 5‑7: Claim Page – Medical Section
To select a specific medical care provider:
1. Click the Ellipsis button next to the Medical Provider’s Code to display the Case Management screen with menu options for Care Providers and Diagnosis Codes. Select the Care Providers menu and click New. When this window appears, click the Ellipsis button next to the Fed ID Number to display the Vendor Selection dialog. Note that only vendors with “P” or nothing in the filter field will be displayed.
The ATS Case Management system is an optional, add-on module that is described in the Options chapter. The standard system uses two of these features.
2. The program will display the information found in the selected vendor’s record. If there is no contact name in the record, you may enter a name here or directly on the Medical page. Note that the Physician and Contact’s Phone/Fax will not appear on the Medical page unless your claim screens have been customized.
3. Click
Save to add the vendor to the list of care providers. Exit the Case Management window.
4. If there is more than one vendor on the list, the first one is considered the primary provider whose information will appear on the Medical page.
![]() To make another provider
primary, highlight the provider and click the Make Primary button on the
toolbar. The next time you view the list, it will appear at the top.
To make another provider
primary, highlight the provider and click the Make Primary button on the
toolbar. The next time you view the list, it will appear at the top.
|
|
When there is more than one provider, we recommend that the vendor who will receive the majority of the medical payments is made primary so that the Payment module will get the name and address information from the claim record when a “P” is entered as the Payee. As the medical treatment changes, the primary vendor may also be changed to facilitate the payment process. |
The Legal Firms section may be used when a claim has gone into litigation. Click the Ellipsis button to search for a vendor. Only those with a Filter containing an “A” or nothing will be available. The program will fill in the name and contact information from the vendor’s record you selected. The date the case was assigned to the firm and any additional attorneys or legal firms involved may be entered when relevant.
When a legal firm has been specified, the program will check the Litigation box in the Details section as it saves the claim.
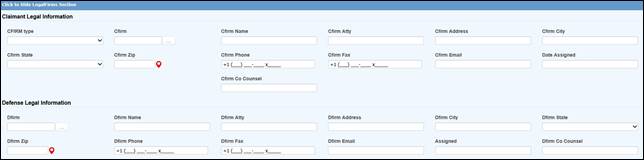 Figure 5‑8: Claim Page – Legal Firms Section
Most of the fields on the screen are self-explanatory. Those that have been added or modified for CMS reporting are:
|
Field Name |
Description |
|
Type of Representative |
The type of representative, either: Attorney, Guardian/Conservator, Power of Attorney, or Other. |
|
TIN / Vendor code |
The tax ID, either a FEIN or SSN. If you click the ellipsis button to search for a legal firm, the program will fill in the vendor’s code and relevant data from the vendor’s table. |
|
Firm Name |
The name of the firm, if appropriate. This is required on reports submitted on or after January 1, 2011 if the representative is associated with or is a member of a firm. |
|
Address and Phone |
The representative’s address and phone number. Representative’s Name The first and last name of the representative. |
When the claim has gone into litigation, the Litigation screen may be used to add information regarding the case.
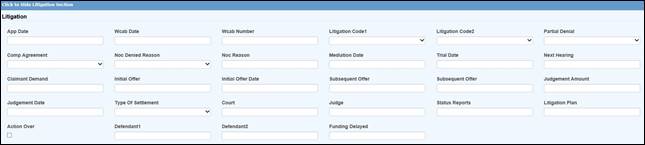 Figure 5‑9: Claim Page – Litigation Section
The Litigation section of the standard screen is shown above. A description of the fields; including those for CMS reporting, are described as follows:
|
Field Name |
Description |
|
Date Filed |
The date the case was filed with the state workers’ comp board. |
|
Date Assigned |
The date the workers’ comp board assigned a number to the case. |
|
Case Number |
The claim number assigned by the state. |
|
Mediation |
The date set for mediation. |
|
Trial |
The date set for the trial. |
|
Claimant’s Demand |
The amount the claimant wanted. |
|
Initial Offer |
The amount and date of the initial offer. |
|
Final Offer |
The amount and date of the final offer. |
|
Settlement (TPOC) |
For structured settlements or annuities, enter the total amount of the obligation based on life expectancy, not the amount of the individual payments. Include the amount an insurance carrier reimburses the self- insured entity for a payment made to the injured individual. When an entity is self-insured for a deductible but the payment of that deductible is done through the insurer, then the insurer is responsible for reporting the deductible, not the self-insurer. Note: The CMS refers to the settlement as the "Total Payment to the Claimant" or TPOC. This field is for the first TPOC. Use the Actions- Bridge menu to enter up to four additional amounts. Since there are current thresholds for CMS reporting, we suggest that the system administrator set the Settlement Date and Amount as transactional fields so you will be able to provide proof as to why the claim was not reported earlier (i.e. the amount was less than the threshold on the date in question). |
|
Settlement Amount |
The date is when the obligation was established; the date the obligation is signed if there is a written agreement unless court approval is required. If court approval is required, it is the later of the date the obligation is signed or the date of court approval. If there is no written agreement it is the date the payment is issued (or the first payment if there will be multiple payments). |
|
Funding Delayed |
The actual or estimated date of the settlement (i.e. when the money was or will be released). |
|
Type of Settlement |
A code for the type of settlement made. |
|
Court |
The name of the court handling the case. |
|
Judge |
The name of the presiding judge. |
|
Status Reports |
The status reports that were filed. |
|
Litigation Plan |
The name of the litigation plan that was used. |
|
Action Over |
Check this box if the litigation is over. |
|
Outcome |
Indicate the outcome of the case. Press the Ellipsis button for a list of choices entered with the Maintain-Legal menu. |
|
Defendant(s) |
The name of 1 to 4 defendants with last name first as in Johnson, Randy. |
CMS Reporting Notes
1. When you have a situation where you have assumed responsibility for medical and there is no dispute, the Settlement Amount should be blank. For example, six months after the claimant tripped and broke his leg, everyone agrees there will be no future medical and the claim is closed. No settlement is involved.
2. For settlements (TPOCs) involving a deductible, be sure to include it if you are responsible for reporting both the deductible and any amount above the deductible.
3. The CMS recognizes four additional TPOCs so an option was added to the Bridge menu which is covered later in this chapter.
The Rehab section may be used if the claimant is or was receiving any vocational rehabilitation services.
 Figure 5‑10: Claim Page – Rehab Section
The following fields appear on the standard screen in addition to the vendor information.
|
Field Name |
Description |
|
Patient Number |
The patient number assigned to the claimant. |
|
Rehab Number |
The vocational rehabilitation number. |
|
Date Assigned |
The date the claimant was assigned to a rehabilitation program. |
|
Plan |
The plan used by the vendor providing the rehabilitation services. |
|
Date Rehab Started |
The date the claimant started rehabilitation. |
|
Date Rehab Ended |
The date the claimant ended rehabilitation. |
The File-Print menu may be used to print all the fields on the selected pages even those that have been created only for your use. Depending on the particular screen, you may have to set the Preference for the printer to landscape when the Print dialog appears so the fields on the right will be displayed on the printout.
When the claim is saved, the program will:
1. Check for required fields. If any are blank, the message “Required Fields Missing” will appear in the title bar and position you on that page so you can enter the missing information.
Note that the Claim Type will automatically be changed to “INDEMNITY” if there are any indemnity reserves.
2. Assign a claim number where the first 2-digits are based on the Fiscal Year in the client’s record and the Injury or Open Date. For example, if the Injury Date is “09/01/2010” and the Fiscal Year is “0701”, the claim number will start with “11”. To base the number on the Open Date, enter “OPEN” as the Next Claim Number with the Administer-Configuration-Application Parameters menu.
If policies are used, these 2-digits may be overwritten by the Claim Number Prefix in the policy.
The Open Claim button may be used to select another claim. The Claim Selection screen shown below will appear to assist you in finding the claim you wish to view and/or edit. The original claim screen will stay open.
If you want to view another claim that the employee has filed, click the Open Other Employee Claims button to display a list of all the other claims. The original claim screen will still be open after you select another one so you may refer back to it if necessary.
Users with the proper authority may edit a claim using the Select Claim menu item. A variety of options are provided to assist you in finding a claim. If you know the claim number, enter it on the Claim Selection screen. For example, you could search for all claims with injury dates between 1/1/2019 and 6/30/2019 where the adjuster is DEMO.
Figure 5‑11: Claim Selection Screen
Click Search or press <Enter> and a list of possible matches will appear. Select the one you want to view and/or modify.
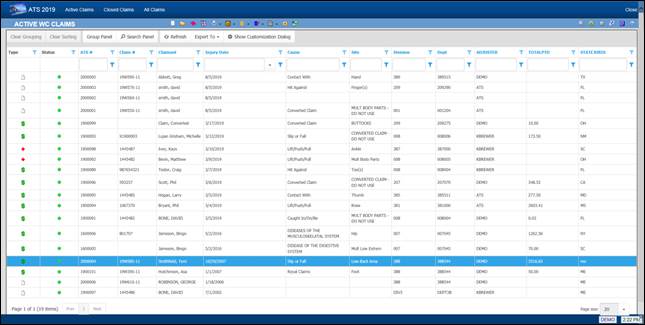 Figure 5‑12: Selected Claims List
Clicking the Exit button will ask if it is OK to close the claim (with the current date), file the record, and exit. If Auto Close has been set on the Application Parameters menu, the incurred reserves will be set to equal the paid-to-date so the futures will be zero.
If a closed date is entered manually (and the value of Auto Close is set to “Y”), you will be asked what to do about the future reserves when saving the record.
However you close the claim, the program will search for future diaries. If any are found, you will be asked if they should be deleted.
The claim cannot be closed if the user’s reserve limit is not high enough to zero out the future reserves.
The Menu Bar provides you with a number of features that make it easy to perform the typical operations that need to be completed when processing a claim. Each of the items is covered in alphabetical order in this section.
It is important to note that many of the tools are available on the selection screen. Simply highlight the desired claim and click the button on the toolbar. You don’t have to actually open the claim.
This option displays the Auto Pay List so that you can schedule recurring payments or edit an existing schedule. This feature is covered in detail in the Financial chapter.
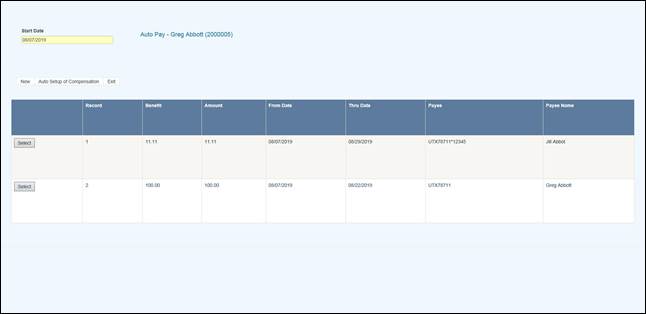 Figure 5‑13: Auto Pay Screen
Clicking the Auto Setup of Compensation button displays the setup screen.
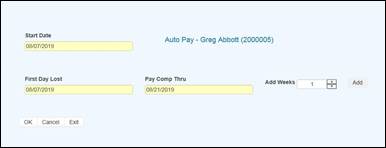
Figure 5‑14: Auto Pay Setup Screen
Set the Add Weeks field to the number of weeks to pay and then click the OK button.
This feature is provided to associate dependents with a specific claim when:
1. The state of jurisdiction for the claim considers dependents when calculating the employee’s benefit rate.
2. The employee has died. In this case, the individual who will receive the death benefits may be entered as a dependent on the claim to facilitate the payment process.
3. The employee’s wages have been garnished and a lien has been entered in the employee’s record.
The ATS Diary is a powerful tool that may be used to remind you of things that need to be done. Depending on how the system has been set up, claim specific diaries may also be generated automatically.
In this section, we will provide you with an overview of the ATS Diary. All of the features are covered in detail in a separate chapter of this manual.
Existing diaries may be viewed or new ones created depending on the user’s access rights. When enabled, this feature may be used via the Diary menu item. (The Diary module is also available from the ATS Console.)
In the following example, the window is empty because there are no diaries for the claim.
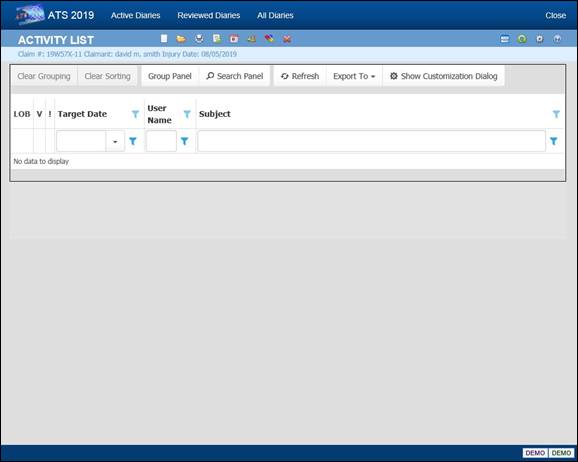
Figure 5‑15: Claim Diaries List
To create a new Diary, click the New button. The Diary will automatically be related to the claim you are currently working on.
A sample diary is shown below.
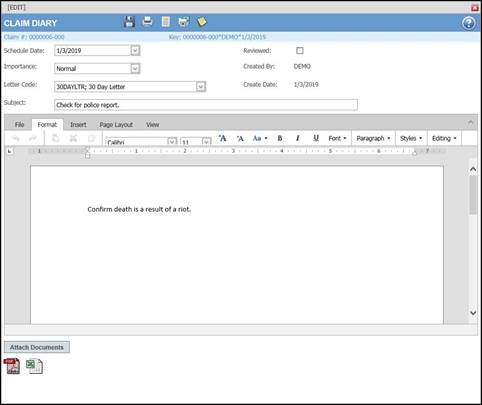
Figure 5‑16: Claim Diary
The Subject is the text to be displayed on the Diary List. Entering a Message is optional. After you finish entering the message, click the Save button to save the entry and then exit. The new diary will appear on the list.
Diaries may be edited by selecting the item and clicking the Open button. The fields in the diary are edited in the same dialog that is used to create a new entry.
A diary must be marked as reviewed before it can be removed from the Active Diary List. To do this, edit the entry and check the Reviewed box. After you exit, the item will no longer appear on the list.
We have just touched upon the features in the ATS Diary. For complete information, please refer to the Diary chapter in this manual.
This feature may be used any time you wish to create a document using the currently displayed claim. Standard forms for the state of jurisdiction specified in the claim will be listed along with any custom or user documents that have been designed for your organization.
The ATS system allows you to save the documents that have been sent for a claim so they may be viewed later with the History module. For information on how to set up this feature, refer to the Forms/Letters section of this manual.
Click the General Payment menu option to make a payment on the claim. See the Finance chapter for information on how to use this program.
The Insurance Services Offices (ISO) acquired the Central Index Bureau (CIB), a national clearinghouse for data on bodily injury claims that can be used to identify possibly fraudulent claims.
ATS provides the ISO Export utility as an optional, add-on interface with the ClaimSearch software from this third-party vendor. Once the utility has been installed, you may use this feature to write selected fields to a text file for export purposes. This dialog will appear so you can select the type of report you wish to send.
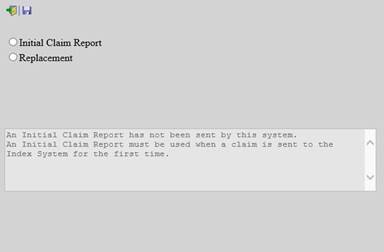
Figure 5‑17: ISO Export Utility
If you are planning on using this feature, it is important to note that the items below are required in order for the utility to operate successfully.
· Social Security Number
· Name (including any middle initial)
· Street Address
· City
· State
· Zip Code
· Date of Birth
· Date of Injury
· Location State (where the injury occurred)
· Cause
· Body Site
· Nature
If any of this information is missing, an error will be detected when you attempt to use the Prepare to Export menu in the Process module.
The Medical Fee or Bill Review module is an optional, add-on product designed to lower your medical costs by paying the maximum reimbursable for each line item on the bill. The Medical Fee Payments menu or the corresponding toolbar button may be used to launch the program. See the Finance chapter for complete information on how to use this product.
Existing notes may be viewed, or new ones created depending on the user’s access rights. When enabled, this feature is available via a toolbar button. By default, the notes will come up in a grid.
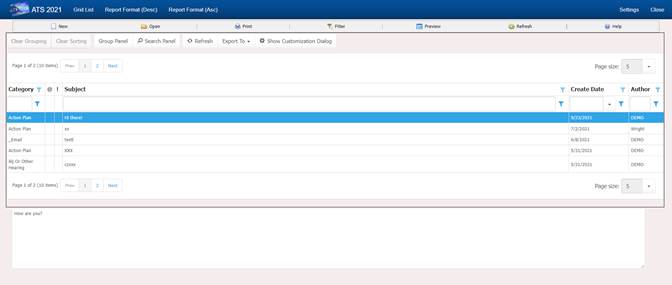
Figure 5‑18: Claim Notes List
The toolbar;
![]()
Grid List – view in grid mode
Report (Desc) Brings all notes into a printable report format in descending order.
Report (Asc) Brings all notes into a printable report format in ascending order.
New – New Note
Open – Open the selected Note
Print – Prints the Page your one.
Filter – Filters Categories
Preview – Expands the grid to preview all note as a child column in each row. – Click again to toggle off.
Refresh – Refresh the page
Help – Bring up Notes Help
Click the Report View menu item to display each note and the contents in a report format that can be printed.
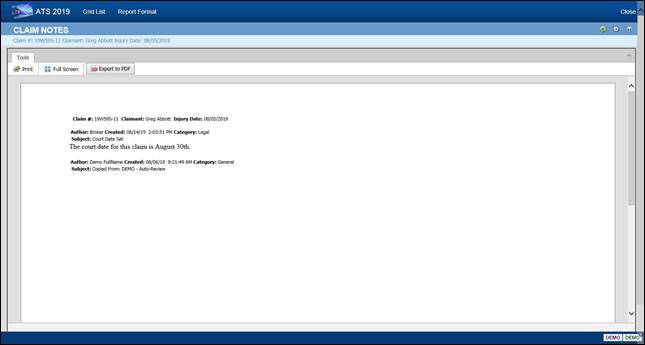
Figure 5‑19: Claim Notes Report
Format
Notes may be edited only on the day they were created. Since claim notes have the potential of becoming legal documents, they may not be changed afterwards.
To create a new note, use the New button. You will be asked to pick the type of note you wish to create. By default, the program assumes that you want to create a note for the current claim. To write a note for another one, click the Selected Claim button. The LOB (and DataSource) box will become active so it can be changed if necessary. For example, you may have a case where a bus driver (an employee) has both a comp and a liability claim. Being able to write a note for both claims from the same place is a very handy feature.
The dialog shown below is used to create notes.
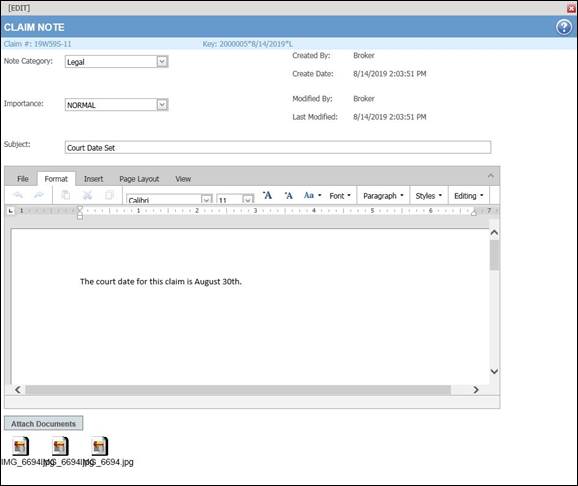
Figure 5‑20: Note Entry Dialog
Click the Attach Documents button to display the dialog shown below. Click the Browse button to find the file you want. By default, the program will look in the user's My Pictures folder. After selecting a file, click the Save button.
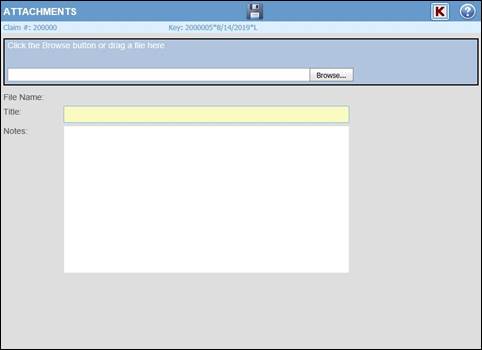
Figure 5‑21: Note Attachment Dialog
After selecting a file, an icon will appear in the note. When the note is saved, a paper clip will appear in the first column for the entry in the Notes window to indicate that there is an attachment.
The Filter Results menu displays the following dialog so you may control which notes will appear. Before using any of the features covered in this section, it is very important to note that the filters will be used regardless of what claim is involved until they are turned off or you log out of the ATS system.
The default is to display all notes regardless of category. In this example, only general notes will appear after clicking OK. By default, the program does not check the date when selecting notes, but you enter a specific range of dates or within a specific number of months as in the example. You may also use the search feature to display only notes that contain specific characters in the subject line.
Selecting History on the Menu bar of the Claim screen will open the History dialog. This dialog provides access to information about actions that have occurred during the life of the claim, including; payments, recoveries, reserves, letters, transactions. It also includes an Audit feature that provides a chronological list of every action associated with the claim. See the History chapter for complete information on how to use this module.
Payments may be used to view the payment, credit and void transactions for the claim.
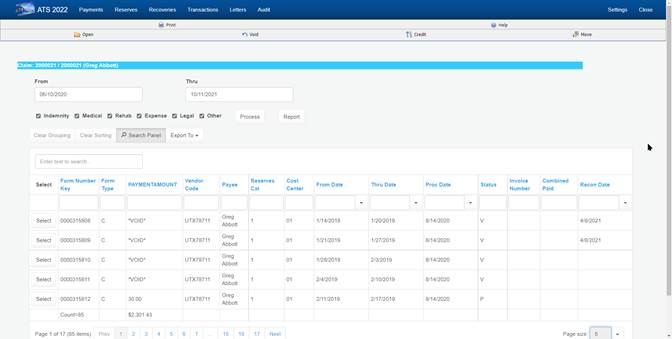
Figure 5‑22: Claim Payment History
Recoveries may be used to view the recoveries that have been received for the claim.

Figure 5‑23: Claim Recovery History
The Reserve History button may be used to view the reserves changes that have been made on the claim. See the History chapter for complete information on how to use this module.
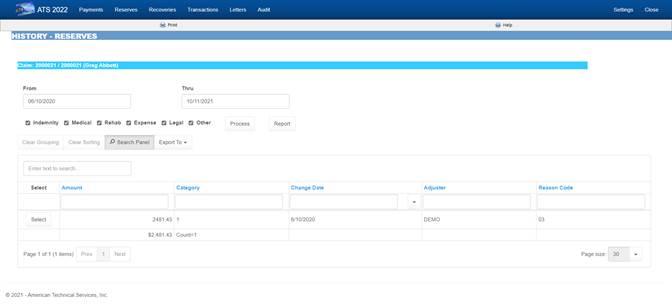
Figure 5‑24: Claim Reserve History
The Letter History menu option shows the forms and letters that have been produced for the claim.
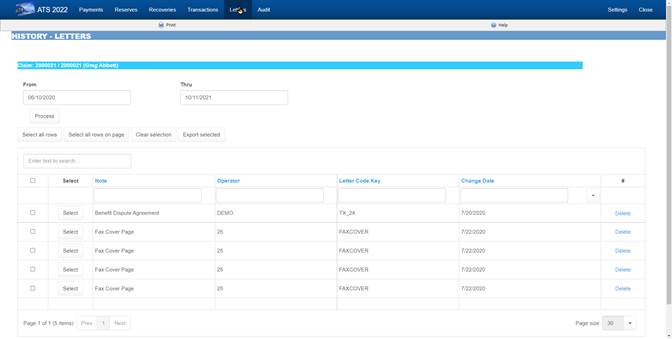
Figure 5‑25: Claim Letter History
The Audit menu item provides access to a chronological list of all actions that have taken place for the selected claim.
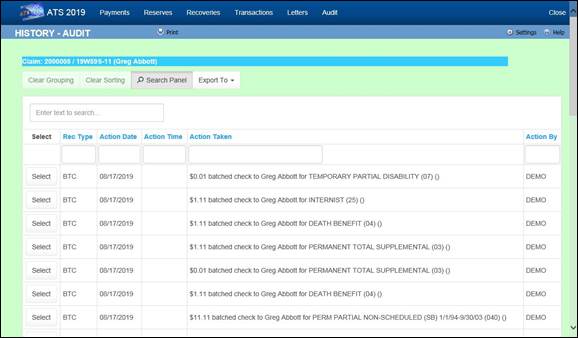
Figure 5‑26: Claim Audit
The reserve worksheet is designed to assist adjusters in calculating the reserves for a claim. Depending on a system setting, it may be the only way you can enter reserves.
The worksheet is not intended to be a financial tool since there will never be a program that balances the amounts in the worksheet against the reserves in the claim. Regardless, the information should prove to be a valuable reference when the worksheet is used to track the changes throughout the life of the claim.
Third-party administrators or companies providing similar services should find the worksheet especially useful when reporting reserve changes to their clients or members.
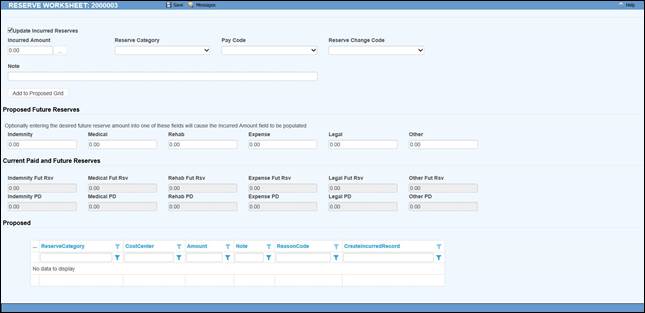
Figure 5‑27: Reserve Worksheet
Click the Calc button to bring up a special payment calculator. Since indemnity reserves are being calculated, the Benefit Type and Rate from the claim are displayed in the dialog. The total is calculated by multiplying the benefit by the estimated number of weeks.
To calculate the claimant’s life expectancy based on the person’s age, sex, and race, click the Ellipsis button after the Number of Weeks box. The program will fill in the weeks and the total amount of PD benefits.
Clicking Save will close the calculator and enter the value and the equation in the Amount and Note boxes on the worksheet. Click Add to move the item to the Worksheet List box and add the amount.
Click the Apply button to update the claim with the proposed amount. The next time you use the worksheet the value will appear as the future reserves and the Worksheet Items box will be empty. Click the Historical option to redisplay the previous transaction(s).
A Close button is displayed if your system has been set up to use the reserve worksheet as an optional feature. When Close is clicked instead of Apply, the window will close. The reserves in the claim will not be updated.
A Cancel button will appear instead of Close when using the worksheet is mandatory (i.e. you can not edit the value on the Reserves page). In this case, the record for the current change will be deleted from the worksheet items.
If either button is selected before clicking Add to move a new entry into the Worksheets Item box, the program will exit and leave everything the way it was before you started adding the new item.
There will be times when you need to decrease the reserves. To do this select the desired reserve category, enter a negative value in the Selected Items-Amount box, add an optional Note, and click Add to move it to the worksheet items. Then select Apply to update the reserves.
The Replace feature may also be used to change the value of the future reserves if there is only one transaction for the category. For example, suppose that the estimated number of TD weeks was incorrect. A new item for the correct amount may be entered using Replace instead of the Add button. The future reserves will be set to that value.
1. The menu item will be disabled if the operator does not have permission to change reserves. (The program will check the operator’s reserve change limit when the claim is saved, and conditionally allow the changes to be made.)
2. Contact ATS support if you would like to use the reserve worksheet exclusively.
Selecting Close Claim will ask if it is OK to close the claim (with the current date), file the record, and exit. If Auto Close has been set using the Application Parameters screen, the incurred reserves will be set to equal the paid-to-date so the futures will be zero. If a closed date is entered manually (and the value of Auto Close is set to “Y”), you will be asked what to do about the future reserves when saving the record.
However you close the claim, the program will search for future diaries. If any are found, you will be asked if they should be deleted.
The claim cannot be closed if the user’s reserve limit is not high enough to zero out the future reserves.
This utility may be used to write selected fields into an ASCII text file for export purposes. The EDI Batch dialog lists the reports that have been batched/sent Since the EDI Export process varies by state, it is documented separately.
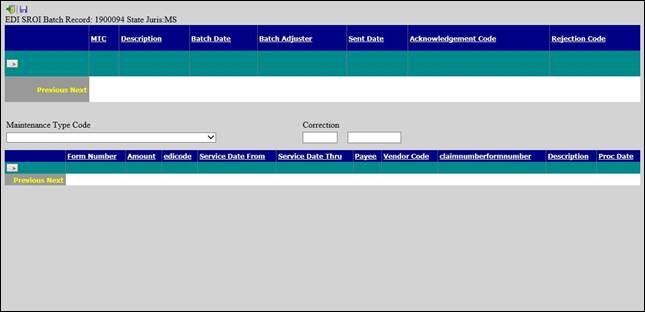
Figure 5‑28: EDI Batch Screen
When a new claim is saved, the program automatically assumes that the employer’s state is the state of jurisdiction to be used to calculate the claimant's benefit rate. The State of Jurisdiction field must be changed in the Detail section, when necessary.
If the Policy module is in use, the program will read the injury date and search for a policy for that year and level (the default) or for one using the special policy format entered in the Option/Module screen. If a policy is not found, a warning will be displayed and the claim cannot be saved.
Unless a special format has been specified, this option may be used to display a list of policies that have been entered with the Policy menu. Making a selection will enable the Save button. After a policy has been attached to the claim, the program will display the Policy Number in the window title bar and write the Deductible amount in the claim record.
This menu option or toolbar button displays the form for tracking the details about any restricted work days. Each time you save specific from/thru dates and a restriction, the information will be displayed in the box at the top of the dialog. The program will update the Restricted Work Days field on the Detail page when you exit the dialog.
Restrictions may be entered manually or by selecting the Restricted Days menu and selecting a code entered with the Restricted Duty menu.
According to the OSHA 300 guidelines, all restricted work days are recordable. Transfers to another job due to the injury or illness must be added to the restricted days for reporting purposes. Although a first job transfer may be recorded in the TW Start and TW End fields, use the Restricted Days menu to enter any subsequent period(s) in the From/Thru Dates with “Job Transfer” as the Restriction.
In cases where the employee receives indemnity payments to compensate for the loss of earning power due to a restriction, enter “I08” (wage loss) in the Report Category field for the pay code so the days are not counted as both time lost and restricted days on the OSHA log.
You may report up to 19 different body parts that were injured and their corresponding IDC-9 diagnosis codes. Use this menu or the Ellipsis button next to the Body Site field to enter this information. Note that entering the nature and impairment percentage is optional.
To modify an entry, highlight it, update the data, and click Save to move the item back to the grid. If you need to remove an entry, highlight it, and click the red X.
The CMS recognizes up to a total of five settlements or TPOC (Total Payment to the Claimant) amounts so an option was added to the Bridge menu to display this window.
Please note that the grid will be blank until you enter an amount and date(s). All the amounts will be totaled including the Settlement (TPOC) Amount on the Litigation page to make it easy to determine whether or not the amount is over the threshold and must be reported.
A CMS Batch option has been added to the Bridge menu. Selecting the option will display this window so you can batch different types of records or transactions. The CMS refers to these as Action Types. For your convenience, a history of what was batched and sent (by whom) will appear in the window.
An "add" record or transaction should be submitted for a new claim that was never submitted, was submitted but not accepted due to errors, or a claim where the RRE assumed ongoing responsibility for medicals previously, but the injured party has just become entitled to Medicare. The CMS stores claims by the following key information:
· Injured Party SSN, HICN, Last Name, First Name, Date of Birth and Gender
· CMS Date of Injury/Loss
· ORM Indicator
A "delete" record or transaction should be sent to remove information from the CMS database if the original record should never have sent in the first place or when you need to change key data submitted previously. In the latter case, the RRE must send a delete record with the key information that matches the previously accepted (add) record followed by another add record with the changed information.
Because Medicare stores claims submitted previously by the key information listed above, it is important that the data not be changed in the claim. We strongly recommend that someone with system administration rights set these fields as transactional so the program will track what changes were made to the data, when the changes were made and by whom. This way you can confirm that the data is the same.
An "Update" should be sent when you need to change information previously submitted and accepted. The key information (listed above) in an update record must also match that in the add record in order for the transaction to be accepted.
Update records should be submitted under these three circumstances:
1. An RRE needs to send the ORM Termination Date to indicate that the responsibility for ongoing medicals has ended. This may be a simple termination, or it might be associated with the reporting of a settlement, judgment, award, or other payment TPOC amount/date.
2. A report of ongoing responsibility for medicals has already been submitted and accepted and there is a separate settlement, judgment, award, or other payment TPOC amount/date. The RRE continues to retain ongoing responsibility for medicals.
3. Information critical for use by Medicare in its claim payment and recovery processes has changed.
If you need to update one of the key fields listed above, follow the process described in the previous section where a delete and add record are required.
If you need to update one of these other fields, send an update transaction:
· ICD-9 Diagnosis Codes
· Description of Illness/Injury
· Carrier’s TIN (FEIN)
· TPOC (Settlement) Date
· TPOC (Settlement) Amount
· Claimant’s Representative Information
The Electronic Filing Cabinet (EFC) module is also called the Document Manager. This is the ATS solution to the paperless document flow many entities require. For instructions on using the EFC and help videos, please go to the following website and create a login: www.grocefc.com.

Figure 5‑29: EFC – Document Manager
Operators with the appropriate authority can handle any financial operation regarding a claim. The transactions will be covered in the following order:
· Making General Payments
· Entering Recoveries
· Scheduling Auto Payments
· Voiding Payments
· Changing Reserves
· Editing Batched Payments
· Issuing Credits
· Using the Bill Review Module
If you are in Explore, you can make payments without actually opening the claim. Simply select the desired claim and click the General Payments button. The button is also available if you are already editing a claim and want to make a payment.
Knowing that some bills arrive after a claim has been closed, the ATS System has a special Stair Step Reserves feature that may be set so you can make a payment without having to reopen the claim.
The future reserves are always displayed for your convenience, but the bank account number and the balance in the trust will not appear if you are creating vouchers. (The number of reserve categories and their names will depend on how your ATS System has been set up.)
On the upper right side of the screen, you’ll see a special field that displays the claim number with an ellipsis button to the right. This field allows you to enter multiple payments rapidly by saving the payment, typing the next claim number in this field, entering the next payment and saving. The ellipsis button provides a claim search function if you don’t have the claim number available.
The example above shows an indemnity payment that was set up by simply clicking the Ellipsis button next to the amount. Refer to the fields below for information on this feature. The fields are described as follows:
|
Field Name |
Description |
|
Pay Type |
The payment type is either voucher or check. Note that checks debit the trust fund (bank account) balance, but vouchers do not. The record shown above will produce a voucher so the number of the trust fund account and the balance in the account are not displayed at the bottom of the screen. This information will appear if you produce checks. |
|
Amount |
The amount to be paid. A special feature allows you to make an auto indemnity payment by pressing the Ellipsis button. The program will automatically display the amount, the employee’s name and address, the default From/Thru dates and “1” in the reserve category field. A default pay code may also appear. (The defaults are set with the Administer-Configuration-Application Parameters menu.) If there is a negative account balance, you may get a "Bank Balance Insufficient" message depending on a setting entered with the Administer-Configuration- Module Parameters menu. When this message appears, the amount will be reset to zero. Another setting may allow you to enter a batched payment with a negative balance. Attempting to print a payment or enter a notation will display the message "You may only batch this payment due to low funds". If you are using the Stair Step Reserves feature set with the Administer- Configuration-Application Parameters menu, the reserves will automatically be increased to cover the payment. |
|
Vendor Code |
If the payee is any of the following, enter the code and the program will fill in the information from the claim. C claimant D dependent (a choice list will appear) CA claimant’s attorney DA defense attorney P medical provider Otherwise, enter the vendor code including the asterisk and location or press the Ellipsis button to select a vendor from the table. |
|
From/Thru Periods |
The dates for up to three billing/payment periods may be entered. Pressing the Ellipsis button next to the amount will display a period based on the Thru date for the last indemnity payment and whether the Benefit type for the claim is “TD” or “PD”. By default, these are two week periods, but the values may be changed with the Administer-Configuration-Application Parameters menu. If the From/Thru period is changed for an auto calculated indemnity payment, the program will display a message explaining how the benefit amount was recalculated and ask if the amount should be adjusted. When a future date has been entered, the program will display “Warning: Date entered is greater than today’s date” on the title bar. Depending on your check printing schedule, you may need to enter future dates. In that case, ignore the warning message when it appears. Back and post-dating payments may be allowed depending on the settings entered with the Administer-Configuration-Module Parameters menu. Note that it is very important to be able to back-date a notated payment that was printed on a prior date. The post-dating feature is also useful since it allows payments to be entered for printing sometime in the future when you may or may not be in the office (e.g, on vacation). |
|
Reserve Cat |
The code for the reserve category that the payment will be drawn against. If the payee is a vendor with a default reserve category and pay code, these values will be displayed on the screen automatically, but they can be modified. |
|
Wage Continued |
If the Wage Continued flag is set in the claim, the message “Warning - Wage Continued” will appear to remind you that an indemnity payment is being made to an employee who is receiving his or her salary in lieu of worker’s comp benefits. A message will also be displayed when auto payments have been scheduled for that period. Unless the Negative Reserves value has been set to “Y” with the Administer- Configuration-Module Parameters menu, the amount to be paid may not be more than the future reserves for the specified category. If the amount is higher, the program will read the Stair Step Reserves value set with the Administer- Configuration-Application Parameters menu. If the value is “N”, you will be given an opportunity to edit the reserves and increase the amount so the payment may be issued. For example, “Futures insufficient by 286.00. (Use the Change Reserves icon on the tool bar.” If Stair Step Reserves contains an “A”, the incurred amount will be automatically increased by the amount of the payment. A value of “C” will increase the reserves for closed claims only. In both cases, the future reserves will still be zero after making the payment. Refer to the Editing Reserves section in this chapter for more information on this process. |
|
Payment Code |
The payment or cost center code for the specified reserve category. Default codes for auto TD or PD indemnity payments may be set with the Administer- Configuration-Application Parameters menu. |
|
OSHA Days |
When making a payment to the employee from reserve category 1 or 3 (indemnity or rehab), the program will check the contents of the Grouper field in the specified Payment Code. If this value contains “TD”, then the From/Thru days are used to calculate the OSHA Days based on a calendar week. This value will be displayed on the screen and added to the existing values in the claim record. There will be times when an employee performs another job or the same job with restrictions due to an injury or illness. If the job pays less than the usual, the employee should get a comp payment to make up the difference. In that case, it is very important that the temporary disability payment is made with a pay code that contains I08 (wage loss) in the report category so the days in the From/Thru period will be ignored when reporting to OSHA. If this feature is not used, the days would be counted as lost time when the employee is really at work. |
|
Note |
An optional note or memo to be displayed on the check/voucher. |
|
Status |
There are three choices: 1. Batch the payment record so that it can be printed later or exported with the Accounting Interface module.
2. Notate payments that were issued without using the ATS System. For example, suppose a check is lost. After voiding the original payment, enter a notated payment with the same date.
3. Click the Print button if you want to print the payment immediately. |
|
Form Number Process Date |
When the Status is Print or Notate, the program will make these fields available and fill in the form number and current date which can be changed if necessary. This is a handy feature when the original payment was incorrect (e.g. has the wrong reserve category) and has to be voided. You can’t batch another payment because the check has already been cashed. In this case, you will need to enter a notated payment Note that the next check number is stored in the bank information entered with the Trust Fund menu while the voucher number is in the client’s record. |
|
Due Date |
The Due Date field is available when the payment is to be batched. If there is no specific date, leave the field empty so the payment will be included the next time a batch is printed. Back and post-dating payments may be allowed depending on the settings entered with the Administer-Configuration-Module Parameters menu. Since the Print Batch program asks for a due date, the post-dating feature allows you to enter payments to be printed in the future. It is also important to be able to back- date a notated payment that was printed on a prior date. |
|
Separate Handling |
If the Separate Handling box is checked, the payment will not be combined with other payments to the same vendor. Checking this box also allows you to inform the accounting department (when the Handle Return File option in the Accounting Interface is used) that the check should be sent back to claims for special handling before it is mailed. |
|
EDI Late Reason |
Each state requires that the initial indemnity payment is issued a specific number of days after the date of injury. If this payment will be transmitted to the state via EDI, then select a code to indicate why the payment is late. Omitting the code may cause the state to reject the transaction. |
|
Invoice Number |
The invoice or reference number being paid, if any. |
At this point, the program will search for possible duplicate payments for the same payee, reserve category, pay code and from date. If one is found, the program will display all the details on the other payment(s) so you can decide whether you should click Continue and save the payment. Clicking Cancel will leave you in the payment screen without saving the record the payment is over this amount, the program will display “Over check limit. Record will be pended.” The payment will be pended until someone with a higher limit releases it (to batch) with the Process- Edit Batch menu.
In states such as Florida and South Carolina, the MMI Date in the claim determines whether a $10 copayment can be applied to a medical payment. A message will appear if the date has been reached. Click Yes to apply the $10. The No button will return to the payment program. When you Save the record, the program will clear the screen except for the payee. At this point, you can enter another payment to the same or a different payee or exit the program.
The AutoPay module is included with the standard ATS System so you may schedule payments to be made on a regular, ongoing basis. This feature is available from the menu from within a claim or from the Selected Claims list screen after selecting a claim.
The program displays the following screen. .
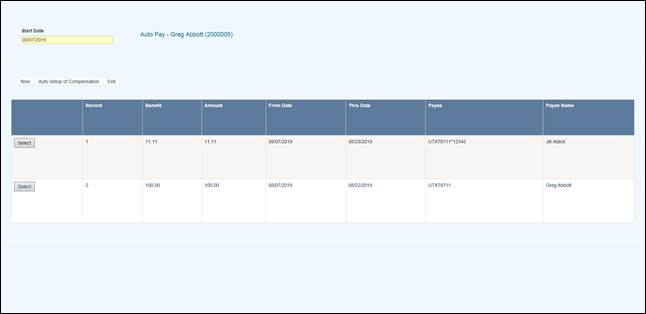
Figure 6‑1: AutoPay Screen
Depending on how the claim has been set up, the following buttons may be used.
|
Button |
Function |
|
Edit |
Displays the selected payment record for viewing and/or editing purposes. If the list is empty, this button will be disabled. |
|
New |
Displays a blank form so a new record may be entered. |
|
Auto Setup |
Sets up a new payment schedule automatically. This button will be disabled if there is a Start TD or Start PD Date in the claim. |
|
Close |
Exits to wherever you started, either the claim or the Selected Claim menu. |
There are two ways of scheduling new payments. Each method will be covered in this section.
The Auto Setup button is available for setting up the benefit period. It will be enabled for indemnity claims that have a specific Benefit Rate, but no benefit payments (i.e. the Start TD and Start PD Date fields are both empty).
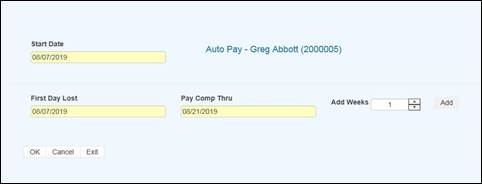
Figure 6‑2: AutoPay Setup
Selecting the button will prompt for the compensation period. The First Day Lost will be displayed if the date exists in the claim record. Enter the date when the period will end. It can always be changed later. If you don’t know the exact date, add the number of weeks to be paid and click the Pay Comp Thru field to update the ending date.
Click OK and the program will set up the payment schedule as shown in the following example.
In addition to the information found in the claim record, the program will search the various tables to find the default values for the Pay Code, State Days, and Waiting Period when the Auto Setup of Compensation feature is used. (All of the fields will be covered next.)
If the program finds all the required information and the Pay Day value for the employer is set to something besides any day, then the only thing left to do is save the record. Otherwise, the date for the Next Check must be entered before the record can be saved.
If you use the New button, normally the information on the form will have to be entered manually. The fields are described as follows:
|
Field Name |
Description |
|
Record # |
The default is “1” for the first payment schedule. Enter “2” to indicate a 2nd one. A total of nine records may exist at any one time. Records no longer appear on the list after the last payment has been made. |
|
PMT Type |
The payment type is either checks or vouchers. If necessary, a system administrator may change the default value. |
|
Payee ID |
The payee’s social security or federal ID number. Enter "C" if the payee is the claimant, "D" for a dependent receiving alimony or child support, or press the Ellipsis button for a list of vendors. If this is a fatality case, we recommend that you enter the individual who will receive the death benefits as a dependent to make it easier to schedule payments. |
|
Payee |
The name of the payee will be filled in automatically after reading the social security number or vendor code in the previous field. |
|
2nd Payee |
The name of a second payee if any. For example, if the employee's check needs to go to a legal firm for disbursement, the c/o name should be entered here. |
|
Address, City, State, Zip, Phone |
The address and phone information will be filled in automatically after reading the record with the specified social security or federal ID number. |
|
RSV Cat |
The reserve category to be used. The Auto Setup feature will enter “Indemnity” by default. Press the Ellipsis button for a list of other categories that are available on your system. |
|
Pay Code |
The payment or cost center code. Press the Ellipsis Button for a list of codes that are available for the specified reserve category. If the Auto Setup button is used, the program will use the Benefit Type code specified in the claim record to look for the default code set up with the Administer-Configure-Application Parameters menu. |
|
Rate |
The employee’s benefit rate. If an amount has been entered in the claim record, it will be displayed here automatically. (A benefit rate must have been entered in the claim in order to use the Auto Setup feature.) |
|
Work Comp From |
When the Auto Setup of Compensation button is used, the program will calculate the starting date based on the First Day Lost and the days in the state's waiting period, otherwise it must be entered manually. In either case, the From Date will be adjusted as payments are made. |
|
Work Comp Thru |
The day benefits should end. The program that batches the payments will generate "Next to Last Payment" and "Last Payment" diaries to warn the adjuster that the claim should be reviewed. This date may be modified if the payment period needs to be shortened or extended. |
|
Wait Period From/Thru |
When the Auto Setup of Compensation button is used, the program automatically calculates the From and Thru dates based on the Waiting Period and Before Paid values in the record for the claim's state of jurisdiction. This feature will not work correctly if the values in the state's record are incorrect. If for some reason, you do not want the program to calculate the waiting period payment, zero out the values for the state. |
|
Pay Period |
The Auto Setup feature will automatically enter “B” (bi-weekly) as the Pay Period. Other valid entries are “W” (weekly) and “M” (monthly). |
|
Benefit Type |
The benefit type from the claim record, either “TD” (temporary disability), “PD” (permanent disability), or “VR” (vocational rehabilitation). |
|
PMT Periods |
The total number of payments to be made will be calculated after you have entered the pay period and from/thru dates. This value can not be modified. It will be updated automatically as payments are made. |
|
Original From |
The Comp Period From Date will be updated as payments are made, but the original date is displayed here for your information. |
|
Next Check |
The date of the next payment. This date will appear as the first Batch On date on the list of future payments. (See below for details.) |
|
Prior Check |
The date of the last payment that was batched. |
When the record is saved, the program will check the claim to verify that there are sufficient reserves to make the payments. If there aren’t, you will be prompted to increase the reserves accordingly.
AutoPay creates the payment schedule and displays it on the screen as it saves the record. This particular example was created to batch the payments after the pay period (AutoPay Mode set to A) and the employer’s Pay Day set to any day. (Refer to the Setup Procedure in a later section.) The Next Check date is used as the first Batch On date. This is the most typical configuration.
Note the first payment on the list is for the waiting period. In the state of jurisdiction for the claim, there is a 14 day period before those days can be paid.
Typically, the Comp Thru Date does not fall at the end of a pay period so the last payment is only for a few days. When that happens, the program will check the Scheduled Hours in the claim record.
If there are no Scheduled Hours, AutoPay assumes that the individual works a regular week and calculates the payment accordingly. But, suppose the employee works Monday and Wednesday through Saturday. (Work days are those which contain a value in the Total field on the Scheduled Hours dialog.) If the Thru Date falls on a Wednesday, the program will know that the employee does not work on Tuesday and only pay for two lost days.
The program that batches the auto payments will generate a diary to the adjuster when the next to the last and the last payments are batched.
The Autobat program must be run to batch payments according to their Batch On date. AUTO will be stored as the user who processed the transaction. Although the reserves must be sufficient to schedule the payments, the reserves may have been used up since then.
Auto payments will always be batched because of a possible late penalty. When the reserves are insufficient, the program checks the Stair Step Reserves value entered with the Application Parameters. If it is either "Closed" or "All", the reserves will be automatically increased to cover the payment. Unless Negative Reserves has been set to “N”, the futures will become negative. In any case, a diary will be sent to the adjuster.
Auto Batch logs may be viewed with the Image Files menu. When appropriate, "Next to Last Payment" and "Last Payment" entries will appear along with a diary telling the adjuster to review the claim.
The number of OSHA Days in the claim is updated as payments are batched against reserve categories 1 and 3 (indemnity and rehab) for pay codes with “TD” in the Grouper field. This number is based on a calendar week.
The system administrator must set up AutoPay so payment schedules are created to meet your particular needs. When the record is saved, the program will check the Pay Day and AutoPay Mode values as defined below.
|
Item |
Set In |
Value |
|
Pay Day |
Employer’s record |
Sunday thru Saturday or Any Day |
|
AutoPay Mode |
Application Parameters |
Standard (sets the first Print Date to the first Pay Day at the end of the pay period) After (sets the first Print Date to the first pay day after the pay period ends) |
When the Auto Setup of Compensation feature is used and Pay Day is set to a specific day of the week, the program will ignore the Next Check date, if one exists, and use the AutoPay Mode to calculate it and the subsequent Print Dates (displayed with the List option). Changing the Next Check date will have no effect.
The Reserve Change button will display the following dialog so the reserves for an open claim may be changed depending on the permissions granted in your user’s profile. This dialog also appears when the reserves must be increased in order to enter a payment.
Before the modified reserves can be saved, a Reserve Change reason must be selected using the drop-downs on the right. These changes may be viewed later with the History module.
There are two types of reserve limits that may be set in the ATS Security System: a Cumulative Limit which is the total incurred entered per user that cannot be exceeded and a One Time Limit which is the amount that may be entered during a session. (A session ends after exiting the program.)
These limits may apply to the total reserves or to individual reserve categories. For example, suppose the One Time Limit is set to 25,000 and the Cumulative Limit is 50,000. Depending on the current amount in the specified category, the change may or may not be allowed. Note that the Cumulative Limit examples assume that prior changes to the incurred were made by the same user.
One Time Limit=25,000 Cumulative Limit=50,000
Incurred in Claim Reserve Change Allowed?
Example 1 15,000 25,000 YES
Example 2 35,000 25,000 NO
Example 3 45,000 10,000 NO
It is important to note that when both the limits are zero or null, there is no limitation on the changes that may be made. If the One Time Limit is set to 25,000 and the Cumulative Limit is zero, the user may increase the reserves up to $25,000 a session regardless of the current amount in the claim.
One Time Limit=25,000 Cumulative Limit=0
Incurred in Claim Reserve Change Allowed?
Example 1 15,000 25,000 YES
Example 2 35,000 25,000 YES
Example 3 35,000 35,000 NO
Conversely, if the One Time Limit is set to zero and the Cumulative Limit is 50,000, the reserves may be increased by any amount until a total of $50,000.
One Time Limit=0 Cumulative Limit=50,000
Incurred in Claim Reserve Change Allowed?
Example 1 15,000 25,000 YES
Example 2 35,000 15,000 YES
Example 3 5,000 50,000 NO
The program will automatically update the future reserves and display the new totals as the incurred values are modified.
There may be times when you need to issue a credit against a specific claim. The credit might be for a particular payment when there was an overpayment. A credit may also be issued when there has been money recovered and the amount should be subtracted from the amount paid. In that case, there would be no prior payment involved. Regardless, if the claim is closed and the futures are zero, they will remain zero after the transaction has been made. Each of these type of credits will be covered in this section.
Select the Payment History button if you need to issue a credit for all or a part of a specific payment. The following screen will appear with a list of the payments that have been made. The list may include some existing credits where the form number ends with *R and a number.
Scroll through the list until you find the payment you want. Then, select the payment and click the Credit button. The program will display the Credit screen along with the data from the original payment. Note the Status field. A warning message will appear if you attempt to credit a payment that has been voided.
The cursor will be positioned in the Credit Date field so that you can modify the following items. Save the record to complete the transaction.
|
Field Name |
Description |
|
Credit Date - Time |
The current date and time appear by default. |
|
Amount |
The amount to credit may not exceed the amount of the original payment. If a credit has already been applied, it will be subtracted from this value. |
|
Note |
The note or memo that appeared on the original payment is displayed. It may be modified to indicate the reason for the credit. |
This option allows you to issue a credit for a claim when there is no particular payment involved (e.g. the credit applies to a group of payments). This feature should also be used when the money recovered on a claim must be deducted from the amount paid. In this case, the amount could not be entered as a recovery since these are tracked separately in the ATS System.
After selecting the desired claim, pick the Credit (no check) button. The program will display the same form used to issue standard credits, but the information has to be entered manually since there is no payment record..
The fields on the form are described as follows:
|
Field Name |
Description |
|
Vendor Code |
If the payee is any of the following, enter the code and the vendor code, name, and address will be filled in with the information in the claim record. · C claimant · P medical provider · CA claimant’s attorney · DA defense attorney If the payee is someone else, press the Ellipsis button to search for the vendor. |
|
Reserve Cat |
The code for the reserve category to be credited. |
|
Amount PTD |
As soon as the reserve category has been specified, the total amount paid for that category will be displayed. |
|
Payment Type |
The type is either check or voucher. |
|
Credit Date/Time |
Normally, this data is not changed. |
|
Reason |
A note explaining why the credit was issued. |
|
Credit Amount |
The amount to be credited may not exceed the amount paid. |
In the ATS System, recoveries are tracked separately from payments, credits, and voids. The amount paid will not be adjusted. Use the Credit menu when the money received must be deducted from the amount paid against the claim.
The fields to be entered on the form are described as follows:
|
Field Name |
Description |
|
Recovery Amount |
The amount recovered. A warning will be displayed if this amount is greater than the amount paid. |
|
Vendor Code |
The code for the vendor making the payment. Press the Ellipsis button to search the vendor records or enter “C” to display the Claimant’s information or "S" to display the Recovery (Subro) Party from the claim. In the latter case, no vendor code will appear because there is none in the claim. |
|
Invoice No./Date |
The invoice or reference number and date. (optional) From/Thru The range of dates in the period. (optional) |
|
Reserve Category |
The code for the category from which the recovery will be made. |
|
Recovery Type |
The code indicating the type of recovery is normally a required field. |
|
Note |
An optional note regarding the recovery. |
|
Recovery Date - Time |
The current date and time may be modified if necessary. |
|
Update Bank |
A check will update the bank balance (i.e. the client’s trust fund). This value has no effect if you use the ATS System to issue vouchers, not checks. |
Menu options are available so that you may void a payment or recovery. Typically, that is necessary when a transaction was entered incorrectly.
Whether the payment was entered for the wrong reserve category and pay code or it was lost in the mail, the original transaction should be voided and re-entered.. This is done by selecting the History button . The following screen will appear with a list of the payments that have been made.
Scroll through the list until you find the payment you want. Then, select the payment and click the Void button. The program will display the Void screen along with the data from the original payment.
The following screen is used to void payments. The only fields that may be edited are the Void Date, Reason, and the Type. Simply save the record to void the payment. If the claim is closed and the futures are zero, they will remain zero after the transaction has been voided.
Note:
1. Voiding a benefit payment may affect the Start TD or Start PD dates in the claim. If the first payment is voided, the new starting date will be the From Date in the second payment.
2. If the claim is closed and the futures are zero, they will remain zero after the transaction has been voided.
Suppose you receive money on a claim and enter it as a recovery before realizing it should have been a credit so the amount would have been deducted from the paid. In that case, you will need to void the original transaction by selecting the Recovery History button.
The following screen will appear with a list of the recoveries that have been made.
Highlight the record to be voided click the Void button. The date, the reason for voiding the transaction, and a code indicating the type of void are the only items that can be entered. To void the recovery, simply save the record. If the bank (trust fund) was updated when the original recovery was made, a message will appear to let you that the balance has been adjusted.
All payments that are entered with a status of “B” are batched for future processing. At any time, these batched payments may be reviewed, approved, posted, deleted and/or released (when pended) by anyone with the proper access level.
Use the Process-Batched Payments menu and click Process to view all the payments.
Use the Previous and Next buttons to page through the list. The columns contain the following information.
|
Column |
Contents |
|
Type |
The type of payment where C = check and V = voucher |
|
Status |
“A” if the Approve feature is used, otherwise empty. |
|
Entry |
The code for the user who entered the payment or AUTO if the system batched the reoccurring payment. |
|
Amount |
The amount of the payment |
|
Payee |
The name of the payee |
|
From/Thru |
The dates in the billing period |
|
Due |
The date the payment is to be issued |
|
Desc |
The pay code |
|
Transaction |
The claim number followed by an asterisk and the number of the payment issued for the claim |
|
Voucher |
The number assigned when the item has been exported with the Accounting Interface module |
|
Entry Date |
The date the payment was batched |
The Edit Batch utility has a wide variety of features as evidenced by the number of buttons and check/edit boxes that appear on the form. Each of the features, including those available from the menu, will be covered in the following sections.
There are two buttons that may be used to process batched (the default) or pended payments which were entered for more than the operator’s check writing limit.
The following filters are available to select a specific group of batched payments.
The ATS System has a Pre-Approve feature that may be used to require the approval of payments before they can be printed.
If the Pre-Approve flag has been set using the Module Parameters screen, these filters will be enabled so that all payments that are not approved will be listed when the Process button is clicked. Remove the check in the Not box to get a list of approved payments. (Approved payments will have an "A" in the Status column.)
By default, all the payments that have not been exported using the Accounting Interface will be listed. Remove the check in the Not box to get a list of exported payments that have a number in the Voucher column.
When the Region feature has been implemented, this filter may be used to display a list of payments for claims in a specific region. An operator may only view payments for a particular region if one is specified in the operator's record and the Region View is turned on.
By default, the payments for all the claims that meet the other criteria (filters) will be listed. When this is a long list, it may be difficult to find a payment for a specific claim. In that case, click the Claims ellipsis button to display the Select Claim screen. Pick a claim and only those payments will appear on the list.
The Payment program allows you to specify a Due Date for each batched payment. By default, this field is empty so this filter will have no effect.
Depending on the settings entered using the Module Parameters screen, post-dating payments may be allowed. In that case, the Due Date filter may be used to display payments with dates either on or before the date specified (in the filter) or blank.
A variety of buttons are available so you can perform the following functions.
If the Pre-Approve flag has been set to "Y" using the Module Parameters screen, the Approve button will be enabled so batched payments can be approved by an operator with the authority to print checks. Otherwise, this button will be disabled (grayed out) since this step is not required. When this feature is used, approved payments will have an "A" in the Status column.
Any payment may be deleted from batch by an operator with Delete permission. Simply highlight the desired item and click the Delete button. The program will ask if you want to perform the operation. To continue, click the Yes button. The program will remove all references to the batched payment from the system and adjust the reserves/paid amounts for the claim.
When a check has been made out by hand or printed with a foreign system, an operator with Print Payments permission should use the Post button to post the payment to the check history table. The date and form number may be changed if necessary.
The next voucher number is found in the client’s record, whereas check numbers are stored in the information for the bank account.
Use Pend mode to view any payments that were entered for an amount over the operator’s check writing limit. Select one of the payments. If your check writing limit is higher than the amount of the payment, the Release button will be available to place it in Batch mode.
Use the View button to view all of the information on a specific payment. Notice the Browse button in the Payee group. Suppose that a payment had issued to the wrong vendor. This button may be used to display the Select Vendor dialog and pick the correct vendor without having to void the payment and enter a new one. After making a change, click the Process button again to update the Payee name on the list.
The Edit Batch Report button may be used to produce a wide variety of reports with the currently listed payments. Clicking the button will display the specification screen with all of the default values as shown below. Check the Page Eject box if you want a new page to be used when the value being sorted by changes.
The report specifications are as follows:
|
Field |
Contents |
|
Sort By |
Payments may be sorted by Adjuster (the default), Claimant, Reserve Category/ Pay Code, ATS Claim Number, Alternate Claim Number, or Region/Level 1. |
|
Mode |
Batched or Pending payments. |
|
Checks |
A check will display only checks on the report. |
|
Vouchers |
A check will display only vouchers on the report. |
|
(Un) Approves |
If the Pre-Approve feature is used, a check will indicate which payments should be included. |
|
(Not) Exported |
A check will either include the payments that have been exported (for printing) or not. |
|
Claim Number |
By default, the wildcard % is used to include all claims. Click the ellipsis button to select a particular one. |
|
Region |
By default, payments for all regions will be included. |
|
Level 1 |
By default, payments for all levels will be included. |
|
Page Eject |
A check will cause a page eject each time the Sort By value changes. |
When you have finished entering the specifications, click the Print Preview button to load the report into the ATS Print Previewer where it may be reviewed and/or printed.
Each year, medical costs continue to skyrocket. Instead of simply paying the full amount on every invoice, use the Medical Fee module, an optional, add-on product designed to lower your medical costs. Each line item on the invoice is calculated and either accepted or overridden based on the state’s fee schedule, the DOL’s OWCP schedule, and/or the Usual and Customary Reimbursement (UCR) value. A vendor’s custom fee schedule may also be used.
This module has also automated the printing of Explanation of Benefits to the medical providers. The UCR module is an optional feature and not part of the standard ATS/Comp Medical Fee product.
Bundling and unbundling is another optional feature that is available. The data to implement any of these features is available from a third party.
1. By default, the program will check to see if the specified vendor has an HMO/PPO with Valid From/Thru dates that cover the From date in the payment record. If so, it will look in the HMO/ PPO’s record for the rate table to be used.
When a rate table is not specified (or found), the program will use the vendor’s State to see if the Schedule flag for that state has been set with the Maintain-State Codes menu.
If the vendor’s State field is empty or the state has no fee schedule, a message will appear indicating that it will use the Fee State Code set with the Administer-Configuration-Module Parameters menu to calculate the amount for the line items to be paid on the invoice.
2. If UCR percentiles are to be used, they should be stored by state with the Medical Fee- UCR Percentile menu. By default, the program will detect that a percentile exists for the vendor’s state and use the UCR value to calculate the amounts, based on the zip code, for the line items ignoring the $ per Unit value in the fee schedule.
3. If the Override State flag has been set with the Module Parameters menu, the program will calculate the amount of the line item using both of the above methods and display whichever amount is lower.
The bill review process is quick and easy. The Bill Review button will display a data entry screen with two pages, the first of which is used to enter general information on the payment as shown below.
|
Field Name |
Description |
|
Payment Type |
The type of payment, either check or voucher. |
|
Invoice |
The number of the invoice that is being paid. |
|
Invoice Date |
The date of the invoice. |
|
Received |
The date the department received the invoice may be entered for accounting purposes |
|
Status |
The status of the payment; either batch to be printed later, print when the record is saved or notation only, which writes the payment record to the check history file with a specified form number and processed date without printing it first. |
|
Payment Code |
The code for the type of payment. |
|
Payment Note |
A note to be displayed on the check or voucher. |
|
Vendor Code |
Enter “C” if the payee is the claimant or press the Ellipsis button to select an active vendor. |
|
Payee |
Making a selection will display the name and address from the vendor’s record. |
Clicking the Line Items button will display the page shown below.
The fields on this form are described as follows:
|
Field Name |
Description |
|
Amount |
The amount on the invoice. The total amount that will be paid for the line item(s) is displayed in the Payable field. The program will display a message and adjust the amount for the line item or the amount payable if either is greater than the invoiced amount. |
|
Service Zip |
By default, the vendor’s zip will be displayed as the zip code where the service was performed. This zip code will not only determine which fee schedule is used, but also the tax rate if tax is to be applied as in New Mexico. |
|
ICD-9 |
The ICD-9 code(s) from the invoice. Up to four codes may be entered. |
|
Inpatient |
A check indicates that the employee has been admitted in a facility and treated as an inpatient. |
|
Item |
The number of the line item. Use the arrow keys to enter another item or review a previous one listed in the grid below. |
|
From/Thru |
The starting and ending date of the billing period. (The default ending date is the same as the From Date.) These dates will determine which particular fee schedule to use. (It must be after the open date on the claim.) For your convenience, the previous From/Thru dates will be displayed as you enter new line items. |
|
ICD-9 |
A number to specify which ICD-9 code applies to the specified CPT code for the line item. |
|
Invoiced CPT Code |
The CPT code for the item. Normally, this must be a valid code (in the fee schedule) in order to continue. The exception is “00000”, which may be used to enter a miscellaneous item that is not found in any fee schedule. Note that the professional component or technical unit value may be used instead of the maximum reimbursable by entering the CPT code followed by either "-26" or “-27” respectively (e.g. 00100-26). |
|
CPT Code |
If the UCR module is in use, the vendor’s zip code will be used to determine the appropriate region. |
|
Description |
The description of the procedure. |
|
Modifiers |
Up to three modifiers may be applied to the CPT code. For example, the following modifiers may be applied to CPT 00100. |
|
Specialty |
When there is a specialty associated with the CPT code, it may be selected from a list of choices by clicking the Ellipsis button. |
|
Qty |
The number of units billed for this line item. Unit Amount The amount billed per unit is optional. |
|
Amount |
The amount billed for the procedure. If the amount per unit has been specified, the program will multiply it by the quantity when the Qty is greater than one and the CPT code begins with 1 or higher (anesthesia units are billed differently). When the following situation occurs, the invoiced amount will be set to zero. The values from the preceding Invoiced fields will appear as soon as the Amount is entered. |
|
Accepted Amount |
The Maximum Reimburseable Amount (MRA) is displayed if it is less than the amount invoiced, otherwise the MRA will appear. As the amount of each line item is accepted, the total value in the Payable field will be incremented. Note that if the Bundling/Unbundling feature is in use, the program will check for major or comprehensive procedures that consist of a number of individual procedures. For example, the CPT code 31505 (larynoscopy diagnostic) consists of many other procedures, one of which is 36000 (microsurgery add-on). If both are on the same bill, the program will detect that the "code 36000 is part of the comprehensive procedure code 31505" and enter ZERO in the accepted amount for line 36000. The program will also look for mutually exclusive procedures (e.g. 27177 and 11010) that are not allowed on the same bill. |
|
Override |
An override code to explain why the amount to be paid is different than the amount billed. Press the Ellipsis button for the user-defined choices entered with the Tables-Medical Fee menu. |
|
Futures |
The amount available in the claim’s (future) medical reserves. See below for details when the amount is insufficient to cover the payment. |
|
Payable |
As line items are entered and accepted, the program will adjust this value accordingly. When the record is saved, this amount will be used to update the paid to date and future reserves in the claim. |
|
Rate Table |
The program will display the name of the fee schedule table in use. |
If you are in the Override field and want to enter another line item, press <Page Down> to increment the Line Number by one and move the cursor to the next From field. By default, the previous From/ Thru dates will be displayed for your convenience.
After all the line items have been entered, save the record. The program will verify that the future medical reserves will cover the payment. If the futures are not enough, the program will check the Negative Reserves value set with the Module Parameters menu.
If the Negative Reserves value is "Y", the entry is allowed and the future reserves in the claim will become negative. If the value is "N", the program will check the Stair Step Reserves value that was set using the Application Parameters screen.
If the Stair Step Reserves value is “A”, the incurred amount in the claim will automatically be increased to cover the payment. Otherwise, the Edit Reserves dialog may be used to increase the reserves. (All changes depend on the operator's reserve limit.) Clicking Close without making a change will decrease the amount to equal the future reserves.
At this point, the payment will be batched, printed, or manually posted to history depending on how the Status field is set.
Note that the payment will be pended if it is over the operator’s check writing limit. (Pended payments must be released using the File menu in the Batched Payments section of the Process module.)
After the record is saved, you will be asked if you want to input another payment for this claim. If you click Yes, the form will be cleared so you can start again. Otherwise, you will be returned to the main menu.
When this optional feature is in use, the program will check for mutually exclusive procedures (e.g. 27177 and 11010) that are not allowed on the same bill. It will also look for major or comprehensive procedures that consist of a number of individual components or procedures. For example, the CPT code 31505 (laryngoscopy diagnostic) consists of many other procedures, one of which is 36000 (microsurgery add-on). If both are on the same bill, the program will detect that the "code 36000 is part of the comprehensive procedure code 31505" and enter ZERO in the accepted amount for line 36000.
The ATS system supports multiple fee schedules; federal (DOL), state, and the usual and customary reimbursement (UCR) schedule. In that case, the program will display the amounts in the different schedules so the user can make a selection.
Discounts and/or custom fee schedules can also be setup for specific vendors. (Without this ability to use custom schedules, invoices for vendors that use their own service codes could not be reviewed.) After custom schedules have been setup, their use is transparent during data entry unless the code on the invoice is found in multiple schedules.
If you would like to use this feature, please contact ATS support as the procedure is beyond the scope of this manual.
The Explanation of Benefits (EOB) is normally printed at the same time as the payment. A special menu option is provided for those clients who export their payments to be printed by a foreign system and/or want to print them again later.
An option on the Financial menu may be used to print the EOBs any time after the check or voucher payments have been printed (not while they are still batched). When the report screen appears, enter the specifications to meet your requirements.
|
Field Name |
Description |
|
Provider Code |
A specific provider (vendor) code. Leave this field empty to include every provider that received a payment within the specified range of dates. |
|
Display By |
The EOBs will be sorted by provider code and then by either the claimant’s name (the default) or the claim number. |
|
Starting Date |
The first payment date to be selected. By default, this is the date that was used the last time the forms were produced. |
|
Ending Date |
The date of the last payments to be selected. |
An example of the standard EOB has been included below.
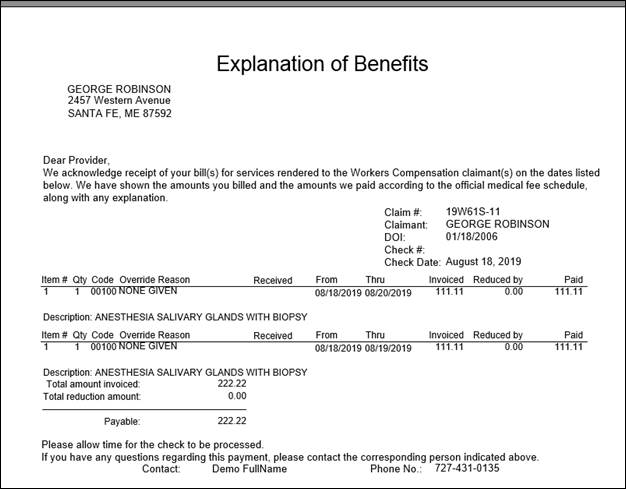
Figure 6‑3: Sample Explanation of Benefits
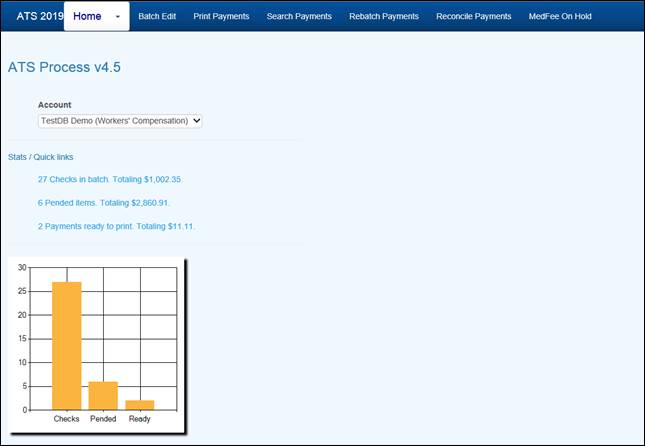
Figure 6‑4: Process Home Page
All payments that are entered with a status of “B” are batched for future processing. At any time, these batched payments may be reviewed, approved, posted, deleted and/or released (when pended) by anyone with the proper access level.
Use the Batched Payments menu and click the Process button to view all the payments.
Use the Previous and Next buttons to page through the list. The columns contain the following information.
|
Column |
Contents |
|
Type |
The type of payment where C = check and V = voucher |
|
Status |
“A” if the Approve feature is used, otherwise empty. |
|
Entry |
The code for the user who entered the payment or AUTO if the system batched the reoccurring payment. |
|
Amount |
The amount of the payment |
|
Payee |
The name of the payee |
|
From/Thru |
The dates in the billing period |
|
Due |
The date the payment is to be issued |
|
Desc |
The pay code |
|
Transaction |
The claim number followed by an asterisk and the number of the payment issued for the claim |
|
Voucher |
The number assigned when the item has been exported with the Accounting Interface module |
|
Entry Date |
The date the payment was batched |
The Edit Batch utility has a wide variety of features as evidenced by the number of buttons and check/edit boxes that appear on the form. Each of the features, including those available from the menu, will be covered in the following sections.
There are two buttons that may be used to process batched (the default) or pended payments which were entered for more than the operator’s check writing limit.
The following filters are available to select a specific group of batched payments.

Figure 6‑5: Batch Mode Filters
The ATS System has a Pre-Approve feature that may be used to require the approval of payments before they can be printed.
If the Pre-Approve flag has been set in Module Parameters, these filters will be enabled so that all payments that are not approved will be listed when the Process button is clicked. Remove the check in the Not box to get a list of approved payments. (Approved payments will have an "A" in the Status column.)
By default, all the payments that have not been exported using the Accounting Interface will be listed. Remove the check in the Not box to get a list of exported payments that have a number in the Voucher column.
When the Region feature has been implemented, this filter may be used to display a list of payments for claims in a specific region. An operator may only view payments for a particular region if one is specified in the operator's record and the Region View is turned on.
Also available is the due-date filter.
By default, the payments for all the claims that meet the other criteria (filters) will be listed. When this is a long list, it may be difficult to find a payment for a specific claim. In that case, click the Claims ellipsis button to display the Select Claim screen. Pick a claim and only those payments will appear on the list.
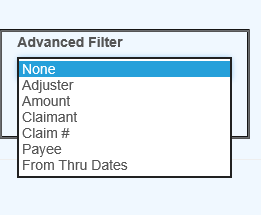
Figure 6‑6: Advanced Filter
![]()
Figure 6‑7: Operation Buttons
A variety of buttons are available so you can perform the following functions.
If the Pre-Approve flag has been set to "Y" with Module Parameters, these buttons will be enabled so batched payments can be approved by an operator with the authority to print checks. Otherwise, this button will be disabled (grayed out) since this step is not required. When this feature is used, approved payments will have an "A" in the Status column.
Any payment may be deleted from batch by an operator with Delete permission. Simply highlight the desired item and click the Delete button. The program will ask if you want to perform the operation. To continue, click Yes. The program will remove all references to the batched payment from the system and adjust the reserves/paid amounts for the claim.
When a check has been made out by hand or printed with a foreign system, an operator with Print Payments permission should use the Post button to post the payment to the check history table. The date and form number may be changed if necessary.
The next voucher number is found in the client’s record, whereas check numbers are stored in the information for the bank account.
Use Pend mode to view any payments that were entered for an amount over the operator’s check writing limit. Select one of the payments. If your check writing limit is higher than the amount of the payment, the Release button will be available to place it in Batch mode.
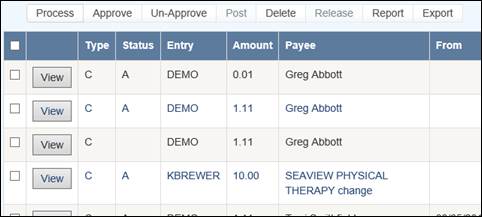
Figure 6‑8: Grid View Buttons
Use the View button to view all of the information on a specific payment. With proper authority information within the batched payment can be modified.
The Report button may be used to produce a wide variety of reports with the currently listed payments.
The Export button will export the grid to a Microsoft Excel type format.
This feature is used to search printed items that may need to be reprinted due to a print job error or a mistake on a check or checks.
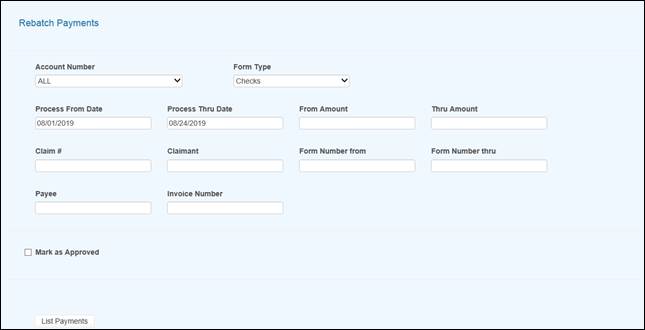
Figure 6‑9: Rebatch Payments Screen
![]()
![]() Once you enter the
search criteria and have records in the grid you will then be presented with
the View
option button as in edit batch as well as a button to Rebatch the selected items. Use the
check box to the left of the item you wish to rebatch or use the checkbox in
the header section to select all of the records in the grid.
Once you enter the
search criteria and have records in the grid you will then be presented with
the View
option button as in edit batch as well as a button to Rebatch the selected items. Use the
check box to the left of the item you wish to rebatch or use the checkbox in
the header section to select all of the records in the grid.

Figure 6‑10: Payments Grid
This button will export the grid to a Microsoft Excel type of format.
The ATS History module is a powerful tool designed to let you review the operations that have been performed on a claim. The types of operations are divided into categories with a variety of search criteria to help you find the information you want. The categories are:
· Payments
· Letters
· Recoveries
· Reserves
· Transactions
· Audit
The History view pages may be accessed from the Toolbar buttons after you have selected a claim on a Claim List or from the Menu Bar within the claim program.
This option is covered first since it is the one used most often. The payment history is queried with the following dialog.
Every payment will be listed when using the default selection criteria: all payments from the date the claim was opened to the current date regardless of reserve category. The total paid, batched, and the grand totals appear at the bottom of the form.
You may search for a specific group of payments by modifying any of the following criteria.
|
Criteria |
Function |
|
Date Range |
Lists payments made from one date through another. The program will start selecting from the date the claim was opened though the current date by default. |
|
Reserve Category |
Selects payments made to one, a group of accounts or all of the reserve accounts. The default will select payments regardless of category. |
Click the Process button to list the payments that match the selection criteria. By default, the payments are sorted in descending order by date with the most recent entry first.
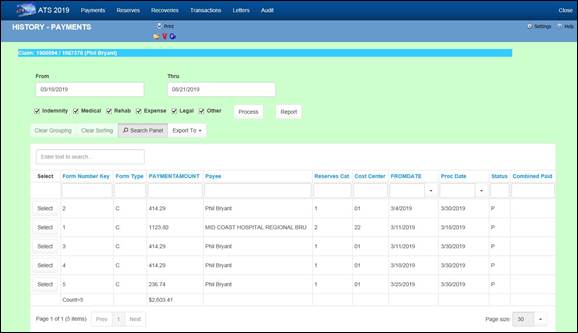
Figure 7‑1: Claim History -
Payments
Any of the History options that display a dialog with an Open button allow you to look at the details for a selected item. All the fields are disabled so they can’t be edited.
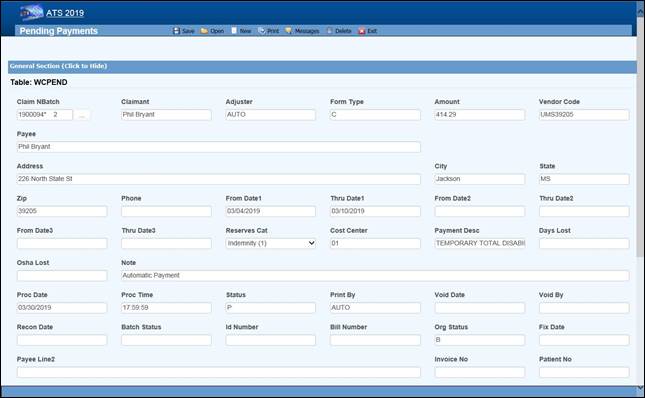
Figure 7‑2: Claim History -
Payment Detail
The Report button displays a report with just the items that appear on the selection list. For example, suppose someone requests a list of the payments made against the first reserve category. In that case, remove the checks for all the other the reserve categories and click Process, the click Report.
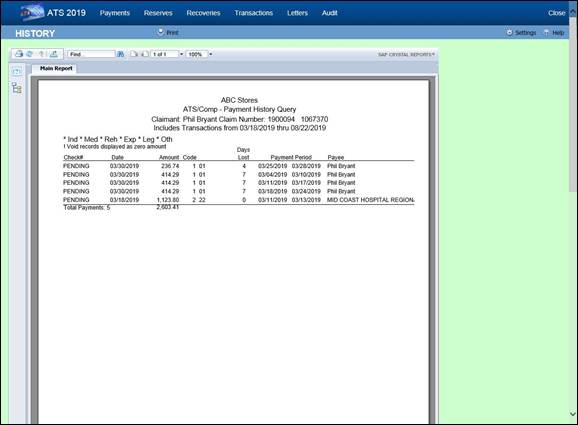
Figure 7‑3: Claim History -
Payment Report
Depending on a parameter set in the Maintenance section for Forms/Letters, a record may be written to the history file each time a form or letter is produced for a claim. If you have used this feature, then you may query the database using the following dialog.
If you enter a Letter Code, the program will search for records that contain the code and a date within the specified range. The note shown on the list is the description that was entered when the document was produced.
Note that the first time a document is generated the record number is always “1”. The next time it is generated the number will be “2” and so on.

Figure 7‑4: Claim History -
Letters
The ATS System keeps track of all changes to the reserves for your future reference. Use this History option to view the transactions. The dialog shows six reserve categories. The number and labels will vary depending on how your system has been set up.
By default, all changes will be listed from January 1, 1901 to the current date regardless of reserve category. To eliminate a category from the list, remove the check by clicking the box.
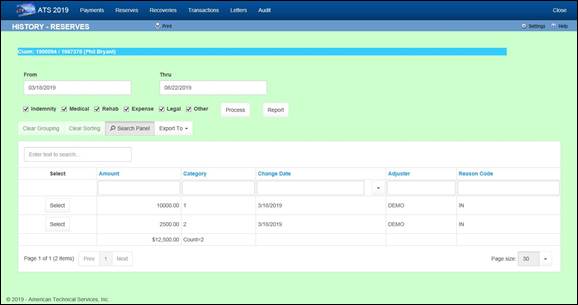
Figure 7‑5: Claim History -
Reserves
This option allows you to look up information on any recovery that has been made for the specified claim. By default, all recoveries will be displayed regardless of the reserve account or party involved when the Process button is selected.
The selection criteria may be modified. For example, to get a list of recoveries for reserve category #1 from a specific vendor, enter the vendor’s federal ID number (by clicking Browse next to the Party box) and remove the checks from every category except the first one.
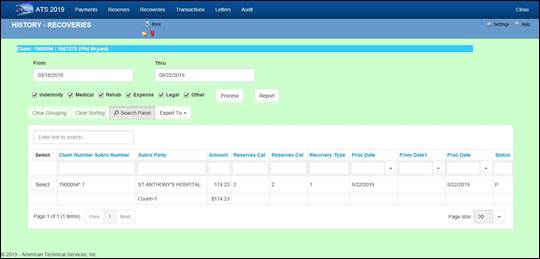
Figure 7‑6: Claim History –
Recoveries
The Audit menu item provides access to a chronological list of all actions that have taken place for the selected claim.
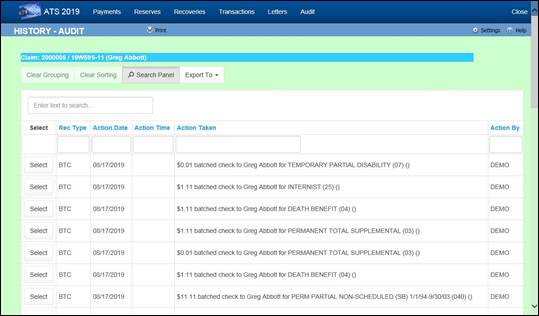
Figure 7‑7: Claim History –
Audit
The ATS Diary is a powerful tool that you may use to remind yourself of things that need to be done. You can create “To Do” notes for yourself and others that may or may not be related to a specific claim. Depending on how the system has been set up, claim specific diary entries may also be generated automatically.
For your convenience, the ATS Diary is available from a number of different programs. In this chapter, we will assume that you have just logged in and clicked the Diary button on the Menu Bar of the Console. Refer to the Claims chapter for specific information on how this feature may be used while you are editing a claim.
Clicking the Diary button will display your Activity List. For example.
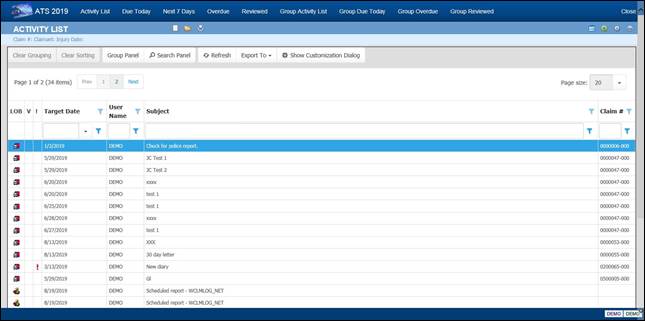
Figure 8‑1: Diary Activity List
Note the column for LOB (Line of Business). If you have installed other ATS products such as ATS/PAC Multi-line Liability or ATS/A&S Disability, the diaries created using those products will appear on the list with the corresponding icon. You may also have different data sources (databases) in use especially if your company is a third-party administrator.
By default, entries will be displayed in order by their Target Date. The oldest entry will be at the top of the list to make it easy to see which one needs to be addressed first.
The default display order may not always be convenient. To change the order, simply click on any of the column headings. Click on the heading again to reverse the order.
Filters are available at the top of each column of the list to help you find specific diaries. In this example, we are searching for diaries that contain “auto” anywhere in the subject, but you can also search for those created by a specific user (adjuster), between certain target dates or for a particular claim number.
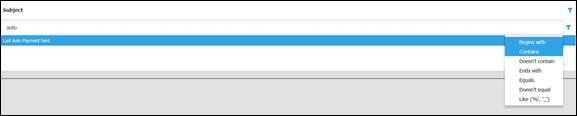
Figure 8‑2: Diary List Filter
There are a variety of different lists available to help you handle your diaries. They are:
· Activity List
· Due Today
· Next 7 Days
· Overdue
· Reviewed
Since all diary entries appear on the Activity List, it is considered the operator’s To Do list. It contains two types of entries. Typically, a diary pertains to a specific claim or first report of injury, otherwise the entry is considered a User diary and that Claim Number column is empty on the list. (You will find that writing notes for yourself and others is a very handy feature.)
The Reviewed tab may be used to view your diaries that are not on the other lists, but are still stored in the table as reviewed.
See also the Calendar section in this chapter for information on another very handy way of viewing diaries.
Operators with supervisor status have an extra set of Menu options to list the diaries for the group of users for which they are the manager or for all users when they have not been specified as a manager. (Supervisors and their groups are defined with the ATS Security System.)
· Group Activity List
· Group Due Today
· Group Overdue
· Group Reviewed
ATS may be set up to generate claim-related diary entries automatically, but you can also create diaries with the File-New menu or toolbar button. This dialog will appear so you
The types of diaries are described as follows:
|
Type |
Description |
|
User Diary |
This type of entry is not related to any particular claim. Typically, these are notes to remind you of something to do such as a staff meeting, but you can also create notes for other operators. (Refer to Reassigning Diary Entries section.) |
|
Current Claim |
This is the default option. The current claim is the claim or first report of injury that has been highlighted on the Activity List. |
|
Selected Diary |
This option may be used to enter a diary for any claim. When selected, the LOB and Data Source fields will be enabled if other ATS products and/or data sources have been installed. (A Claim Selection dialog will appear when you click OK.) |
A sample diary for a claim is shown below. Dates may be typed in or entered with the Calendar button. You will be warned if the date selected falls on a weekend or a holiday.
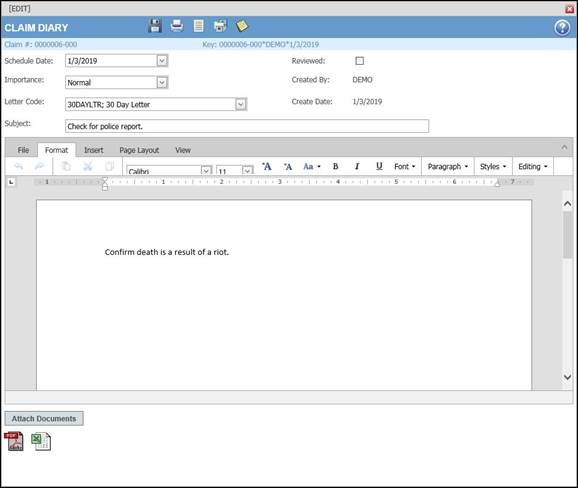
Figure 8‑3: Diary Entry Screen
The Subject is the text to be displayed on the Activity List. Entering a Message is optional. When you finish entering the diary, click the Save and Close button. The new diary will appear on your Activity List.
This is a very handy feature that may be used anytime you know that a certain form or letter needs to be sent on a specific day. The button next to the Letter Code field will list the documents that are available for your use.
There are a variety of operations that may be performed from the button bar. They are:
1. The Attach File button will display the dialog shown below so you can attach any type of file to the diary.
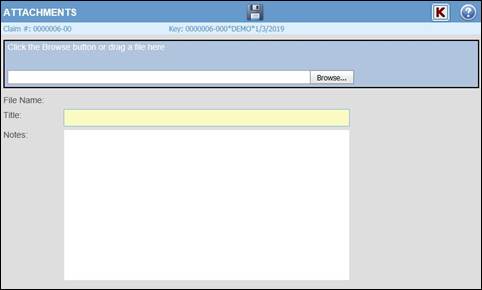
Figure 8‑4: Diary Attachment Dialog
Click the Browse button to find the file you want. By default, the program will look in the user's My Pictures folder. After selecting a file, click the Save button.
2. The Detach button is available if you wish to delete the file you attached previously.
3. The Open Claim button is available to display the case associated with the current diary. If the diary pertains to a report of injury, that case will also be opened.
4. The Show Notes button may be used to display the notes pertaining to the claim or report of injury.
A diary may be opened and edited in the same dialog that is used to create it originally. The subject or message for a diary entry may be edited along with the Scheduled (Target) Date. (See the Reschedule section in this chapter.)
A diary must be marked as reviewed before it can be removed from the Activity List. To do this, edit the entry, check the Reviewed box, and save the record. After you exit, the item will no longer appear on the list. The Mark as Reviewed button is available to users with Supervisor status so they can mark diaries as reviewed without having to edit them.
The Reviewed Diaries option may be used to view diaries that are not on the Activity List, but are still stored in the table as reviewed, in case you wish to see the entries before they are purged.
The diary entries that appear on the current list may be printed by using the Print button.
There are many reasons to reassign diary entries. People may go on leave and need someone to handle their job temporarily, the adjuster on a claim may change, or a person may leave for another job.
Click the Reassign Diary button to list the users who are able to receive diaries. Make a selection and click OK. Afterwards, the entry will appear on the other person’s Activity List, not yours.
At times, it may be necessary to reschedule diary entries. You can open the diary and change the Scheduled Date or click the associated button. A window will open so you can enter the new (target) date.
The Calendar will give you a rough idea of the amount of work to be done on any given day. It is available from the Show menu or the associated button. When the calendar opens, three months will appear the current date (in blue) will be selected by default. The days which have a diary appear in red.
In this example, the Preview Pane has been selected so the contents of each diary will be displayed.
A system administrator should use the following procedure to set up the ATS Diary features:
1. The Diary Transfer, Diary Receive and Supervisor permissions must be set appropriately for each user with the ATS System Security module. The Manager must also be indicated for each user who is not a supervisor so the user’s diaries will appear on the list for the appropriate group.
2. The appropriate values must be set with the Module Parameters screen in order to trigger the generation of claim-related entries.
3. The WCSCAN02 program that generates the claim-related entries must be scheduled to run each day.
4. By default, diaries will appear in yellow or red to indicate that they are due or overdue. When the Diary is selected from the ATS Explore, the Diary/Scan menu is available to set the number of days before a diary will turn color.
Following is the process used to generate forms and letters in ATS. The letters shown are just a sample and your specific letters will depend on your state and custom requirements. Based on the Jurisdiction state you will be presented with State Letters as well as any custom (User) letters.
![]()
![]() Select the letter you want to
produce. Then click Open
Selected.
Select the letter you want to
produce. Then click Open
Selected.
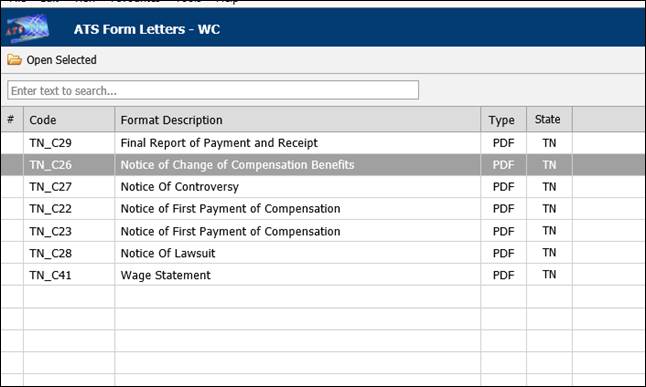
Figure 9‑1: Forms and Letter List
![]()
![]() The letter will generate with
defined fill fields.
The letter will generate with
defined fill fields.
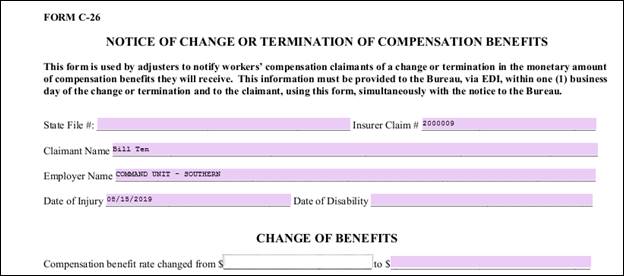
Figure 9‑2: Sample Generated Form
Additional features such as underline and highlight are available.
![]()
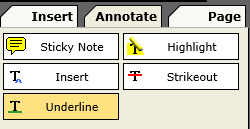
![]()
![]() Once you are done with your
form, you may print,
use Save
and Download
to keep a local copy or email a copy, as well as save the document to the file
history.
Once you are done with your
form, you may print,
use Save
and Download
to keep a local copy or email a copy, as well as save the document to the file
history.
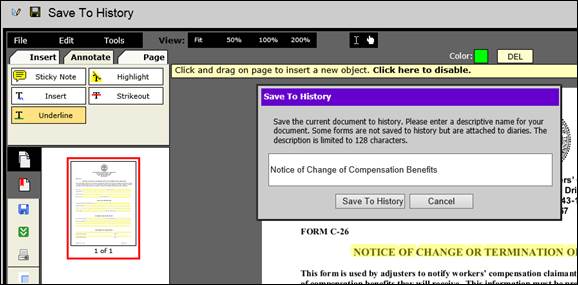
Figure 9‑3: Form Output Options
ATS Reports comes with a wide variety of standard reports that are generally divided into the following categories:
· Claims
· Financial
· Statistical
· Government
· User
However, additional categories may be available, depending on the reports available, and new categories can be created, as required.
In addition to standard reports, ATS provides the option for a web-based Ad Hoc report tool as well as an Analytics reporting tool (Tableau).
Users with the appropriate permission may access the report menus. Those who are restricted to viewing claims for specific regions and/or levels will also be restricted when producing reports.
This chapter will explain how to use the reporting features. Details on specific reports and samples of the output are included in the Appendix.
To access the Report module, select Reports from the Menu Bar of the Console.
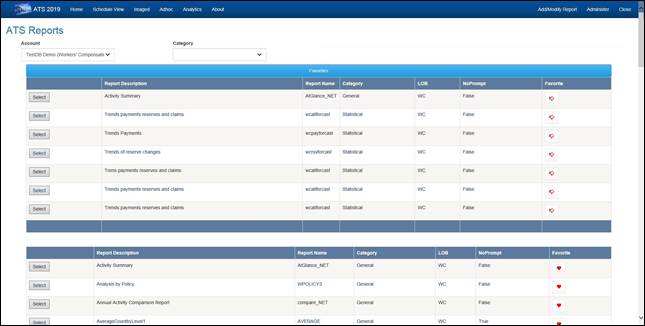 Figure 10‑1: Reports – Home
On the Home page you can select the Account (database) that the report will use when it runs.
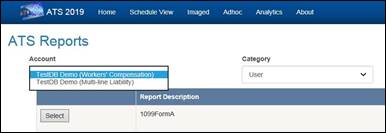
Figure 10‑2: Reports – Account Selection
The following is an example of the output from the “Activity Summary” report.
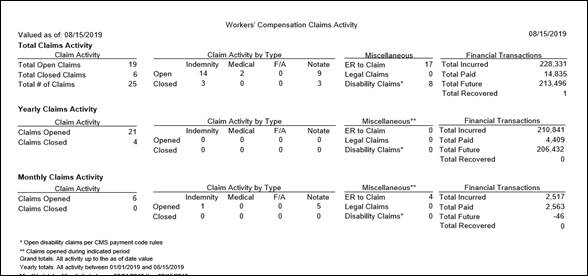
Figure 10‑3: Reports – Activity Summary Report
Sample
All of the report screens operate the same way. They are designed to help you enter the specifications you need to generate a report. Selecting an item such as “Activity Summary” will display a screen with the report parameters.
The following information is requested on the sample form shown below.
ATS allows you to group the departments or divisions in your company into regions. If this feature is used, you may select a specific region for reporting purposes.
When the default value of “ALL” is used, the program will skip this initial selection process and start with the next item.
Note that if a user only has permission to view the claims for a specific region, this field will be set to that value and can’t be edited.
Each claim record contains the codes for the employee’s levels. If you enter a specific code for level 1, the program will read each claim record and select only those for that level.
If a user has permission to view the claims for a specific region, only the levels in that region will be listed.
By default, financial information is based upon the current date. A special valued as-of date may be used to generate some information as it had been on a prior date. The program will provide a snapshot of the Claim data based on the date entered.
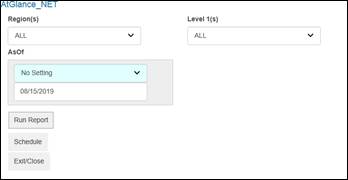
Figure 10‑4: Reports –Activity Summary
Parameter Entry Example
After completing the selection process, the program will check for any specifications that indicate how to display the records such as:
· Display Totals Only
· Print Level 2
· Subtotals
Check the Display Totals Only box to produce a summary report. Remove the check to display the details on the selected claims.
Note that if this box is checked, the details on the closed claims will not appear even if you have used the option to include them.
Some reports will group the selected claims by level 1 and then sort each of those groups by the level 2 code. In that case, the default is to display the subtotals for level 2, but you may have the option of removing the check in order to suppress them.
After selecting options and filling in the parameters, the report can be generated immediately by clicking the Run Report button or scheduled to run at a later time by clicking the Schedule button.
At any time, you can pull up the record for a particular claim and get the current reserves and paid to date figures broken down by reserve category. The totals displayed on the Financial page are stored in the claim record. The details on the specific transactions are stored separately in history. (Reserve transactions are stored in a reserve history table while payment, credit, and void details are in check history.) As each transaction is saved, a routine is run to keep the claim and history in balance.
Since reports that include a Valued As-of Date field must be able to create a snapshot of the claim on a specific date in the past, the financial transactions are taken from history.
Suppose you want a report showing the reserves and payments the way they were on December 31, 2010. The following criteria will select all the transactions processed during 2003 for all claims opened since 1985. The reserve and payment transaction amounts (normally marked with an asterisk) for the various categories will appear as though the report was run on 12/31/2010 instead of the way they are today.
Open Dates
From 01/01/1985
Thru 12/31/2010
Transaction Dates
From 01/01/2010
Thru 12/31/2010
Valued As-of
12/31/2010
The Incurred, Total PTD, and Futures are always the same as those that appear in the claim record. The payment transaction value includes only the payments with Processed Dates within the specified range. Any credit or void applied to a payment after the as-of date will not be reflected on the report. The reserve transaction value includes all changes made up until the Valued As-of Date.
Typically, the information in the reports is sorted by the region and division (level 1) in which the claim occurred. When ”Include all Items” is specified in both of the fields, the program will sort and group the selected records by the region (if used) and then by the level 1 code found in the claim. The records will then be displayed in order by the claimant’s name or claim number.
The description of the report may indicate another sort order. For example, the phrase “By Levels 1 and 2” indicates that the selected records for each level 1 will also be sorted by the code for level 2. In that case, the following order would be used if you have EASTERN, WESTERN, NORTHERN, and SOUTHERN as regions, state codes as level 1, and ST0001, ST0002… as level 2.
EASTERN / MA / ST0001
EASTERN / MA / ST0002
EASTERN / MA / ST0003… EASTERN / ME / ST0111
EASTERN / ME / ST0112…
When the report specifications have been entered, select the Print Preview button on the toolbar to load the report into the report viewer where it can be viewed and/or printed.
If you are printing from the Crystal Report Writer, it is important to note that only the first page of the report is displayed initially. If you click Print at that point, only that page will be printed.
You must go to the end of the report if you intend to print all or selected pages. (Maximize the report so the Go to Last Page button is available.)
ATS reports may be printed by selecting the Print button on the toolbar. A Print dialog will appear so you can specify which printer to use, the number of copies, and the pages to be printed.
Click the Export button to select the specific format you wish to use. Those that Crystal supports are listed below.
Reports produced by the ATS system may be stored in
an image file on the disk. The Image Reports list allows you to view, print,
delete, and/or email these files to someone else. There are a variety of ways
to find the report you want.
The ATS System provides a dynamic dashboard system that provides the ability to view information in graphical format with drill-down capabilities. Dashboards can be configured to display directly on the Console and then expand to the full screen when desired. Dashboards can also be accessed via the Dashboard option on the Console menu bar.
![]()
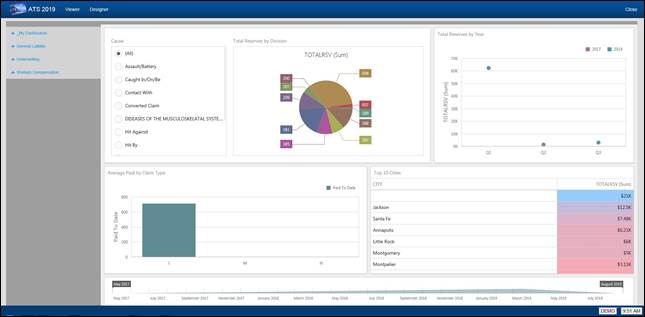
Figure 11‑1: Dashboard Viewer
The Dashboard Viewer allows you to display interactive dashboards that operate on data in real time. Subsets of data can be selected and clicking on specific identifiers within the display will automatically cause the other portions of the screen to display data based on the specified identifier.
The left side of the viewer contains the menu of available dashboards. The menu is broken down by Line of Business and then by category, such as Claims, Financial, etc.
The My Dashboards section of the menu contains any dashboards created by you with the Designer.
The Dashboard designer allows authorized users to create new dashboards that report on information that is meaningful to them.
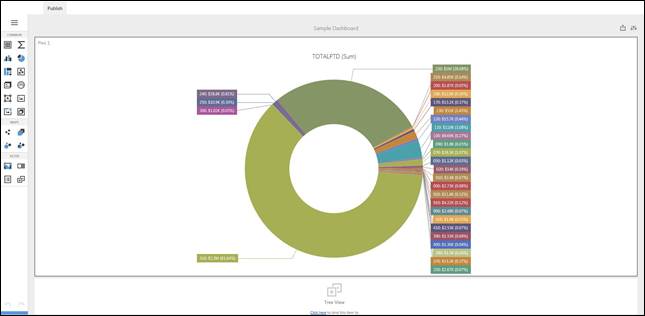
Figure 11‑2: Dashboard Designer
In addition to the web-based designer, a more robust
Windows version is available.
There are a wide variety of easy-to-edit tables that contain the company specific information available when pressing Ellipsis button next to certain fields on the input screens.
The following chart briefly describes the items on the Maintain menus. Each one is covered in detail in this chapter.
Menu Item Submenu Item Contents of Table
Organization
Organization Organizations within the company
Region Regions within the company
1st thru 3rd Levels in the client’s hierarchy
Sub 2 and Sub 3 A 4th and 5th pseudo level
Loss Act Injury act codes
Agency (Source) Source of accident codes
Body - Member Member of body injured
Site Site or part of body injured
Cause Cause/reason for injury
Deductible Deductible codes
Loss Coverage Loss coverage codes
Nature Nature of injury codes
OSHA OSHA codes
Recovery Types Expected recovery codes
Restrictions Restricted duty codes
Severity Severity of injury codes
Type of Coverage Coverage type codes
Type of Loss Loss type codes
Type of Settlement Settlement type codes
Carrier Tables EDI, NCCI and Traveler’sTables
Rsv/Payments/ Recoveries
Indemnity Pay Codes Reserve / cost center account 1
Medical Reserve / cost center account 2
Rehab Reserve / cost center account 3
Expense Reserve / cost center account 4
CC5 (Legal) Reserve / cost center account 5
CC6 (Other) Reserve / cost center account 6
Reserve Types Types of reserve accounts
Reserve Change Reserve account change codes
Recovery Type Recovery type codes
Fed/State Withholding Tax tables
Void Types Void transaction codes
Late Payment Reasons Codes for EDI export purposes
Industry
SIC Standard industry codes
NAICS North American Industry Classification System codes
NCCI National Council on Compensation Insurance codes
NDC National Drug codes
Occupation Occupation codes
Medical Fee
Override Codes to override fee schedule
DRG Codes (ICD-9) DRG or ICD-9 diagnosis codes
Initial Treatment Initial treatment codes
HMO/PPO HMO/PPO provider codes
MOC Managed care organizations
UCR Percentile State UCR percentiles
Provider Specialty Vendor specialty codes
Reason Reason/referral codes for Case Management module
Other
Relationship Relationship to employee
State State specific information
County Country codes for use on custom screens
Employment Status Employment status codes
Location Codes for specific locations
Legal Litigation codes
Forms/Letters
Common Standard ATS forms/letters
User Client-specific forms/letters
Letter Builder Editor for creating HTML documents
User Defined
Tables Lists the client’s custom tables
The Maintenance portion of the system provides the ability to modify the contents of various tables in the database that are used to populate the values in lists.
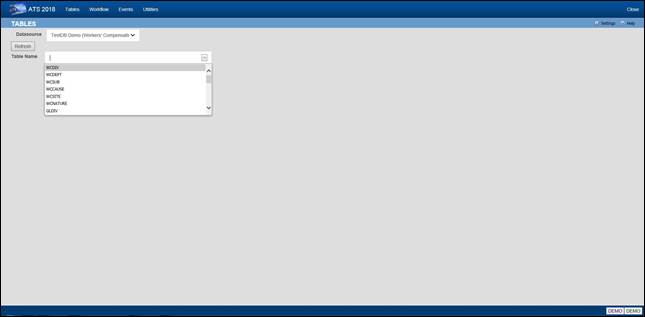
Figure 12‑1: Table Maintenance – Table
Selection
To maintain the values in a table, start by selecting the Datasource where the data resides. Then select the name of the table you want to access. A list of the records contained in the table will be displayed along with all of the values each record contains.
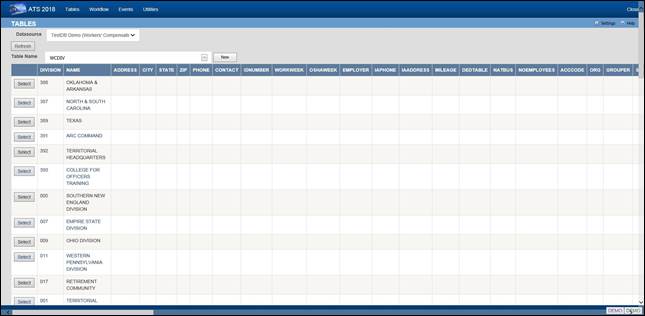
Figure 12‑2: Table Maintenance – Table
Contents List
To edit the values for a particular record, click the Select button next to the list entry. This will open the corresponding editor for records in the table.
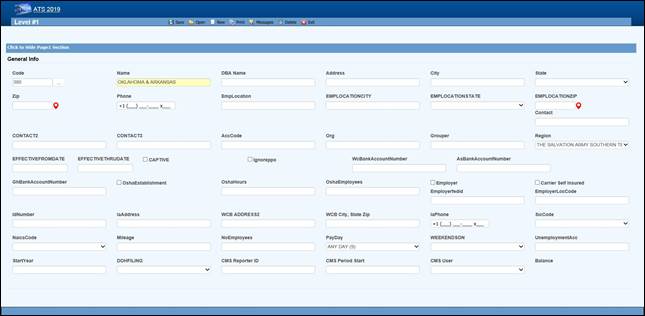
Figure 12‑3: Table Maintenance – Sample Editor
Screen
This menu should be used to define the levels in your company’s hierarchy that will be used to group claims for reporting purposes and enter other information related to the employee. The options will be covered in the order in which they appear on the menu:
· Region
· Level 1
· Level 2
· Level 3
· Level 3 - Sub 2
· Level 3 - Sub 3
· Organization
Regions may be associated with a specific level 1 or state depending on the Region Mode set with Administer-Configuration-Module Parameters. If a user has access to one or more regions and Region View has been set in the user's profile, the operator may view/edit claim and employee records and process payments only in the particular region(s). If these features are to be used, select this menu to enter the region codes on the screen displayed below.
Note that ATS allows bank accounts to be set up for specific regions in any or all of the ATS/Comp modules. When this feature is used, these accounts must be set up with the Process-Trust Fund menu.
The fields are described as follows:
|
Field Name |
Description |
|
Code |
The code to identify the specific region. |
|
Description |
The description of the region. |
|
Trade Name |
The trade (company) name if any. |
|
DBA Name |
A DBA name may be needed if the region is the Responsible Reporting Entity (RRE). |
|
Mailing Address/Phone |
The address and phone number for the region as needed for reporting purposes. |
|
Bank Account Numbers |
If this region has a specific bank account for any or all of the ATS/Comp modules, enter the account number. |
|
Employer |
If this is the only employer in the region, check this box and fill in the rest of the information for reporting purposes. |
|
Self-Insured |
A check indicates that the employer is self-insured. |
|
Emp. Fed ID |
The employer’s tax ID. |
|
Physical Address |
The employer’s address if it is different than the mailing address. |
|
Location Code |
The employer's location code should be entered if it is required on the first report of injury. |
|
Unemployment Account Number |
The employer’s UIAN number. |
|
Pay Day |
The day of the week the employees are paid where 0 = Sun, 1 = Mon, 2 = Tues, 3 = Wed, 4 = Thurs, 5 = Fri, 6 = Sat, and 9 = Any Day. If AutoPay is used and the region is the employer, this information and the day the (work) week ends will be used to schedule the payments to be batched. (For details refer to the AutoPay Mode flag covered in the Parameters-Application section of this chapter.) |
|
Week Ends On |
The day the work week ends should be entered if AutoPay is used and the level is the employer. |
|
DOH Filing |
When New York’s Department of Health’s surcharge needs to be paid, either monthly or annually. |
|
Form Type |
The type of payment to be issued: checks only, checks by default, vouchers only, or vouchers by default. |
|
Effective From/Thru |
The date this region (fund, member, plan) before effective. If it’s no longer use, enter the ending date. |
|
CMS Reporter ID |
The reporter ID if this region is the RRE. |
|
CMS Reporting Group |
The number of the group (from 1 to 12) assigned to the RRE. |
|
CMS User |
The user responsible for creating the export files. A diary will be generated to remind that person to make sure the necessary claims have been batched. |
When generating reports, a client database is normally sorted and broken up into groups depending on the values entered in the level fields. Valid entries for these levels are created using the Maintain- Organization menu.
Whenever levels are displayed on an input screen, they will be labeled Division, Dept (department) and Sub (sub-department) by default. A system administer may customize these labels with the Application Parameters menu.
Although ATS will help you set up your level categories initially, it is important to understand what is involved. For example, suppose you are a nation-wide company of XYZ retail stores. The company would be considered the client in the ATS System. If you have an RIS department to administer the claims, your company would also be the ATS agent. Since your organization is divided into geographical regions, you could use the ATS region feature and levels as shown below. Although codes would be entered in the database, the description is used here for clarity purposes.
Region Level 1: Store Level 2: Department
Western Market SF-CA Women’s Clothing
Eastern Wall Street-NY Kitchen
Central Burlington-IA Furniture
On a report, the claim information may be sorted and grouped by region, store, and department as in:
Central
Burlington-IA
Furniture
claim 1
claim 20
claim 61
Appliances
claim 12
claim 35
Chicago-IL
Linens
claim 23
Eastern…
In another situation, an entity such as the ABC school district may use the following two levels. Sites such as classroom, employee parking lot, and bus would be entered as locations (instead of level three) since there is a cost analysis by location available on the statistical report menu.
Level 1: Division Level 2: Dept Level 3: N/A
Administration Accounting Employee Parking Lot
Instructional Marshall High School Classroom
Transportation School Buses Bus1
The following screen is used to enter information for Level 1. The label and functionality of the Grouper may vary, but otherwise the level screens are similar. The Region, Bank Accounts, CMS and Ignore PPO fields are only available in level 1.
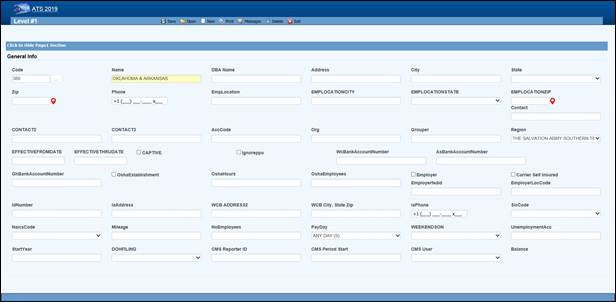
Figure 12‑4: Organization Maintenance – Level
1 Entry
When a specific level is an employer, enter items such as the Address, Fed. ID, SIC Code, and WC ID number if they are required on your state-mandated forms and letters. The Pay Day and Week Ends On should also be entered before scheduling payments with AutoPay.
The fields on the form are described as follows:
|
Field Name |
Description |
|
Code |
The code used to reference a specific level. When the policy feature is in use and the level is used in the policy format code, do not use a hyphen in the level code. Otherwise, the claim program will not be able to find a policy since hyphens are used to separate the parts of the policy code. For example: OK CCC_ADM Not OK CCC-ADM |
|
Name |
The name of the level such as ABC Stores or a functional unit like Administration. This name will appear in reports and on any input screen where the level code is entered. It may also appear on state forms and letters if this level is the claimant’s employer. |
|
DBA Name |
The DBA name. |
|
Mailing Address |
The complete mailing address. |
|
City |
The city. |
|
State |
The state code. |
|
Zip |
The zip or postal code. |
|
Phone |
The phone number. Enter 10 digits and the program will insert the parentheses, space and dash. |
|
Contacts |
The name of one to three contact people at this level. |
|
ACC Code |
An optional code that may be used by the accounting interface when making payments. |
|
ORG Code |
A second accounting/organizational code that may be used for your own purposes. |
|
Grouper |
The label and functionality of this field will vary. Refer to the Level Type Feature section for details. |
|
Effective From/Thru |
The date this region (fund, member, plan) before effective. If it’s no longer use, enter the ending date. |
|
OSHA Establishment |
Check this box if this level is considered an OSHA workplace where the log will be kept. |
|
Hours Worked |
This is the total number of hours worked by all employees during the past year that should be displayed on OSHA's Form 300A. This number may be calculated by multiplying the number of full-time employees times the number of hours worked/year (excluding vacations). |
|
Avg Number of Employees |
This is the annual average number of employees to be displayed on OSHA's Form 300A. This number may be calculated by dividing the total number of payments made to employees during the year by the number of pay periods. |
|
The following fields are only available on the level 1 screen: |
|
|
Region |
If the Region by Level feature has been implemented, this field will appear on the Level 1 form so the code associated with each level may be entered. Refer to the Parameters-Option/Module and Region sections in this chapter for information on using this feature. |
|
Bank Accounts |
Payments may be drawn against a bank account set up for each level. This feature may be used in one or all of the ATS/Comp modules by entering the account number in the appropriate field on this form. (Accounts must also be set up using the Finance-Edit Trust Fund menu.) |
|
Captive |
A check indicates that this level is a captive. |
|
Ignore PPO |
(ATS/Med only) Check this box if the Claims program should ignore the provider’s HMO/PPO discount when calculating the benefit amount to be paid. The field has no effect in ATS/Comp. |
|
The following information should be supplied if the level is an employer: |
|
|
Employer |
Check this box if this level is an employer. The system will use this flag to determine who the employer is when filling out an Employer's First Report of Injury and some of the state-mandated forms and letters. The program will look for the employer by checking in the following order: · Level 3 (starting with Sub 3 and Sub 2) Level 2 · Level 1 · Region State Client |
|
Self-Insured |
Check this box if the employer is self-insured. |
|
Fed ID |
The employer’s tax ID number. |
|
Location |
The location code or number required by the state. |
|
Physical Address |
The physical address if it’s different from the mailing address. Include city, state, and zip for reporting purposes. |
|
UIAN |
The employer’s unemployment account number. |
|
Mileage |
The amount paid for an office visit as a whole number of cents/mile (without a decimal). |
|
Total Employees |
The total number of employees at this level should be entered if it is needed on a state-mandated report. |
|
Pay Day |
The day of the week the employees are paid where 0=Sun, 1=Mon, 2=Tues, 3=Wed, 4=Thurs, 5=Fri, 6=Sat, and 9=Any Day. If AutoPay is used, this information and the day the (work) week ends on will be used to schedule the payments to be batched. (For details refer to the AutoPay Mode flag covered in the Parameters-Application section of this chapter.) |
|
Week Ends On |
The day the work week ends should be entered if AutoPay is used. |
|
WC ID |
The workers' comp or state ID number. |
|
WC Phone |
The phone number of the Workers’ Comp Board. |
|
WC Address |
The address of the Workers’ Comp Board. |
|
SIC |
The SIC code for the business done at this level. |
|
NAICS Code |
The North American Industry Classification System code for this level. |
|
DOH Filing |
When New York’s Department of Health’s surcharge needs to be paid, either monthly or annually. |
|
Fiscal Year |
The start of the fiscal year in a MMDD format as 0101 or 0701. |
|
CMS Reporter ID |
The reporter ID if this region is the RRE. |
|
CMS Reporting Group |
The number of the group (from 1 to 12) assigned to the RRE. |
|
CMS User |
The user responsible for creating the export files. A diary will be generated to remind that person to make sure the necessary claims have been batched. |
The label and functionality of the Grouper field will vary depending on whether the Level Type value has been set to “Validate”, "Backfill” the default, or "None” in the Application Parameters. If this field contains:
1. Validate - the Claim and Employee programs will use the level 1 entry to determine which item(s) are valid for the subsequent levels and generate the selection lists accordingly.
In this case, the label for the next level will appear on the form (e.g. the level 1 Grouper field would be labeled Dept by default). Clicking the Ellipsis button will display a dialog with a list of the available codes for level 2.
Select the item(s) that are associated or valid for the specified level and click Add. The first entry in the top list box will be marked with an asterisk (*) to indicate that it is the primary code that will appear on the input form. To move another item to the top of the list, highlight the entry and click the Make Primary button. Clicking Remove will take the selected item off the list.
The Grouper is labeled “N/A” in level 3 since it provides no function when the Validate feature is used.
2. Backfill - the Grouper field will be used to link specific levels in the client’s hierarchy as in the following example:
Code Grouper
Level 1 ABCST1 ABCST
Level 2 CA123 ABCST1
Level 3 101 CA123
In level 1, "Grouper" will appear as the label and the contents of the field may be used for grouping similar levels on a custom, adhoc report. In the example above, “ABCST” would group information on all the ABC Stores (ABCST<n>) together.
In levels 2 and 3, the label for the previous level will appear on the form (e.g. Division on the form for level 2 and Dept for level 3). Clicking <F4> will display a list of the available codes. Select the one associated with the current level. In the example, “ABCST1” would be entered as the Grouper in the record for level CA123.
When you are entering a new claim or employee record, you can enter the code for level 3 (101) and the program will use the value in the Grouper field to fill in the codes for the other levels (CA123 and ABCST1) automatically.
These menu options may be used if you have more than three levels in your company's hierarchy. The codes are entered on a screen similar to the one used for Level 3.
Sub 2 and sub 3 are referred to as pseudo levels 4 and 5 since the Level Type feature that validates or backfills levels 1 through 3 does not recognize these codes.
The claim forms that you are using must be modified in order to use these codes.
Loss codes are entered in the claim to describe the agency, body site, cause and nature of the claimant’s injury or illness since this information is required on many state forms. A system administrator may change the labels for these codes with the Application Parameters menu so different text may appear on your input forms.
Special cost analyses by the standard loss codes mentioned above may be produced using Statistical Reports to determine if there are any trends that need to be addressed.
You may have a custom set of claim forms that allow you to enter additional codes. All of the codes on the menu are briefly described on the following chart.
|
Loss Codes |
Description |
|
Act |
The act which caused the injury or accident. |
|
Agency (Source) |
The source of the accident for further breakdown of the cause such as slippery floor. |
|
Body Site |
The part of the body which was injured such as the abdomen. |
|
Body Member |
The member of the body which was injured. |
|
Cause |
The reason for accident (e.g. slip and fall). |
|
Deductible |
The coverage deductible codes. |
|
Loss Coverage |
The codes for the loss coverage plans. |
|
Nature |
The nature of injuries such as sprained or broken. |
|
OSHA |
The Occupational Safety and Health Administration codes. |
|
Recovery Types |
The codes which indicate the degree of recovery that is expected. |
|
Restricted Duty |
The codes which describe the type of restricted duty. |
|
Severity |
The codes which identify the severity of the injury. |
|
Type of Coverage |
The codes which identify the type of coverage. |
|
Type of Loss |
The codes which identify the type of loss. |
|
Type of Settlement |
The codes which identify the type of settlement that was granted. |
The screen used to maintain the Cause codes is shown below. The same one is used for all the loss code tables except for the OSHA and restriction screens that only contain a code and description.
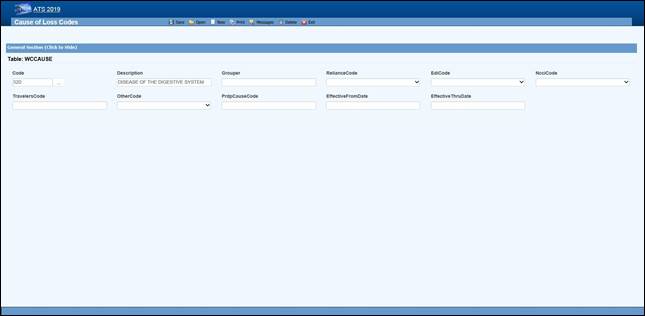 Figure 12‑5: Loss Maintenance – Cause Code
Entry
Figure 12‑5: Loss Maintenance – Cause Code
Entry
Note the NCCI code above. Unless you normally use NCCI codes, you must select a code equivalent to the cause, site and nature codes you use in-house if you report transactions to the state via EDI.
The loss code menu options prompt for the following information:
|
Field Name |
Description |
|
Code |
The code used to describe the accident or injury. Description The description associated with the code. |
|
Grouper |
A value that may be used to sort and group records for reporting purposes. For example, you might enter ACTS_GOD as the Grouper code for wind, earthquake, lightning etc. |
|
Effective From/Thru |
The range of dates the code was effective. |
|
Exclude from Web |
Check this box if the code should not be available on the list. |
|
Carrier Codes |
The fields for the insurance carriers are disabled unless your system has been setup to use them. In that case, the codes for the carriers you deal with must exist in the appropriate carrier table before you can associate them with a specific loss code. |
|
Carrier Tables |
Suppose you need certain loss codes for reporting/exporting purposes, but you do not use them internally. In that case, you would have to add the codes in the appropriate carrier table so that they can be entered into the standard loss tables for cross reference purposes. To do this: 1. Select the List option on the Loss-Carrier Tables menu and pick the desired table. 2. Enter the codes you need. 3. Enable the appropriate field (e.g. NCCI Code) on your loss screen. (A system administrator has the authority to do this.) 4. Modify the record for each code by entering the equivalent carrier’s code. Typically, the Data Export program will search for the appropriate carrier code. If the field is empty, the program will use the Code that you use in-house. |
The ATS System uses the information in a set of tables to classify the different types of reserve, payment and recovery transactions that may be made. Before discussing the various tables in this group, it is important to clarify some of the terminology that is used in this manual.
|
Term |
Description |
|
Reserve Type Codes |
These refer to the types of cost center or payment categories. By default, ATS supports four reserve categories, but this number may be increased to six with the Tables-Parameters-Application menu. The names of the first four categories should be indemnity, medical, rehab, and expense. Categories five and six are normally legal and other, but may be changed. Labels for the categories are entered with the Reserve Types option on this menu. |
|
Cost Center Codes |
Payment codes related to a specific cost center. These items are normally labeled “”CC” or “Pay Code” on the ATS input screens. The options will be covered in the order in which they appear on the menu: · Indemnity · Medical · Rehabilitation · Expense · Legal · Other · Reserve Types · Reserve Changes · Recovery Types · Void Types · Late payment Codes · Federal/State Withholding |
Cost Center codes are also referred to as payment codes in the ATS System since they are used to track payments against particular categories of reserve accounts. All categories of cost center codes are entered on a screen identical to the one shown below.
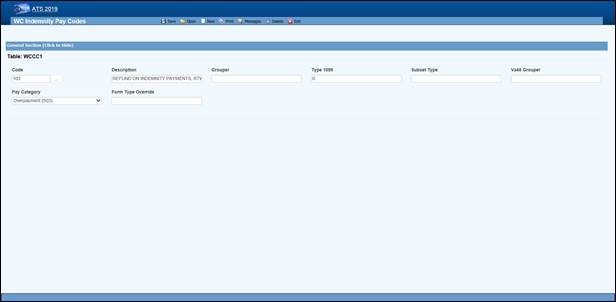 Figure 12‑6: Payment Maintenance – Cost Center
Code Entry
Figure 12‑6: Payment Maintenance – Cost Center
Code Entry
The following information is stored for each of the cost centers:
|
Field Name |
Description |
|
Code |
The cost center or payment code. These items are normally labeled “Pay Code” on the ATS screens. |
|
Description |
The description of the code. |
|
Group |
The code used in making time loss payments (TD), calculating the loss of earning percentage (LEP) or grouping similar items together on a report. See the notes below. |
|
1099 - Misc Amount Type Code |
Enter values of income (3), medical (6), non-employee compensation (7), gross proceeds to an attorney (C) if the pay code refers to a 1099 reportable item. Contact your accounting department if you have questions about entering these values to ensure that the amount on a vendor’s 1099 return is correct. |
|
Sub Type |
This value will be used to generate New York’s C-8 report. The special payment categories may be either “L” (Lump Sum), “D” (Death), or “F” (Disfigurement). |
|
Report Grouper |
Special codes needed to classify payments for some specific reporting purposes. ATS support will let you know when you will need to use this field. |
|
Category |
Many states require employers to submit certain payment information. If you have to produce this type of report, it is important to enter the associated category for the payments that need to be included. |
1. The Days Lost and OSHA Days are calculated when comp payments are made for an indemnity or rehab pay code that contains “TD” in the Grouper field. (Note that TTD and PTD are valid TD codes.)
2. AutoPay may also be used to schedule permanent disability payments when the Grouper field in the pay code contains “PD”.
3. Several of the standard reports review the check history table and total the benefits paid to date. In order for this feature to work correctly, the appropriate benefit type code must have been entered in the Grouper field for the pay codes. For reserve category #1 (indemnity) this code may be either “TD” or “PD”. Only TD is recognized for pay codes in reserve category #3 (rehab).
The ATS System can maintain up to six cost centers or reserve accounts. The first four categories should be used since they are required for state reporting purposes. Their names should not be changed. They will appear whenever the reserves are displayed on input forms and reports.
|
Cost Center |
Payments Related To |
|
1 |
Indemnity |
|
2 |
Medical |
|
3 |
Rehabilitation |
|
4 |
Expense |
|
5 |
Legal or state statutory benefits such as California’s 4850 |
|
6 |
Other categories that are not already defined |
In order to use five or six reserve categories, a parameter must be set in Application Parameters. The names of these categories are normally “Legal” and “Other”, but they may be changed.
Selecting the claim type is one of the first things done when entering a new claim. If either indemnity or medical is specified, the program will check to see if there are any default reserve values. In the example above, $500 will automatically be displayed as the medical reserves for a new medical claim. No medical reserves will be entered for indemnity claims.
Whenever the reserves for a claim are changed, the program will ask the operator to select a code to explain why the change was made before the record can be saved. The History module may be used to view this information along with who made the change and when.
This option is provided so you may enter the Reserve Change codes you need along with their descriptions.
Some sample codes are listed below.
001 Reserve Adjustment
001N Initial Reserve - New Claim
002 Time Loss
003 Surgery Scheduled
004 Second Surgery
005 Surgery Unsuccessful
006 Healing Delay - Injury Related
007 Healing Delay - Other Medical
008 Residuals Predicted by Medical
009 Residuals Greater than Predicted
010 Vocational Assistance Needed
011 Recovery Granted
012 Litigation - Additional Comp
013 Change in Compensation Rate
014 Change of Physician
015 Unsuccessful RTW
016 Change of Diagnosis
017 Benefit Reduction
018 Recalculation - PTDs and Fatals
019 Reopening Reserve
020 Administrative Delay
021 Reduction - Submitted for Close
022 Reduced-Residual less than Predicted
023 Reduced - Successful RTW
024 Reduced - Medically Stable
This option displays the following form so you can enter the codes for the types of recovery transactions that can be made.
This option displays the following form so that you can enter the codes to classify the types of void transactions that can be made.
The states that accept reports electronically require a code to indicate a reason for issuing an initial indemnity payment more than 14 days after the date of injury. This menu option is provided so you can enter the appropriate code when you are making the payment.
The valid codes are:
L1 No excuse
L2 Late notification employer
L3 Late notification employee
L4 Late notification jurisdiction transfer
L5 Late notification health care provider
L6 Late notification assigned risk
L7 Late investigation
L8 Technical processing delay computer failure
L9 Manual processing delay
LA Intermittent lost time prior to first payment
C1 Coverage lack of information
E1 Wrongful determination of no coverage
E2 Errors from employer
E3 Errors from employee
E4 Errors from jurisdiction
E5 Errors from health care provider
E6 Errors from other claim administrator/IA/TPA
D1 Dispute concerning coverage
D2 Dispute concerning compensability in whole
D3 Dispute concerning compensability in part
D4 Dispute concerning disability in whole
D5 Dispute concerning disability in part
D6 Dispute concerning impairment
These menus have been provided primarily for use with the ATS/A&S Disability module where taxes need to be withheld from the employee’s benefits. Although the Claim program uses Maine’s state tax table to calculate the benefit rate, the input screens have not been included in this manual since ATS personnel maintain the tables on a yearly basis.
This menu is provided for ATS customers who make payments with the optional, add-on Medical Fee module although some of the codes for initial treatment and managed care organizational (MCO) may be used when entering a claim or an employer's First Report of Injury.
Each of these menu items will be covered in the following sections:
|
Menu Item |
Description |
|
Override |
The codes to use when a payment is different from the amount based upon the RVS or UCR codes. |
|
DRG Codes (ICD-9) |
The DRG or ICD-9 codes to be used when entering a new claim. |
|
Initial Treatment |
The codes used to categorize the initial treatment that was provided. |
|
HMO/PPO |
The HMO/PPO providers that your vendors use. |
|
MCO |
The managed care organizational type codes. |
|
UCR Percentile |
The usual and customary reimbursement (UCR) percentile for specific states. |
|
Provider Specialty |
The codes to describe a vendor’s specialty. |
ATS maintains the tables with the Relative Value Schedule (RVS) codes and fee schedules for the individual states so these options do not appear on the menu.
When making a payment with the Medical Fee module, you may enter an override code to explain the reason why the amount paid is different than the amount the provider charged for the item. The following screen is used to enter and/or edit these codes.
The ATS System comes with the standard ICD-9 table that contains the physician’s diagnosis or procedure (CPT) codes that may be entered when making a payment with the Medical Fee module. ICD-9 codes may also be used when tracking the care provided to the claimant with the optional Case Management module. The table also contains cause of injury codes. The cause and diagnosis codes will both be required when submitting a claim for a Medicare beneficiary to the CMS (Centers for Medicare and Medicaid Services).
This is a BIG table with over 12,000 records. Each record only contains the code and description so there is no reason to search for and/or view them. Contact ATS support if you would like a listing of the codes.
When entering a new claim or an employers’ First Report of Injury, codes may be specified to indicate the type of initial treatment that was provided. A table for these codes is maintained using the following screen.
The valid codes for reporting to the state are:
00 NO MEDICAL TREATMENT
01 MINOR BY EMPLOYER
02 MINOR/HOSPITAL
03 EMERGENCY CARE
04 HOSPITALIZED 24 HOURS
05 FUTURE MAJOR MEDICAL/LOSS TIME ANTICIPATED
The ATS System allows you to maintain a list of HMO and PPO providers that may be associated with a particular vendor. When making a payment with the optional Medical Fee module, the program will check to see if the specified vendor has an HMO/PPO with Valid From/Thru dates that cover the From date in the payment record. If so, it will look in the HMO/PPO’s record for an alternate Rate Table (the RVS fee schedule) to be used to calculate the acceptable amount for the item that was billed. Note that the code fields at the bottom of the screen are used in the ATS Group Health product. A sample provider record is shown below.
Enter the data as described below:
|
Field Name |
Description |
|
Code |
The HMO/PPO code. |
|
Description |
The description used to identify the HMO/PPO. |
|
Valid From/Thru |
The range of dates covered by this provider. |
|
Discount |
Any discount to be applied when calculating the acceptable amount to be paid. |
|
Rate Table |
The alternate rate table to be used when making payments with the Medical Fee module. If this field is empty, either the table for the vendor’s state or the state specified as the Fee State Code with the Tables-Parameters- Option/ Module menu will be used by default. See the Medical Fee-Bill Review section for details. |
|
Message |
A message to be displayed during the payment process. |
|
Code Fields |
The fields at the bottom of the screen are used in the ATS Group Health product. |
Managed Care Organization (MCO) codes may be specified in the optional, add-on Case Management or First Report of Injury modules. A table for these codes is maintained using the following screen.
The Bill Review program in the Medical Fee module may use a third party product to track the state’s usual and customary reimbursement (UCR) percentile by zip code instead of, or in conjunction with, the state’s RVS fee schedule. To use this feature, a percentile between 1 and 8 must be entered for the state. (Please refer to the Finance-Medical Fee section for detailed information on setup and usage.)
The ATS Group Health Claims program may also use a third party UCR product to calculate benefit payments. In that case, enter the GH Percentile.
The Reason Codes option on the menu displays the following screen so the codes to explain why a referral has been made may be entered for use in tracking the claimant’s medical treatment with the optional Case Management module.
This standard table provided so you can enter the providers specialty in the vendor’s record. Each record contains a code, classification and specialization as you can see on the list. Use the Search button if you want to view a particular item.
Access is provided to standard industry tables that have been purchased and converted for use in the ATS System. Normally, the codes should not need to be edited.
The ATS System comes with a table of Standard Industry Classification (SIC) codes since the code for the employer is often required on state mandated forms and letters. This menu option displays the following form so you can view and/or enter the SIC code you need to identify the nature of business in the appropriate record(s) for the employer. If there are equivalent North American Industry Classification System (NAICS) codes, they may be entered for cross-reference purposes.
This menu option may be used to view and/or enter the North American Industry Classification System (NAICS) codes. The form used to maintain this table is similar to the one shown above.
The job classification codes in this table are from the National Council on Compensation Insurance, Inc. (NCCI). They are available for use in the Employer’s Report of Injury module.
The National Drug Code table has been provided for use when tracking the care provided to the claimant with the optional Case Management module. Use the Search button if you want to view a particular item.
ATS provides you with a table for storing occupation or job codes. When these codes are associated with specific claims, reports can be generated to determine any trends that should be addressed.
The form below is used to enter your codes. Note the fields for some of the insurance carriers. Suppose you deal with Travelers and need to send them data. In that case, enter the equivalent code if it is different from the one you entered in the first field. The data export program will check the Traveler Code field. If the field is empty, the program will assume that it should use the data in the Code field.
This table contains the following information. If you plan to use special carrier codes, you must use the appropriate options on the Carrier Tables menu to enter the codes before they can be displayed on the selection lists.
|
Field Name |
Description |
|
Code |
The code that is used internally to identify a specific occupation. |
|
Description |
The description used to identify the occupation. |
|
Grouper |
A value that may be used to sort or group similar occupations for reporting purposes. For example, occupations might be grouped by payment type (salaried, hourly…). Nurses might be grouped by shift number and so on. |
|
Effective From/Thru |
The period in which the code should be on the selection list. |
|
Exclude From Web |
A check indicates that the code should not be listed on the Web. |
|
Carrier Codes |
The equivalent code for the carrier(s) if it is different from the one you use internally. |
A special table is provided to store the employment status codes you wish to use. A sample is shown below.
The fields on the form are described as follows:
|
Field Name |
Description |
|
Code |
The code for the employment status may be numbers such as 01, 02, 03, etc. or letters like “FT” (full-time), “TEMP” (temporary), and “VOL” (volunteer). |
|
Description |
The description of the employment code. |
|
Full Time |
Check this box if the code is used for a full-time position. Since a variety of codes such as "FULL", "F", and "FT" may be used to indicate "FULL-TIME", ATS programs will use this value to determine whether a position is full-time for reporting purposes. |
|
Effective From/Thru |
The period in which the code is valid. |
|
Exclude from Web |
A check indicates that the code should not be listed on the Web. |
|
EDI Code |
If you are sending claims to the state via EDI, enter an EDI code for each code you use in-house, The valid codes are: · Regular Employee · PT Employee · Seasonal · Unemployed · Volunteer Worker · On Strike · FT Disabled · Apprenticeship · PT Retired · Piece Worker · Other |
This menu option is provided so you can enter the relationship codes you need to use when filling out a record on an employee’s dependent.
If you will be reporting claims for Medicare beneficiaries to the CMS, enter the following codes:
Code Description
F Family Member, Individual Name Provided
O Other, Individual Name Provided
X Estate, Entity Name Provided (e.g. "The Estate of John Doe")
Y Family, Entity Name Provided (e.g. "The Family of John Doe")
Z Other, Entity Name Provided (e.g. "The Trust of John Doe")
This menu option may be used to enter the codes you need in order to indicate the location where the accident/injury occurred. If you produce OSHA logs, it is important to note that the location of the accident will appear on the report.
The Grouper field may be used to group similar locations for ad hoc reporting purposes. For example, you may have a number of register aisles with codes 18 though 24. If REG is entered as the Grouper in these records, all the claims for accidents that occurred in any of these locations could be grouped together on a custom report.
This menu is provided for clients who wish to use special litigation codes in a claim. The Grouper may be used to sort records in a custom report.
This menu option allows you to enter special codes that may be used to describe the limitations that could apply to a claimant’s Restricted Days due to an accident or illness.
This table contains the following:
|
Field Name |
Description |
|
Code |
A code such as “NL” to indicate the type of restriction. |
|
Description |
The description of the code where “NL” might be “NO LIFTING”. |
This menu option displays the following form so you may enter the state specific information that will be used throughout the ATS System.
The specific fields are described as follows:
|
Field Name |
Description |
|
Code |
The code for a specific state or province. |
|
Description |
The name of the state or province. |
|
OWCP Schedule |
Check this box if the Bill Review program should compare the state schedule with the OWCP schedule for federal claims. |
|
Fee Schedule |
Check this box if the state has a fee schedule. (This information is used in the Medical Fee module.) |
|
State Days |
The number of days in the state’s work week which is used to calculate the claimant’s lost work days when making time loss (indemnity) payments. |
|
OSHA Days |
The number of days in the OSHA week which will be used to calculate the lost OSHA days when making time loss payments. This number should be seven since OSHA now uses a calendar year. |
|
Waiting Period |
The default number of days in the state’s waiting period is 7. Verify that the correct number has been entered for the state(s) you deal with. This value (and the next one) must exist before the Pay Waiting Period set with the Administer-Configuration-Diary/Scan Parameters menu will be used to generate diary entries. The Waiting Period and Before Paid values will also be used to determine whether the waiting period has been paid when calculating the Lost OSHA Days for the OSHA 300 and the appropriate dates when the Auto Compensation button has been selected to schedule new auto payments. |
|
Before Paid |
The number of days before the waiting period may be paid. The default is 21. |
|
Subro Statute |
The days before the state’s statute expires should be entered if the corresponding field set with the Tables-Parameters-Diary/Scan menu is to be used to generate a diary. |
|
Check Summary |
Check this box so the program will examine each indemnity payment and enter a transaction record whenever there are changes in the Comp benefit period (e.g. the rate or benefit type changed). This feature is required to produce some state reports such as New York’s SI-4 and C8. When used, a Comp Period button will appear in the AutoPay and History modules so you can review the changes. |
|
Region |
A region code should be entered if the Region by State feature has been set up with the Tables-Parameters-Option/Module menu. |
|
Hospital Tax |
The hospital tax percentage should be entered when required for state reporting purposes. |
|
Care Tax |
A state care tax percentage to be applied when making payments with the Medical Fee Module. |
|
Federal District # |
The number of the federal district in which this state is located. No Fault Insurance Check this box if the state mandates no fault insurance. |
|
No Fault Limit |
The limit set by the state. |
|
Claim Screen |
The name of a custom screen to use when a claim is for this particular state of jurisdiction. |
|
ER Screen |
The name of a custom screen to be used to enter reports of injury for the specified state. |
|
EDI Release |
The number 1 or 3 to indicate which IAIABC release the state supports. |
|
EDI Sender EDI Receiver |
The federal ID number and ZIP code for the party sending and receiving the EDI information. This data is required in order to transmit the records electronically. |
|
EDI Trading Partner |
The ID number assigned to you by the state. Depending on the state, this number may be an element in the name of the export file. |
|
Employer |
Check this box if there is only one employer in the specified state. |
|
Name Address |
The name and address for the employer that should be used on state forms and letters. |
|
Fed ID # |
The employer’s federal ID number. |
|
Self-Insured |
Check this box if the employer is self-insured. Entering the From and Thru dates the employer was/is self-insured is optional. |
|
Wage Statement |
The code for the state’s wage statement. |
|
Pay Day |
The day of the week the employees are paid where 0=Sun, 1=Mon, 2=Tues, 3=Wed, 4=Thurs, 5=Fri, 6=Sat and 9=Any Day. If AutoPay is used and the state record identifies the employer, the Pay Day will determine how to schedule the print dates depending on the AutoPay Mode set with the Tables-Parameters-Application menu. |
|
WC ID |
The employer’s workers’ comp or state ID number. |
|
WC Address |
The worker’s compensation or OWCP address. |
|
DBA Name |
The DBA name of the employer if one exists. |
|
CMS Reporter ID |
The Reporter ID if the employer is an RRE. |
|
CMS Reporting Group |
The group number (from 1 to 12) assigned to the RRE. |
|
CMS User |
The user responsible for creating the export files. |
|
Ongoing Responsibility |
Check this box if the state mandates that employers assume responsibility for all medicals for the employee’s lifetime. |
100% Dependent, 21
1099, iii, 11, 23, 24, 25, 26, 27, 135
Active, ix, 12, 24, 59
Activity List, x, 107, 108, 109, 110, 111, 112
Adjuster, 18, 41, 90
Agency, 45, 122, 132
Agent, 32, 33
AKA, iii, 15, 19
Alternate Claim Number, 90
Application Parameters, 29, 37, 40, 45, 48, 55, 56, 69, 75, 76, 77, 81, 82, 83, 93, 127, 130, 131, 136
Attachment, x, 64, 111
Attachments, iv, 63
Audit, iv, vi, x, 64, 67, 101, 105, 106
Auto Close, 56, 69
Auto Setup, iv, 57, 79, 80, 81, 83
AutoPay, iii, x, 42, 44, 46, 57, 78, 79, 82, 83, 126, 128, 130, 135, 144, 145
Bank Account, 17, 25, 126
Basic Pay, 42
Batch, iv, vi, ix, x, 36, 37, 44, 69, 70, 71, 77, 78, 81, 82, 88, 89, 90, 96, 97, 99
Batched Payments, v, 74, 87, 94, 96
Benefit, 43, 68, 76, 79, 81, 136
Benefit Type, 43, 68, 81
Bill Review, 25, 61, 74, 91, 140, 144
Biller ID, 24
Birth Date, 15, 21
body parts, 45, 48, 71
Body Parts, iv, 45, 46, 71
Body Site, 45, 49, 61, 71, 132
Bundling, v, 91, 93, 94
care tax, 144
carrier, ix, 32, 48, 72, 122, 133, 141, 142
Case Management, 51, 123, 139, 140, 141
Cause, ix, xi, 10, 42, 45, 46, 61, 122, 132
Central Index Bureau, 60
Checks, v, 86, 90
CIB, 60
claim number, 11, 16, 33, 34, 37, 38, 44, 52, 54, 55, 74, 88, 95, 97, 108, 119
Claim Number, 34, 37, 38, 44, 55, 90, 108
Claim Selection, x, 55, 109
Claim Type, 38, 41, 50, 54
Claimants, 18, 20
Claims, i, iii, v, ix, x, 4, 5, 12, 16, 24, 34, 39, 55, 56, 78, 89, 98, 107, 115, 120, 129, 140
Close Claim, iv, 69
Closed Date, 42
CMS, iv, 16, 20, 22, 40, 42, 44, 45, 48, 52, 53, 71, 72, 126, 128, 130, 139, 143, 145
Combine Vendor, 26
Console, 2, 3, 35, 58, 107, 115, 120
cost center codes, viii, 134
Country, 24, 123
CPT, 92, 93, 94, 139
Credit No Check, v, 85
Credits, v, 49, 74, 84
Cumulative Limit, 83, 84
dashboard, 5, 120
Dashboard, xi, 5, 120, 121
Dashboards, vii, 3, 120
date of birth, 15
Date of Injury, 42, 61, 72
Day of Injury Paid, 29
Days per Week, 29
DBA Name, 24, 126, 128, 145
Death Date, 42
dependent, 20, 21, 22, 42, 57, 75, 80, 142
Dependents, iii, 16, 20, 22, 42, 43, 57
Dept, 16, 29, 30, 40, 126, 127, 130, 131
Diary, iii, vi, vii, x, 5, 34, 42, 58, 59, 107, 108, 109, 110, 111, 112, 144
direct deposit, 14
Direct Deposit, 17, 25
District, 24, 144
Division, 16, 29, 40, 126, 127, 131
Document Manager, x, 73
DOH, 26, 126, 130
DRG codes, viii, 123, 138, 139
EDI, iv, ix, x, 34, 36, 37, 47, 69, 70, 78, 122, 123, 132, 142, 144, 145
EDI Date, 34
EDI Export, iv, 34, 37, 69
EFC, iv, x, 73
Electronic Filing Cabinet, 73
E-mail, 24
employee, 9, 14, 15, 16, 17, 18, 19, 20, 21, 22, 26
Employee, ix, 14, 16, 17, 18, 19, 20, 21, 28, 35, 39, 55, 127, 130, 142
Employee #, 16
employees, 15
Employees, 14
Employer’s Report, ii, iii, ix, 18, 19, 28, 29, 30, 31, 32, 33, 34, 35, 36, 37, 38, 45, 141
Employment Type, 16
EOB, 94, 95
Examiner #, 25
Exemptions, 16
Explanation of Benefits, v, x, 91, 94, 95
Fatal Injury, 31
fee schedule, 144
fee schedules, 94, 138
Fee Schedules, v, 94
Firm Name, 52
First Day Lost, 80, 81
First Report of Injury, 15, 28, 32, 34, 42, 129, 138, 139, 140
forms and letters, 66, 113, 128, 129, 141, 145
Forms and Letters, vii, 113
FROI, 28, 29, 33, 35
garnished, 16, 58
Gender, 21, 71
General Payments, iii, iv, 60, 74
HICN, 16, 44, 71
Hire Date, 15
History, iv, vi, x, 49, 54, 60, 64, 65, 66, 83, 85, 86, 87, 101, 102, 103, 104, 105, 106, 136, 144
HMO/PPO, viii, 26, 91, 123, 129, 138, 139, 140
hospital tax, 144
Hospitalized, 48
Hours per Day, 29
IAIABC, 28, 29, 30, 31, 32, 40, 43, 144
ICD-9, viii, 45, 46, 48, 72, 92, 123, 138, 139
Injury Date, 6, 30, 37, 38, 41, 42, 54
Injury Time, 41
Insurance Services Offices, 60
Invoice Number, 78
ISO, iii, x, 46, 60
Key Map, ix, 8
Knowledge Date, 30
Last Work Date, 30
Legal Firms, x, 51, 52
Letter Code, 103, 110
Line of Business, 107, 120
Litigation, viii, x, 48, 51, 52, 53, 71, 123, 136, 143
LOB, 62, 107, 109
Location Code, 24, 126
Login, 1
Longshoreman, 48
loss codes, 3, 31, 45, 131, 133
Loss Codes, ix, 31, 32, 131
Lost Time, 48
Managed Care Organization, 140
Marital Status, 15
maximum medical improvement, 47
MCO, 138, 140
Medical Fee, iii, v, viii, 25, 26, 61, 90, 91, 93, 123, 138, 139, 140, 144
Medicare, 16, 20, 42, 44, 48, 71, 72, 139, 143
Medicare Beneficary, 44
MMI, 47, 78
NAICS, 123, 130, 141
national council on compensation insurance, viii, 123, 141
national drug code, viii, 141
Nature, 45, 49, 61, 122, 132
NCCI, viii, 29, 48, 122, 123, 132, 133, 141
NDC, viii, 123, 141
Next Check, 80, 81, 82, 83
north american industry classification system, viii, 123, 130, 141
Notes, iii, iv, x, 17, 26, 34, 53, 61, 62, 64, 111
NPI, 24
Occupation, viii, 16, 123, 141
One Time Limit, 83, 84
Open Date, 38, 42, 54
ORM, 44, 72
OSHA, 33, 42, 45, 46, 47, 48, 71, 77, 82, 122, 129, 132, 135, 143, 144
Paid as Billed, 26
Pay Code, 24, 80, 81, 90, 134
Pay Period, 15, 81
Pay Type, 75
Payee, 51, 80, 88, 90, 92, 96
payment, 20, 26, 27, 42, 43, 44, 47, 49, 51, 53, 57, 60, 65, 68, 72, 74, 75, 76, 77, 78, 79, 80, 81, 82, 83, 84, 85, 86, 87, 88, 89, 90, 91, 93, 94, 95, 96, 97, 98, 99, 101, 118, 126, 133, 134, 135, 137, 138, 139, 140, 142, 144
Payment Code, 77, 91
PD, 42, 43, 68, 76, 77, 79, 81, 87, 135
PERI, 25, 46
Policy, iv, 32, 33, 37, 41, 70
Post, v, vi, 89, 99
PPS, 26
Primary Vendor, 25, 26
Print Name, 24
Privacy Case, 47
PTD, 86, 118, 135
Query Employee Changes, 18
Rate Table, 93, 139, 140
reason codes, 140
rebatch, 100
Rebatch, vi, x, 100
Recoveries, v, vi, x, 49, 65, 74, 87, 101, 105, 122
Recovery Type, viii, 86, 122, 137
Region, v, vii, 11, 18, 30, 36, 88, 90, 97, 116, 122, 125, 127, 128, 129, 144
Region by Level, 18, 129
Region View, 18, 36, 88, 98, 125
regions, 122, 125
Rehabilitation, 48, 134, 135
Relationship, viii, 21, 123, 142
Reopen Date, 42
Report Date, 42
Report Purpose Code, 30
Reserve Category, 86, 90, 101
Reserve Change, v, viii, 49, 54, 83, 84, 122, 136
reserve worksheet, 67, 68, 69
Reserve Worksheet, iv, x, 49, 67, 68
reserves, 5, 41, 42, 49, 50, 54, 56, 64, 66, 67, 68, 69, 74, 75, 76, 81, 82, 83, 84, 89, 93, 94, 98, 104, 118, 135, 136
Reserves, iv, v, vi, viii, x, 5, 6, 48, 49, 50, 68, 69, 74, 75, 76, 82, 83, 93, 94, 101, 104, 133
Restricted Work Days, 46, 70
Routing Number, 17, 25
RRE, 44, 71, 72, 126, 130, 145
Rsv Category, 24
RTW, 46, 136, 137
Salary Continued, 29
Search, iii, ix, 11, 17, 18, 24, 35, 39, 55, 60, 140, 141
Settlement, 53, 71, 73, 122, 132
SI-4, 48, 144
SIC, viii, 123, 128, 130, 141
Specialty, viii, 25, 92, 123, 138, 140
SSN, 15, 16, 17, 21, 28, 34, 52, 71
Stair Step Reserves, 76, 93
standard industry classification, viii, 141
Stanford Reserve Estimate, 49
State Claim Number, 33
State of Hire, 29
state of jurisdiction, 21, 28, 29, 33, 41, 43, 44, 57, 59, 70, 81, 82, 144
State of Jurisdiction, ix, 36, 39, 40, 70
State/Federal Levy, 24
Status Bar, 2, 4
Student, 21
Sub, viii, 16, 29, 30, 40, 122, 125, 126, 129, 131, 135
Subrogation, 48
Supervisor, vi, 16, 108, 111, 112
Suspension, 46
Target Date, 107
Tax ID, 23, 26, 27
TD, 42, 43, 47, 69, 76, 77, 79, 81, 82, 87, 135
Term Date, 15
third-party administrator, 32, 107
Third-party administrators, 67
tile, 3, 5
Tile, 4
Time of Injury, 30
TIN Notice, 25
TPA, 32, 138
TPOC, iv, 53, 71, 72, 73
Trade Name, 126
transitional work, 47
TW, 46, 47, 71
Type of Rep, 22
UCR, viii, 91, 92, 94, 123, 138, 140
Unbundling, v, 93, 94
Valued As-of, vii, 118
vendor, 8, 10, 23, 24, 25, 26, 27, 51, 52, 54, 60, 75, 76, 78, 80, 85, 86, 90, 91, 92, 95, 105, 135, 138, 139, 140
Vendor Code, 24, 75, 85, 86, 92
void, 65, 86, 87, 90, 118, 137
Void, viii, 87, 122, 134, 137
Voucher, 88, 97
Vouchers, v, 86, 90
W-9, 25
Wage, 15, 29, 43, 48, 76, 145
waiting period, 48, 80, 81, 144
Work Status, 25