Employers’
Report of Injury
The Employer’s Report of Injury module is an optional, add-on module designed to assist you in filing a First Report of Injury (FROI) with the State. The module allows you to:
· Create a new report according to the state’s current specifications and format.
· Print the report and/or write selected fields to an export file to be sent electronically to the state.
· Determine whether adequate safeguards and equipment were provided and if the employees used the safety measures.
· Promote the report when a claim has been filed to eliminate having to retype the relevant information.
Entering a New Employers’ Report
Creating a report is a simple process. To begin, select New FROI from a menu or click the New button on the Employer’s Report result list. When the Select Employee screen appears, use any of the lookup options to find the desired record.
A record for the employee must exist before a report of injury can be entered. If a record is not found, the Employee must be added.
The next step is to indicate the state of jurisdiction. The employee’s state is selected by default, but you may change it to that of the employer or choose another state from the list.
Click Select to display the screens for the specified state. Although every state has its own form for filing purposes, much of the information is the same. To simplify the input process for those companies that deal with multiple states, ATS has used the same general layout for the screens regardless of the state.
For documentation purposes, we have selected the screens for Illinois since that state uses the IAIABC form which is considered the standard. The General section is shown below with the personal information such as the address, phone number, date of birth and hire date read from the employee’s record. The employee’s name is displayed in the title bar for your convenience.
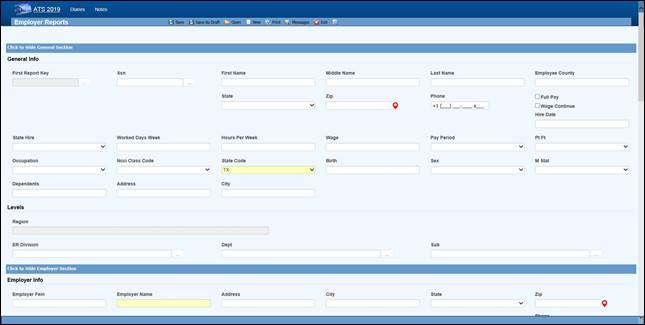 Figure 4‑1: Employer’s Report Page -
General Section
Figure 4‑1: Employer’s Report Page -
General Section
Typically, you will be asked to enter the additional information described below. Other fields may be provided depending on the state of jurisdiction.
|
Field Name |
Description |
|
State
of Hire |
The
state in which the employee was hired. |
|
Days per Week |
The
average number of work days/week. |
|
Hours
per Day |
The
average number of hours worked/day. |
|
Day
of Injury Paid |
A
check indicates that the employee was paid for the day on which the
injury/illness occurred. |
|
Salary
Continued |
A
check indicates that the employee is receiving his/her regular salary in lieu
of worker’s compensation benefits. |
|
Wage |
The
program calculates and displays the employee’s weekly salary. |
|
Period |
The
pay period is always “Weekly”since the State wants
to know the AWW. |
|
NCCI Class Code |
The
NCCI classification code may be required if it’s
on the state’s FROI. |
Press <Alt>+2 or scroll down to position to the Employer section that contains the employer and level information. Note the Dept, Division, and Sub in the following example. The labels used to identify the levels will vary depending on how your system has been set up with the Administration- Configuration-Application Parameters menu.
Any information that is not required by the IAIABC will have to be entered manually, but the standard information in the following example will be displayed automatically if it exists.
 Figure 4‑2: Employer’s Report Page -
Employer Section
Figure 4‑2: Employer’s Report Page -
Employer Section
|
|
It is important to understand how the program searches
for the person’s employer in case some information is missing. First, it
looks at the levels specified for the employee to find a record where the
Employer box is checked. If one is not found, the program will see if the
employee’s region or state is marked as the employer. The client is assumed
to be the employer if no other one is found. |
|
|
·
Level
3 (starting with Sub 3 and Sub 2 if used) ·
Level
2 ·
Level
1 ·
Region ·
State
·
Client |
Information about the injury or illness should be entered in the Detail section. Since each State form is different, the fields will vary. The ones on the IAIABC form are shown below.
 Figure 4‑3: Employer’s Report Page -
Detail Section
Figure 4‑3: Employer’s Report Page -
Detail Section
The following fields are on the IAIABC form. Depending on the state, the program may prompt you to enter additional information.
|
Field Name |
Description |
|
Injury
Date |
The
date of injury is required. A dialog will appear if there is an existing
report for the person on the same date.
Depending on what you see, continue entering the new report or exit
the program. |
|
Time Began Work |
The
(military) time the employee started to work (e.g. 1430) on the day of the
injury. The colon will be inserted for you. |
|
Time
of Injury |
The
time of injury in a military format. |
|
Last
Work Date |
The
last day the employee was at work. |
|
Knowledge
Date |
The
date the employer learned of the injury. |
|
Disability
Start Date |
The
date disability payments began (i.e. the first day lost due to the injury or
illness). |
|
Report
Purpose Code |
The
state’s code that describes the reason for submitting the report. |
|
Location/Dept. |
The
location where the injury or illness occurred. |
|
County |
The
county where the injury occurred. |
|
Employer’s
Premises |
A
check indicates that the injury/illness occurred at the work place. |
|
Safeguards/safety
equipment provided |
A
check indicates that the employer provided safety measures. |
|
Safety Measures Used |
A
check indicates that the employee used the safety measures that were
provided. |
|
Returned
to Work |
Check
the box and enter the date if the employee is back at work. |
|
Fatal
Injury |
A
check indicates that the employee died as a result of the injury/illness. If
so, enter the date of death. |
|
|
The
fields in the Details section that indicate whether safety measures were
provided and/or used may not be required by the State, but ATS considers
these standard fields since they can provide valuable information for
reporting purposes. |
All States require you to describe the incident in detail. The fields in the Loss Description section indicate where the information should be entered so the Report of Injury will be filled out correctly.
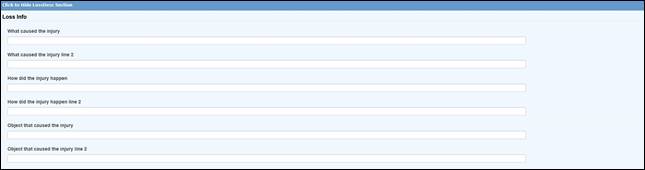 Figure 4‑4: Employer’s Report Page –
Loss Description Section
Figure 4‑4: Employer’s Report Page –
Loss Description Section
The Loss Codes section allows you to enter more details about the injury. The screen shown below will appear regardless of which state was specified.
Although a state may not request this information on the report, the loss codes you enter will be transferred along with other pertinent data if the report is promoted to a claim. These fields may also provide valuable information for reporting purposes.
 Figure 4‑5: Employer’s Report Page –
Loss Codes Section
Figure 4‑5: Employer’s Report Page –
Loss Codes Section
The Medical section is provided so you may enter information on the initial treatment that was provided along with the physician, hospital, or off-site facility that was involved.
The information on the screen shown below is requested on the IAIABC form. Since more and more states are adopting this form, the Medical tab will display this screen regardless of which state you have specified.
Also note the Initial Treatment code. If this is required, someone with the authority to maintain the Loss Codes must enter these codes before they can be used in a report of injury.
 Figure 4‑6: Employer’s Report Page –
Medical Section
Figure 4‑6: Employer’s Report Page –
Medical Section
The Admin section is shown below. Many states request information on the company which will be handling the injury report. This is your company if you are adjudicating your own claims or doing business as a third-party administrator (TPA). In either case, the program will automatically fill in the information if it has been entered in the Agent record. A sample screen is shown below.
If required, the Date Notified may be interpreted differently on your state form. Although this is usually the date the claim administrator or insurance carrier received the First Report of Injury, in Massachusetts it is the date the injury or illness was reported as work related. Please refer to the help message when in doubt as to what to enter.
 Figure 4‑7: Employer’s Report Page –
Administrator Section
Figure 4‑7: Employer’s Report Page –
Administrator Section
All of the insurance carrier information on the IAIABC form may be entered in the Carrier section. If your company is self-insured in the state or has only one carrier, a system administrator may use the Field Properties feature to enter the pertinent information as default values so it does not have to be typed into each new report.
If the Policy module is in use, one may be attached after the report of injury has been saved.
 Figure 4‑8: Employer’s Report Page –
Carrier Section
Figure 4‑8: Employer’s Report Page –
Carrier Section
The special fields on this screen are described as follows:
|
Field Name |
Description |
|
Self-Insured |
A
check will indicate that carrier is the self-insured employer. |
|
Policy |
The
carrier's policy that will used, if the report becomes a claim, plus the
dates it is valid. |
|
Agent |
The
agent’s code and name. |
|
Insured’s
Number |
The
insured’s report number to display on the FROI if necessary. |
|
OSHA Case Number |
The
OSHA case number, if it is different than the ATS
claim number. |
|
State
Claim Number |
The
claim number assigned by the state of jurisdiction. |
The last section, Summary, contains the information shown in the example below.
 Figure 4‑9: Employer’s Report Page –
Summary Section
Figure 4‑9: Employer’s Report Page –
Summary Section
The fields on the screen are described as follows:
|
Field Name |
Description |
|
Promoted
to Claim |
The
program will check this box if the report is promoted. (See a later section.) |
|
Claim Number(s) |
The
claim number assigned when the report is promoted.
Depending on how your system has been set up, an alternate claim number may
be assigned at the same time. |
|
EDI Date |
The
date the record was batched for transmission to the State. This may not be the date it was actually
transmitted. |
|
Completed
By |
The
name of the person submitting the Employer’s Report to the State. (Required) |
|
Title |
The
title of the person submitting the Employer’s Report. |
|
Phone |
The
phone number of the person submitting the Employer’s Report. |
|
Date |
The
date the Employer’s Report was completed. |
Saving an Employer’s Report
After entering the relevant information, click the Save button. If the “Required Fields Missing” message appears in the title bar, enter the data and click Save again.
|
|
Although
a State may require certain information on the reports, there are very few
required fields on the ATS screens because we realize that an operator may
not have all the information at the time the report is created. We don’t want
to create a situation where contrived information might have to be entered in
order to save the record. |
After the report has been saved, the employee’s masked SSN (with the last four digits), an asterisk, and a counter to indicate the number of injuries the person has reported will be displayed in the window’s title bar. For example, “XXX-XX-8987*0004” is the employee’s fourth report of injury.
At this time, the Print buttons have been activated. The EDI Export feature is also available. These topics are covered separately.
The Print Options
Before printing the State’s First Report of Injury, we recommend that you use the blue Print button to view the information that you have entered on the form. If you find anything that is missing or incorrect, we suggest that you return to the ATS program, make the necessary corrections, and select the blue Print button again.
The File-Print Page menu or the corresponding gray Print button is available if you want to print the contents of the screens.
The Notes and Diary Options
The ATS Diary and Notes features may be accessed using the associated toolbar buttons. Please refer to the Claims chapter for details on using the Notes feature. The Diary is covered in a separate chapter in this manual.
New First Report Option
The New button on the toolbar or <Alt>+N will display the Select Employee screen so you can create a new report without returning to the Console or Result List.
Open First Report Option
The Open button on the toolbar or <Alt>+O will display the Select FROI criteria so you can look up an existing Report of Injury without returning to the Console or Result List. The search criteria screen is the same as in the snapshot shown below.
Editing an Existing Report
Authorized users may view and/or edit Reports of Injury. The Selected FROIs menu item opens the Employer’s Report Search Criteria page that provides you with a wide variety of search options.
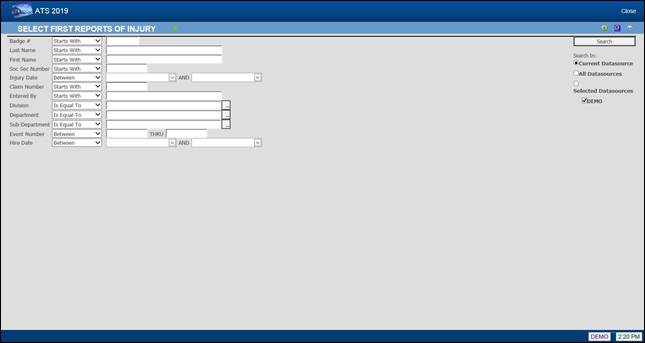 Figure 4‑10: Employer’s Report Search Criteria
The following list shows employees whose last names start with the letter “S” and have filed a report for an injury that occurred between January 1, 2015 and December 31, 2015.
 Figure 4‑11: Employer’s Report Result
List
Figure 4‑11: Employer’s Report Result
List
Note that if the Region feature has been implemented and Region View has been set in your user record, you will only be able to see a list of employees who have filed a Report of Injury in your assigned region(s).
Other menu options provide you with additional ways of looking for First Reports you have created.
They are:
|
Menu Option |
Function |
|
Recent |
Lists
the First Reports completed in the last seven days. |
|
Unpromoted |
Lists
the First Reports that have not been promoted to a claim. All but three have not been promoted on the
above list, |
|
Promoted |
Lists
the First Reports that have been promoted.
Note the blue arrow is used to identify the promoted claim. |
|
All |
Lists
all the First Reports with the most recent at the top of the list. |
Once you have selected the desired report, the program will display the record so the required changes may be made.
All the operations covered in the next sections can be performed as the report is created. With the exception of changing the State of Jurisdiction, which can be done at any time, the features will become available after the Employer Report is saved.
Batching the Employer’s Report Data
After saving the Employer’s Report, the EDI Batch menu option may be used to write selected data to a text file for export purposes. This dialog will appear so you can indicate the type of report you wish to send. The data will vary depending on which report (MTC) code is chosen.
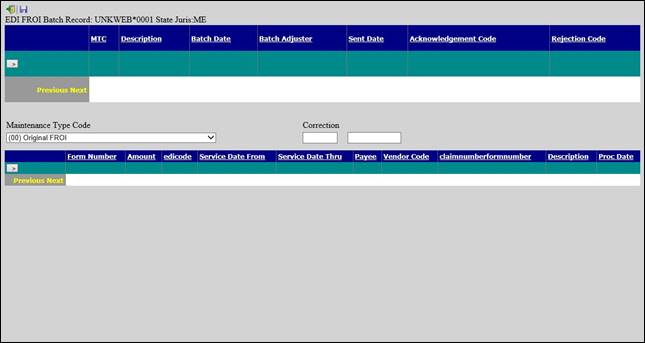 Figure 4‑12: Employer’s Report EDI Batch Dialog
The EDI process varies by state. Please refer to the separate EDI Export Utility document for details.
Promoting a Report of Injury
Many of the incidents that are reported never result in a claim action. If the employee does file a claim, the report may be promoted to claim status so the pertinent data does not have to be retyped.
![]() To
promote an Employer’s Report of Injury to a claim use the Promote
button after the report has been saved.
To
promote an Employer’s Report of Injury to a claim use the Promote
button after the report has been saved.
The program will:
1. Attach a policy (optional) and assign a claim number.
If the Policy module is in use, there must be a policy that
covers the Injury Date. The program will check the From/Thru Dates for
the policies and display a message if one does not exist. Otherwise, select a
policy from the list of those that are available.
The program will automatically assign a claim number based on the value of the Next Claim Number, set using the Application
Parameters page. If the Next Claim Number field contains
a number (not all zeroes), the program will assign it to the claim. Otherwise,
the program will use the Fiscal Year from the client’s record and the Injury
Date in the employer’s report to determine which
year code to use at the beginning of the claim number. For example, if the
Fiscal Year is “0701” and the Injury Date is “09/01/2010”, the claim number
will start with “11”.
Retired people can develop an illness such as hearing loss and asbestosis
related to the work they did. If that situation exists in your company, you may
choose to base the first two digits of the claim number on the Open Date instead of the Injury Date by entering “OPEN” in the Next Claim Number field.
If policies are used, the first two digits of the number may be overwritten by
the policy’s Claim Number Prefix, if
one exists.
2. Create a claim with the pertinent information from the Employer’s Report. The program will transfer any relevant information to the new claim.
3. Write the claim number(s) on the Summary section of the report along with a check in the Promote to Claim field. Also display the new claim number in the title bar.
4. A warning message will appear if there is already a claim for the employee with the same date of injury.
|
|
All
reports are promoted with a Claim Type of “N” for notation. The claims adjuster
will need to decide whether the claim is a medical or indemnity case and
update the Claim Type accordingly. |