Employees
The employee must have a record in the ATS System before a claim or an employer’s report of injury can be entered for the individual. The Employee program is available after selecting the Explore menu and clicking the Employee tab on the Worker’s Compensation menu.
Note that if your company has another software package that tracks employee information, a custom interface may be provided to import relevant data into the ATS System in order to save time and ensure that the data is accurate.
Entering a New Record
![]() Users
with appropriate access rights may enter employee records. You can use the New Employee item on a menu or the Open button on
the Employee
List to open the Employee data input page.
Users
with appropriate access rights may enter employee records. You can use the New Employee item on a menu or the Open button on
the Employee
List to open the Employee data input page.
The standard screen used to track employee information is shown below with a sample record. Since the ATS System allows screens to be tailored to meet your organization’s requirements, your screen may look slightly different.
Note the fields related to the direct deposit feature will be hidden unless the user has the authority to use this feature.
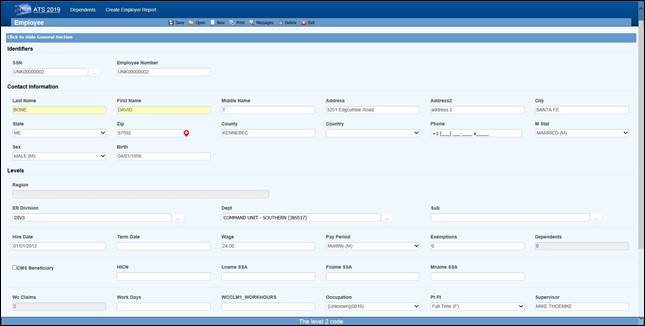 Figure 2‑1: Employee Data
Input Page
Figure 2‑1: Employee Data
Input Page
The individual fields on the form are described as follows. Note that as soon as you enter the SSN, the program will search for an existing record with that SSN and display “Processing” at the top of the screen. If one is found, that record will be displayed.
|
Field Name |
Description |
|
SSN |
This is a required field. New employees will automatically be assigned a number such
as UNK00000028. When you type over this number, the program will insert
dashes if necessary, check to see if a record with that SSN already exists and, if so, display it on the
screen. If you are not sure of the SSN, we recommend that
you use the “UNK” number and edit the record when you have the
information. Any existing claims will
be updated when the record is saved. Note
that during a data conversion, a “UNK” number is assigned when the SSN is missing or invalid. This feature makes it
easy to find the records that need to be updated. |
|
Last Name |
The
employee’s first and last names
are required. This should be the name the person is known as. There are other
fields for their legal name. |
|
First Name |
If
a person changes his or her name, use the AKA feature to keep track of the previous
name(s) so the claim and employee records can be looked up by either one. For
details, refer to the AKA section. Note that is feature is in development so
it may not be available in your current version. |
|
Middle |
A
middle initial if any. |
|
Address |
Enter
the address and the zip code. The program will automatically fill in the
correct city, county, and state if the zip code is in the United States. |
|
Phone |
Phone
numbers entered as 10 digits such as 4101234567 will be displayed as 1+ (410)
123-4567 where the “1+” is the international dialing code for the United
States. |
|
Birth Date |
The
employee’s date of birth. Enter the date in
an MMDDYYYY format. The program will insert the slashes. |
|
Sex |
The
employee’s gender. |
|
Marital Status |
The
employee’s marital status may
be selected from the drop-down list or entered using the appropriate code
where M=married, S=single, D=divorced, and W=widowed. |
|
Hire Date |
The
date of employment. |
|
Term Date |
The
employee’s termination date
if any. |
|
Last Transaction |
The
ATS system will track changes made to fields in the employee record if a system administer has set them
up as transactional. The program will display the last date one of the
transactional fields was changed for informational purposes. |
|
Wage |
The
employee’s wage during the
specified pay period. |
|
Pay Period |
The employee’s pay cycle may be
selected from the drop-down list or entered using the appropriate code where
H=hourly, D=daily, W=weekly, B=bi- weekly, M=monthly, and A=annual. Note:
When a claim or First Report of Injury is entered for the employee, the program will
calculate the average weekly wage and write it into the record so it can be
used to determine the employee’s benefit rate. |
|
Exemptions |
The
number of exemptions is an optional field used to calculate any taxes withheld when
making benefit payments in the A&S Disability product. (The same employee screen is used for both.) |
|
Dependents |
The ATS System will update this field
and display the total number of
dependents for the employee as records are added and/or removed. The
number may not be edited. (See the Dependents section.) Note: The Dependents module may be used when 1. The employee's wages have been
garnished and a lien needs to be set up (e.g. child
support). 2. The number of dependents affects the
Workers' Comp benefit rate. 3. There is an additional claimant for a
Medicare beneficiary who is deceased. |
|
# Claims |
The
program will increment this value as claims are entered for the employee. This field may not
be edited. |
|
CMS Beneficiary |
A check in this box indicates that the
employee is a Medicare beneficiary. Normally,
the check is entered by the program that processes the CMS Query Response file. |
|
HICN |
The
Medicare health insurance claim number will be filled in with the data in the CMS Query Response file. |
|
Last Name (SSA) First Name (SSA) Middle Initial |
The
employee’s name as known by
the Social Security Administration if
it’s different than the one used in the rest of the Worker’s
Compensation system. If the employee is a Medicare beneficiary, this name will be sent when
submitting a report to the CMS (Centers for Medicare and Medicaid
Services). |
|
Division Dept Sub |
The levels that indicate where the employee works within the company’s hierarchy are
called Division, Dept, and Sub by default. These labels have probably been
changed on your screen. Levels may be entered in the following ways
depending on how your system has been set up: 1.
Pressing the Ellipsis button in any level field will display a list of
all the available entries. This is the default. 2.
If the Level 1 and 2 fields are blank, you may be able to enter a Level 3 to
have the program automatically fill in the associated levels. |
|
Occupation |
The
employee’s occupation. Press
the Ellipsis button for a list of choices. |
|
Employment Type |
The
employee’s status such as
full-time and part-time. Press the Ellipsis button for a list of choices. |
|
Employee # |
The number assigned to the employee by the company. It may be entered in the
Employee Selection dialog to look up a record. This
ID number may be used to ‘identify’ the employee in certain cases where the SSN may not be displayed for privacy reasons. |
|
Supervisor |
The
name of the employee’s supervisor. |
|
Notes |
A
short note pertaining to the employee. For example,
“Employee hired for project number J3466”. |
|
Direct Deposit |
Direct deposit is an optional, add-on
module. A check in this box indicates that the employee wants his/her benefit payments deposited
directly in the bank. Depending on the user’s security settings, these fields
may not be visible. |
|
Routing Number |
The bank’s routing number. |
|
Bank Account |
The employee’s bank account
number. |
Saving a New Record
The program will display a message indicating that the record has been saved successfully. At that time, the employee’s name and SSN or ID will be displayed in the window’s title bar. If you have skipped over any of the required fields, the “Required fields missing” message will appear. Enter the data. When you are done, save the record again.
Editing an Existing Record
The Employee menu provides a number of options to find the record you want to view and/or modify. The first option, the Selected Employees search, lists a variety of criteria you can use to quickly find the record. The standard list is shown below. The criteria on your system may be different.
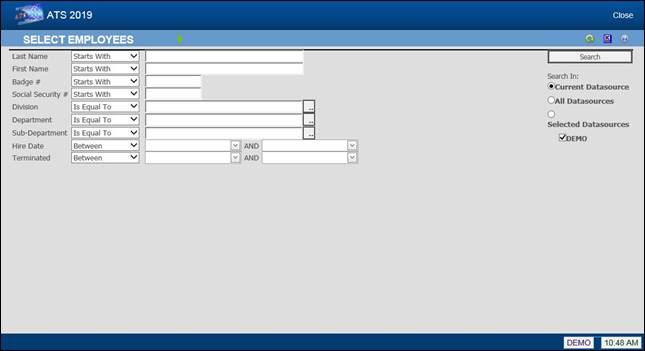 Figure 2‑2: Employee Search Criteria
There are other ways to look up records. The options are as follows:
|
Menu |
Function |
|
Claimants |
Lists
all claimants with claims where the Adjuster is the current user. Current Employees Lists
all employees that are currently working for the organization. |
|
Current
Employees |
Lists
all employees that currently work for the organization. |
|
Inactive
Employees |
Lists
all employees that have left the organization (i.e. a Termination Date
exists). |
|
All
Employees |
Lists all
employees whether or
not they are
currently working for
the organization. |
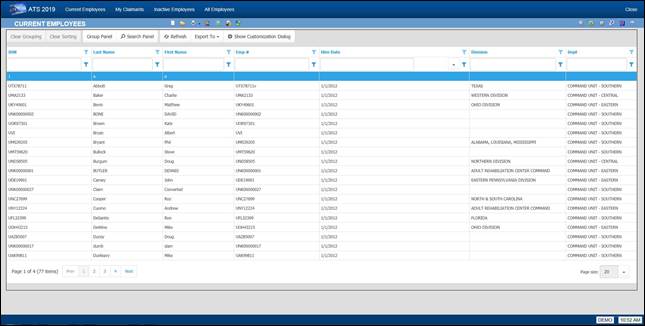 Figure 2‑3: Employee Search Result
List
Figure 2‑3: Employee Search Result
List
Note that if the Region by Level feature has been implemented and Region View has been set, you will only be able to see a list of the employees in your specific region.
However you find the employee, make the desired changes. When you are done, save the record and exit the program.
If a system administrator has set the Query Employee Changes flag using the Module Parameters screen, the program will check the employee’s name, address, phone, supervisor, birth, and/or termination date. If any information has changed, you will be asked if the individual’s claims and reports of injury should be updated.
|
|
When
an employee’s social security number is changed, all the appropriate tables
will be updated automatically. |
Adding an Employer’s Report of Injury or a Claim
![]() Some
employees sustain a number of injuries while they work for a company. If you need to enter a report for a person
that already has an existing employee record, we recommend that you edit the record
to make sure that the information is current. When you are finished, you may
use the New Employer’s Report button to continue.
Some
employees sustain a number of injuries while they work for a company. If you need to enter a report for a person
that already has an existing employee record, we recommend that you edit the record
to make sure that the information is current. When you are finished, you may
use the New Employer’s Report button to continue.
![]() The
same suggestion applies when you need to enter a claim. When you are finished
verifying that the employee’s data is up to date, you may
use the special New Claim button to continue.
The
same suggestion applies when you need to enter a claim. When you are finished
verifying that the employee’s data is up to date, you may
use the special New Claim button to continue.
Adding an AKA Name
People are often known by more than one name. The name in the employee’s record and their open claim(s) should be the same as it is the one that will appear on all payments issued to the employee.
Any other name the employee uses should be entered as an alias using the AKA feature. For example, a woman often takes her husband’s name when she gets married. In that case, you should enter her new name in the Last Name field and her maiden name as the alias. After that you will be able to find the employee and the associated claim records using either name.
![]() The
Employee data entry
page contains an AKA button.
Clicking the button opens the Also Known As list. The list
shows all of the AKA entries for the employee.
The
Employee data entry
page contains an AKA button.
Clicking the button opens the Also Known As list. The list
shows all of the AKA entries for the employee.
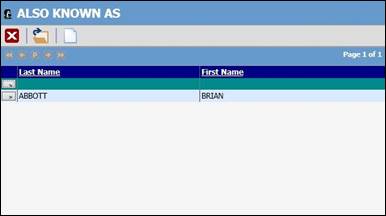
Figure 2‑4: Employee Also Known As List
Click the new button to open the AKA data input dialog. Enter the alias and save the record. Now you can search by both current and alias names.
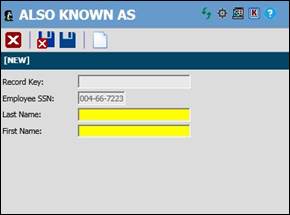
Figure 2‑5: Employee Also Known As Dialog
Entering a New Dependent
There are a number of reasons for creating dependent records. Some of them are:
1. The employee was a Medicare beneficiary and is now deceased. Dependent records must be entered for any “Additional Claimants” that need to be submitted to the CMS (Centers for Medicare and Medicaid Services).
2. The individual wants to attach a lien to the employee’s payments or be considered when calculating the benefit amount for a claim.
3. The individual is the employee’s beneficiary and entering the person as a dependent will simplify the payment process for a fatality claim.
![]() To
enter a new record or modify an existing one, click the Dependents button to display the Dependents
List.
To
enter a new record or modify an existing one, click the Dependents button to display the Dependents
List.
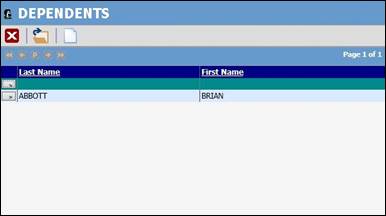
Figure 2‑6: Employee Dependent List
Click on the new button. The following screen will appear. Enter all pertinent data and then click Save. The dependent record is now available to use.
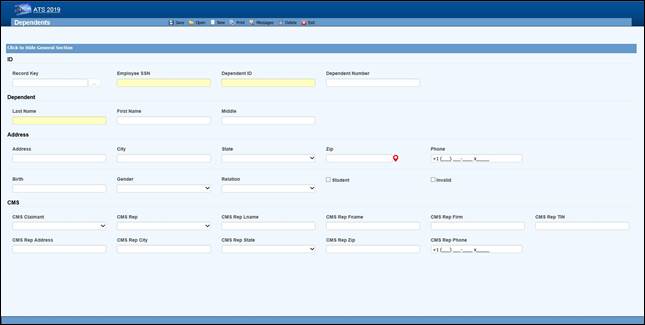 Figure 2‑7: Employee Dependent Data Input
The fields on this screen are described as follows:
|
Field Name |
Description |
|
SSN |
A
valid SSN should be entered for the individual. |
|
Last Name First Name M.I |
The complete name if the dependent is an individual. If the dependent is an estate, enter “The
Estate of <employee>”, “the Family of
<employee>” or “The Trust of <employee” depending on the entry in
the Relationship field. In any case, leave the other name
fields empty. |
|
Address |
The
individual’s address, city, state, and zip code |
|
Phone |
The
individual’s phone number. |
|
Birth
Date |
The
individual’s birth date is important if the state of jurisdiction for the employee’s claim has an age
limit for tacking deductions for dependents (when calculating the benefit
rate). |
|
Gender |
The
individual’s gender if relevant. |
|
Relationship |
The dependent’s relationship to
the employee. The valid options are: F
= Family Member, Individual Name Provided O
= Other, Individual Name Provided X
= Estate, Entity Name Provided (e.g. "The Estate of John Doe") Y
= Family, Entity Name Provided (e.g. "The Family of John Doe") Z
= Other, Entity Name Provided (e.g. "The Trust of John Doe") |
|
Student |
A
check indicates that this individual is a student. |
|
100% Dependent |
A
check indicates that the dependent is to continue being on a claim’s eligible
list regardless of age. |
|
Additional CMS Claimant |
This
number from C1 to C4 must exist in the record in order for the dependent’s data to be
submitted to the CMS. |
|
Type
of Rep |
The type of representative for the dependent. Valid choices are: ·
Guardian/ Conservator ·
Attorney ·
Power of Attorney ·
Other |
|
Name Address... |
The
rest of the fields for the representative are self-explanatory. |
Saving a new record (or deleting an existing one) will update the # of Dependents for the associated employee.