MAINTAIN
There are a wide variety of easy-to-edit tables that
contain the company specific information available when pressing Ellipsis
button next to certain fields on the input screens.
The following chart briefly describes the items on the
Maintain menus. Each one is covered in detail in this chapter.
Menu Item Submenu Item Contents of Table
Organization
Organization Organizations within
the company
Region Regions within the company
1st
thru 3rd Levels
in the client’s hierarchy
Sub 2 and Sub 3 A
4th and 5th pseudo level
Loss Act Injury act
codes
Agency (Source) Source
of accident codes
Body
- Member Member of body injured
Site Site or part of body injured
Cause Cause/reason for injury
Deductible Deductible codes
Loss
Coverage Loss
coverage codes
Nature Nature
of injury codes
OSHA OSHA
codes
Recovery
Types Expected
recovery codes
Restrictions Restricted duty
codes
Severity Severity of injury codes
Type
of Coverage Coverage type codes
Type
of Loss Loss type codes
Type
of Settlement Settlement
type codes
Carrier Tables EDI, NCCI and Traveler’sTables
Rsv/Payments/ Recoveries
Indemnity
Pay Codes Reserve / cost
center account 1
Medical Reserve /
cost center account 2
Rehab Reserve /
cost center account 3
Expense Reserve /
cost center account 4
CC5
(Legal) Reserve
/ cost center account 5
CC6
(Other) Reserve
/ cost center account 6
Reserve
Types Types of reserve accounts
Reserve
Change Reserve account change codes
Recovery
Type Recovery
type codes
Fed/State
Withholding Tax tables
Void Types Void
transaction codes
Late
Payment Reasons Codes for EDI export purposes
Industry
SIC Standard industry codes
NAICS North American Industry
Classification System codes
NCCI National Council on
Compensation Insurance codes
NDC National Drug codes
Occupation Occupation
codes
Medical Fee
Override Codes to
override fee schedule
DRG
Codes (ICD-9) DRG or ICD-9 diagnosis codes
Initial
Treatment Initial
treatment codes
HMO/PPO HMO/PPO provider codes
MOC Managed
care organizations
UCR Percentile State
UCR percentiles
Provider
Specialty Vendor specialty codes
Reason Reason/referral
codes for Case Management module
Other
Relationship Relationship to
employee
State State specific information
County Country codes for use on custom screens
Employment
Status Employment status
codes
Location Codes for
specific locations
Legal Litigation codes
Forms/Letters
Common Standard ATS
forms/letters
User Client-specific
forms/letters
Letter
Builder Editor for
creating HTML documents
User Defined
Tables Lists the
client’s custom tables
TABLE Maintenance
The Maintenance portion of the system provides the
ability to modify the contents of various tables in the database that are used
to populate the values in lists.
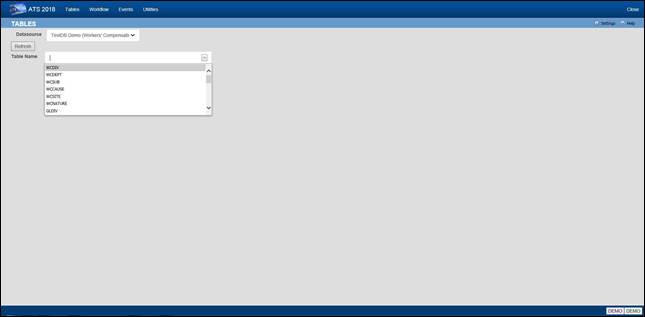
Figure 12‑1: Table Maintenance – Table Selection
To maintain the values in a table, start by selecting
the Datasource where the data resides. Then select
the name of the table you want to access. A list of the records contained in
the table will be displayed along with all of the
values each record contains.
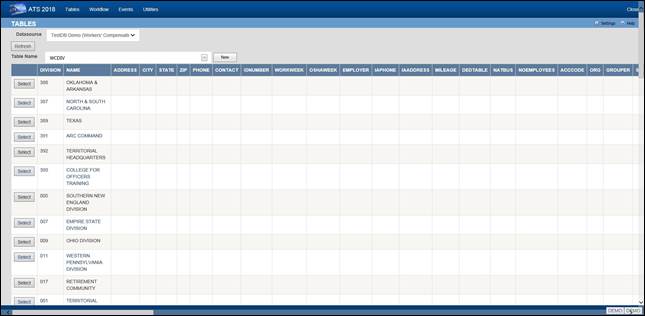
Figure 12‑2: Table Maintenance – Table Contents List
To edit the values for a particular
record, click the Select button next to the list entry. This will open
the corresponding editor for records in the table.
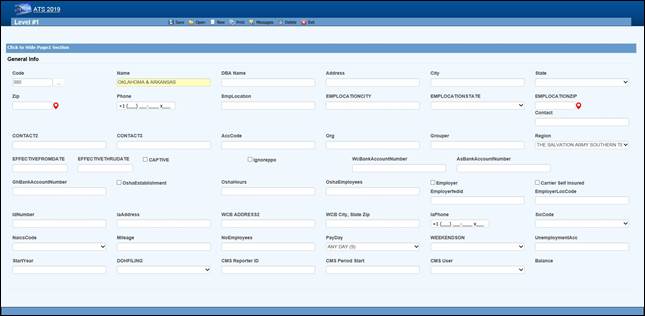
Figure 12‑3: Table Maintenance – Sample Editor Screen
Organization Maintenance
This menu should be used to define the levels in your
company’s hierarchy that will be used to group claims for reporting purposes
and enter other information related to the employee. The options will be
covered in the order in which they appear on the menu:
·
Region
·
Level 1
·
Level 2
·
Level 3
·
Level 3 - Sub 2
·
Level 3 - Sub 3
·
Organization
Region
Regions may be associated with a specific level 1 or
state depending on the Region Mode set with Administer-Configuration-Module
Parameters. If a user has access to one or more regions and Region View has been set in the user's profile, the
operator may view/edit claim and employee records and process payments only in
the particular region(s). If these features are to be used, select this menu to
enter the region codes on the screen displayed below.
Note that ATS allows bank accounts to be set up for
specific regions in any or all of the ATS/Comp
modules. When this feature is used, these accounts must be set up with the
Process-Trust Fund menu.
The fields are described as follows:
|
Field Name |
Description |
|
Code |
The
code to identify the specific region. |
|
Description |
The
description of the region. |
|
Trade
Name |
The
trade (company) name if any. |
|
DBA
Name |
A
DBA name may be needed if the region is the Responsible Reporting Entity (RRE). |
|
Mailing
Address/Phone |
The
address and phone number for the region as needed for reporting purposes. |
|
Bank
Account Numbers |
If
this region has a specific bank account for any or all of
the ATS/Comp modules, enter the account number. |
|
Employer |
If
this is the only employer in the region, check this box and fill in the rest
of the information for reporting purposes. |
|
Self-Insured |
A
check indicates that the employer is self-insured. |
|
Emp.
Fed ID |
The
employer’s tax ID. |
|
Physical
Address |
The
employer’s address if it is different than the mailing address. |
|
Location
Code |
The
employer's location code should be entered if it is required on the first
report of injury. |
|
Unemployment
Account Number |
The
employer’s UIAN number. |
|
Pay
Day |
The day of the week the employees are paid
where 0 = Sun, 1 = Mon, 2 = Tues, 3 = Wed, 4 = Thurs, 5 = Fri, 6 = Sat, and 9
= Any Day. If
AutoPay is used and the region is the employer, this
information and the day the (work) week
ends will be used to schedule the payments to be batched. (For
details refer to the AutoPay Mode flag covered in the Parameters-Application
section of this chapter.) |
|
Week
Ends On |
The
day the work week ends should be entered if AutoPay is used and the level is the employer. |
|
DOH Filing |
When
New York’s Department of Health’s surcharge needs to be paid, either monthly
or annually. |
|
Form
Type |
The
type of payment to be issued: checks only, checks by
default, vouchers only, or vouchers by default. |
|
Effective
From/Thru |
The
date this region (fund, member, plan) before effective. If it’s no longer use, enter the ending date. |
|
CMS Reporter ID |
The
reporter ID if this region is the RRE. |
|
CMS Reporting Group |
The
number of the group (from 1 to 12) assigned to the RRE. |
|
CMS User |
The
user responsible for creating the export files. A diary will be generated to
remind that person to make sure the necessary claims have been batched. |
Levels 1 to 3
When generating reports, a client database is normally
sorted and broken up into groups depending on the values entered in the level
fields. Valid entries for these levels are created using the Maintain-
Organization menu.
Whenever levels are displayed on an input screen, they
will be labeled Division,
Dept (department) and Sub (sub-department) by default. A system
administer may customize these labels with the Application Parameters menu.
Although ATS will help you set up your level
categories initially, it is important to understand what is involved. For
example, suppose you are a nation-wide company of XYZ retail stores. The
company would be considered the client in the ATS System. If you have an RIS
department to administer the claims, your company would also be the ATS agent.
Since your organization is divided into geographical regions, you could use the
ATS region feature and levels as shown below. Although codes would be entered
in the database, the description is used here for clarity purposes.
Region Level
1: Store Level 2: Department
Western Market
SF-CA Women’s Clothing
Eastern Wall
Street-NY Kitchen
Central Burlington-IA Furniture
On a report, the claim information may be sorted and
grouped by region, store, and department as in:
Central
Burlington-IA
Furniture
claim
1
claim
20
claim
61
Appliances
claim
12
claim
35
Chicago-IL
Linens
claim
23
Eastern…
In another situation, an entity
such as the ABC school district may use the following two levels. Sites such as
classroom, employee parking lot, and bus would be entered as locations (instead
of level three) since there is a cost analysis by location available on the
statistical report menu.
Level 1:
Division Level
2: Dept Level
3: N/A
Administration Accounting Employee Parking Lot
Instructional Marshall High School Classroom
Transportation School Buses Bus1
The following screen is used to
enter information for Level 1. The label and functionality of the Grouper may
vary, but otherwise the level screens are similar. The Region, Bank Accounts, CMS and Ignore PPO fields are only available in
level 1.
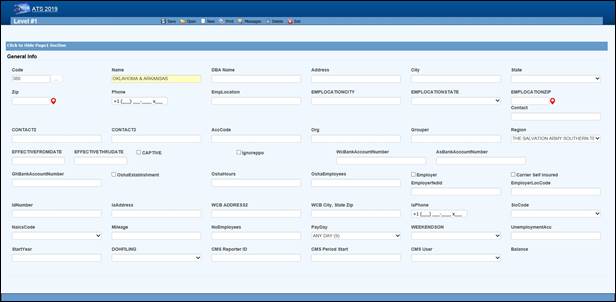
Figure 12‑4: Organization Maintenance – Level 1 Entry
When a specific level is an employer, enter items such
as the Address, Fed. ID, SIC Code, and WC ID number if they are required on
your state-mandated forms and letters. The Pay Day and Week Ends On
should also be entered before scheduling payments with AutoPay.
The fields on the form are described as follows:
|
Field Name |
Description |
|
Code |
The code used to reference a specific level.
When the policy feature is in use and the level is used in the policy format
code, do not use a hyphen in the level code. Otherwise, the claim program
will not be able to find a policy since hyphens are used to separate the
parts of the policy code. For example: OK
CCC_ADM Not OK
CCC-ADM |
|
Name |
The name
of the level
such as ABC
Stores or a
functional unit like Administration. This name will appear
in reports and on any input screen where the level code is entered. It
may also appear on state forms and letters if this level is the claimant’s employer. |
|
DBA
Name |
The
DBA name. |
|
Mailing
Address |
The
complete mailing address. |
|
City |
The
city. |
|
State |
The
state code. |
|
Zip |
The
zip or postal code. |
|
Phone |
The
phone number.
Enter 10 digits
and the program
will insert the parentheses, space and dash. |
|
Contacts |
The
name of one to three contact people at this level. |
|
ACC
Code |
An
optional code that may be used by the accounting interface when making
payments. |
|
ORG
Code |
A
second accounting/organizational code that may be used for your own purposes. |
|
Grouper |
The
label and functionality of this field will vary. Refer to the Level Type
Feature section for details. |
|
Effective
From/Thru |
The
date this region (fund, member, plan) before effective. If it’s no longer use, enter the ending date. |
|
OSHA Establishment |
Check
this box if this level is considered an OSHA workplace where the log will be kept. |
|
Hours
Worked |
This
is the total number of hours worked by all employees during the past year
that should be displayed on OSHA's Form 300A. This
number may be calculated by multiplying the number of full-time employees times the number of hours worked/year (excluding
vacations). |
|
Avg
Number of Employees |
This
is the annual average number of employees to be displayed on OSHA's Form 300A. This
number may be calculated by dividing the total number of payments made to
employees during the year by the number of pay periods. |
|
The following fields are only available
on the level 1 screen: |
|
|
Region |
If
the Region by Level feature has been implemented, this field
will appear on the Level 1 form so the code associated with each level may be
entered. Refer to the Parameters-Option/Module and Region sections in this
chapter for information on using this feature. |
|
Bank
Accounts |
Payments
may be drawn against a bank account set up for each level. This feature may
be used in one or all of the ATS/Comp modules by
entering the account number in the appropriate field on this form. (Accounts
must also be set up using the Finance-Edit Trust Fund menu.) |
|
Captive |
A
check indicates that this level is a captive. |
|
Ignore
PPO |
(ATS/Med
only) Check this box if the Claims program should ignore the provider’s HMO/PPO discount when calculating the benefit amount
to be paid. The field has no effect in ATS/Comp. |
|
The following information should be
supplied if the level is an employer: |
|
|
Employer |
Check this box if this level is an employer.
The system will use this flag to determine who the employer is when filling
out an Employer's First Report of Injury and some of the state-mandated forms and
letters. The program will
look for the employer by checking in the following order: ·
Level 3 (starting with Sub 3 and Sub 2) Level 2 ·
Level 1 ·
Region State Client |
|
Self-Insured |
Check
this box if the employer is self-insured. |
|
Fed
ID |
The
employer’s tax ID number. |
|
Location |
The
location code or number required by the state. |
|
Physical
Address |
The
physical address if it’s different from the mailing address. Include city,
state, and zip for reporting purposes. |
|
UIAN |
The
employer’s unemployment account number. |
|
Mileage |
The
amount paid for an office visit as a whole number of cents/mile (without a
decimal). |
|
Total
Employees |
The
total number of employees at this level should be entered if it is needed on
a state-mandated report. |
|
Pay
Day |
The
day of the week the employees are paid where 0=Sun, 1=Mon, 2=Tues, 3=Wed,
4=Thurs, 5=Fri, 6=Sat, and 9=Any Day. If AutoPay is used, this information and the day the
(work) week ends on will be used to schedule the payments to be batched. (For
details refer to the AutoPay Mode flag covered in the Parameters-Application
section of this chapter.) |
|
Week
Ends On |
The
day the work week ends should be entered if AutoPay is used. |
|
WC
ID |
The
workers' comp or state ID number. |
|
WC
Phone |
The
phone number of the Workers’ Comp Board. |
|
WC
Address |
The
address of the Workers’ Comp Board. |
|
SIC |
The
SIC code for the business done at this level. |
|
NAICS Code |
The
North American Industry Classification System code for this level. |
|
DOH Filing |
When
New York’s Department of Health’s surcharge needs to be paid, either monthly
or annually. |
|
Fiscal
Year |
The
start of the fiscal year in a MMDD format as 0101 or 0701. |
|
CMS Reporter ID |
The
reporter ID if this region is the RRE. |
|
CMS Reporting Group |
The
number of the group (from 1 to 12) assigned to the RRE. |
|
CMS User |
The
user responsible for creating the export files. A diary will be generated to
remind that person to make sure the necessary claims have been batched. |
Level Type Feature
The label and functionality of the Grouper field will
vary depending on whether the Level Type value has been set to “Validate”,
"Backfill” the default, or "None” in the Application Parameters. If this field contains:
1. Validate -
the Claim and Employee programs will use the level 1 entry to
determine which item(s) are valid for the subsequent levels and generate the
selection lists accordingly.
In this case, the label for the next level will appear
on the form (e.g. the level 1 Grouper field would be labeled Dept by default). Clicking the Ellipsis button will
display a dialog with a list of the available codes for level 2.
Select the item(s) that are associated or valid for
the specified level and click Add. The first entry in the top
list box will be marked with an asterisk (*) to indicate that it is the primary
code that will appear on the input form. To move another item to the top of the
list, highlight the entry and click the Make Primary
button. Clicking Remove will take the selected item off the list.
The Grouper is labeled “N/A” in level 3 since it
provides no function when the Validate feature is used.
2. Backfill -
the Grouper field will be used to link specific levels in the client’s
hierarchy as in the following example:
Code Grouper
Level 1 ABCST1 ABCST
Level 2 CA123 ABCST1
Level 3 101 CA123
In level 1, "Grouper" will appear as the
label and the contents of the field may be used for grouping similar levels on
a custom, adhoc report. In the example above, “ABCST”
would group information on all the ABC Stores (ABCST<n>) together.
In levels 2 and 3, the label for the previous level
will appear on the form (e.g. Division on the form for level 2 and Dept for level 3). Clicking <F4> will display
a list of the available codes. Select the one associated with the current
level. In the example, “ABCST1” would be entered as the Grouper in the record
for level CA123.
When you are entering a new claim or employee record,
you can enter the code for level 3 (101) and the program will use the value in
the Grouper field to fill in the codes for the other levels (CA123 and ABCST1)
automatically.
Sub 2 /
Sub 3
These menu options may be used if you have more than
three levels in your company's hierarchy. The codes are entered on a screen similar to the one used for Level 3.
Sub 2 and sub 3 are referred to as pseudo levels 4
and 5 since the Level Type feature that validates or backfills levels 1 through
3 does not recognize these codes.
The claim forms that you are using must be modified in
order to use these codes.
Loss Maintenance
Loss codes are entered in the claim to describe the
agency, body site, cause and nature of the claimant’s injury or illness since
this information is required on many state forms. A system administrator may change
the labels for
these codes with
the Application Parameters menu so different text may appear on your
input forms.
Special cost analyses by the standard loss codes mentioned above may be produced using
Statistical Reports to determine if there are any trends that need to be
addressed.
You may have a custom set of claim forms that allow
you to enter additional codes. All of the codes on the
menu are briefly described on the following chart.
|
Loss Codes |
Description |
|
Act |
The
act which caused the injury or accident. |
|
Agency (Source) |
The
source of the accident for further breakdown of the cause such as slippery
floor. |
|
Body
Site |
The
part of the body which was injured such as the abdomen. |
|
Body
Member |
The
member of the body which was injured. |
|
Cause |
The
reason for accident (e.g. slip and fall). |
|
Deductible |
The
coverage deductible codes. |
|
Loss
Coverage |
The
codes for the loss coverage plans. |
|
Nature |
The
nature of injuries such as sprained or broken. |
|
OSHA |
The
Occupational Safety and Health Administration codes. |
|
Recovery
Types |
The
codes which indicate the degree of recovery that is expected. |
|
Restricted
Duty |
The
codes which describe the type of restricted duty. |
|
Severity |
The
codes which identify the severity of the injury. |
|
Type
of Coverage |
The
codes which identify the type of coverage. |
|
Type
of Loss |
The
codes which identify the type of loss. |
|
Type
of Settlement |
The
codes which identify the type of settlement that was granted. |
The
screen used to maintain the Cause codes is shown below. The same one is used for
all the loss code tables except for the OSHA and restriction screens that only contain a
code and description.
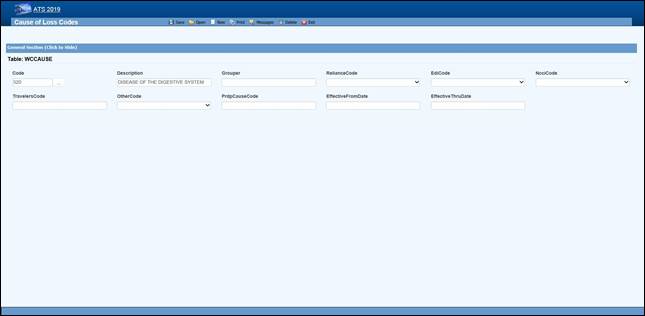 Figure 12‑5: Loss Maintenance – Cause Code
Entry
Figure 12‑5: Loss Maintenance – Cause Code
Entry
Note the NCCI code above. Unless you normally use NCCI
codes, you must select a code equivalent
to the cause, site and nature
codes you use in-house if you report transactions to the state via EDI.
The loss code menu options prompt for the following
information:
|
Field Name |
Description |
|
Code |
The
code used to describe the accident or injury. Description The description
associated with the code. |
|
Grouper |
A
value that may be used to sort and group records for reporting purposes. For
example, you might enter ACTS_GOD as the Grouper code for wind, earthquake,
lightning etc. |
|
Effective
From/Thru |
The
range of dates the code was effective. |
|
Exclude
from Web |
Check
this box if the code should not be available on the list. |
|
Carrier Codes |
The
fields for the insurance carriers are disabled unless your system has been
setup to use them. In that case, the codes for the carriers you deal with
must exist in the appropriate carrier table before you can associate them
with a specific loss code. |
|
Carrier Tables |
Suppose you need certain loss codes for reporting/exporting purposes, but you do
not use them internally. In that case, you would have to add the codes in the
appropriate carrier table so that they can be entered into
the standard loss tables for cross reference purposes. To do this: 1.
Select the List option on the Loss-Carrier Tables menu and pick the desired table. 2.
Enter the codes you need. 3.
Enable the appropriate field (e.g. NCCI Code) on your loss screen. (A system
administrator has the authority to do this.) 4.
Modify the record for each code by entering the
equivalent carrier’s code. Typically, the Data Export program will
search for the appropriate carrier code. If the field is empty, the program
will use the Code that you use in-house. |
Reserves/Payment/Recovery Maintenance
The ATS System uses the information in a set of
tables to classify the different types of reserve, payment and recovery transactions that may be made.
Before discussing the various tables in this group, it is important to clarify
some of the terminology that is used in this manual.
|
Term |
Description |
|
Reserve
Type Codes |
These refer to the types of cost center or
payment categories. By default, ATS supports four
reserve categories, but this number may be increased to six with the
Tables-Parameters-Application menu. The
names of the first four categories should be indemnity, medical, rehab, and
expense. Categories five and six are normally legal and other,
but may be changed. Labels for the categories are entered with the
Reserve Types option on this menu. |
|
Cost
Center Codes |
Payment codes related to a specific cost
center. These items are normally labeled “”CC” or “Pay Code” on the ATS input
screens. The
options will be covered in the order in which they appear on the menu: ·
Indemnity ·
Medical ·
Rehabilitation ·
Expense ·
Legal ·
Other ·
Reserve Types ·
Reserve Changes ·
Recovery Types ·
Void Types ·
Late payment Codes ·
Federal/State Withholding |
Cost Center Codes
Cost Center codes are also referred to as payment codes in the ATS System since they are used to
track payments against particular categories of
reserve accounts. All categories of cost center codes are entered on a screen
identical to the one shown below.
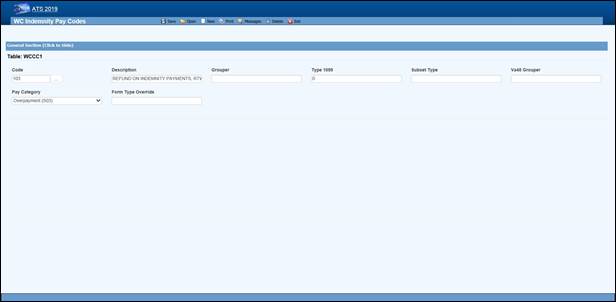 Figure 12‑6: Payment Maintenance – Cost Center Code
Entry
Figure 12‑6: Payment Maintenance – Cost Center Code
Entry
The following information is stored for each of the
cost centers:
|
Field Name |
Description |
|
Code |
The
cost center or payment code. These items are normally labeled “Pay
Code” on the ATS screens. |
|
Description |
The
description of the code. |
|
Group |
The
code used in making time loss payments (TD), calculating the
loss of earning percentage (LEP) or grouping similar items together on a
report. See the notes below. |
|
1099 - Misc Amount Type
Code |
Enter
values of income (3), medical (6), non-employee compensation (7), gross proceeds
to an attorney (C) if the pay code refers to a 1099 reportable item. Contact your accounting
department if you have questions about entering these values to ensure that
the amount on a vendor’s 1099 return is
correct. |
|
Sub Type |
This
value will be used to generate New York’s C-8 report. The special payment categories may be either “L” (Lump Sum), “D”
(Death), or “F” (Disfigurement). |
|
Report
Grouper |
Special codes needed to classify payments for
some specific reporting purposes. ATS support will let
you know when you will need to use this field. |
|
Category |
Many
states require employers to submit certain payment information. If you have
to produce this type of report, it is important to enter the
associated category for the payments that need to be included. |
The Grouper Field
1.
The Days Lost and OSHA Days are calculated when comp payments are made
for an indemnity or rehab pay code that contains “TD” in the Grouper field. (Note
that TTD and PTD are valid
TD codes.)
2.
AutoPay may also be used to schedule permanent
disability payments when the Grouper field in the pay code contains “PD”.
3.
Several of the standard reports review the check
history table and total the benefits paid to date. In order
for this feature to work correctly, the appropriate benefit type code
must have been entered in the Grouper field for the pay codes. For reserve
category #1 (indemnity) this code may be either “TD” or “PD”. Only TD is recognized for
pay codes in reserve category #3 (rehab).
Reserve Types
The ATS System can maintain up to six cost centers or
reserve accounts. The first four categories should be used since they are
required for state reporting purposes. Their names should not be changed. They
will appear whenever the reserves are displayed on input forms and reports.
|
Cost Center |
Payments Related To |
|
1 |
Indemnity |
|
2 |
Medical |
|
3 |
Rehabilitation |
|
4 |
Expense |
|
5 |
Legal
or state statutory benefits such as California’s 4850 |
|
6 |
Other
categories that are not already defined |
In
order to use five or six reserve categories, a parameter must be set in
Application Parameters. The names of these categories
are normally “Legal” and “Other”, but they may be changed.
Selecting the claim type is one of the first things
done when entering a new claim. If either indemnity or medical is specified,
the program will check to see if there are any default reserve values. In the
example above, $500 will automatically be displayed as the medical reserves for a new medical claim. No medical reserves
will be entered for indemnity claims.
Reserve Change
Whenever the reserves for a claim are changed, the program will ask
the operator to select a code to explain why the change was made before the
record can be saved. The History module may be used to view this information
along with who made the change and when.
This option is provided so you may enter the Reserve
Change codes you need along with their descriptions.
Some sample codes are listed below.
001 Reserve
Adjustment
001N Initial Reserve
- New Claim
002 Time Loss
003 Surgery
Scheduled
004 Second
Surgery
005 Surgery
Unsuccessful
006 Healing
Delay - Injury Related
007 Healing
Delay - Other Medical
008 Residuals
Predicted by Medical
009 Residuals
Greater than Predicted
010 Vocational
Assistance Needed
011 Recovery
Granted
012 Litigation - Additional Comp
013 Change in
Compensation Rate
014 Change of
Physician
015 Unsuccessful
RTW
016 Change of
Diagnosis
017 Benefit Reduction
018
Recalculation - PTDs and Fatals
019 Reopening
Reserve
020
Administrative Delay
021 Reduction -
Submitted for Close
022 Reduced-Residual
less than Predicted
023 Reduced -
Successful RTW
024 Reduced -
Medically Stable
Recovery Type
This option displays the following form so you can
enter the codes for the types of recovery transactions that can be made.
Void Types
This option displays the following form so that you
can enter the codes to classify the types of void transactions that can be made.
Late Payment
Reasons
The states that accept reports electronically require
a code to indicate a reason for issuing an initial indemnity payment more than 14 days after the date of injury.
This menu option is provided so you can enter the appropriate code when you are
making the payment.
The valid codes are:
L1 No excuse
L2 Late notification
employer
L3 Late notification
employee
L4 Late notification
jurisdiction transfer
L5 Late notification
health care provider
L6 Late notification
assigned risk
L7 Late
investigation
L8 Technical
processing delay computer failure
L9 Manual processing
delay
LA Intermittent lost
time prior to first payment
C1 Coverage lack of
information
E1 Wrongful
determination of no coverage
E2 Errors from
employer
E3 Errors from
employee
E4 Errors from
jurisdiction
E5 Errors from
health care provider
E6 Errors from other claim administrator/IA/TPA
D1 Dispute concerning
coverage
D2 Dispute
concerning compensability in whole
D3 Dispute
concerning compensability in part
D4 Dispute
concerning disability in whole
D5 Dispute
concerning disability in part
D6 Dispute
concerning impairment
Federal/State Withholding
These menus have been provided primarily for use with
the ATS/A&S Disability module where taxes need to be withheld from the
employee’s benefits. Although the Claim program uses Maine’s state tax table to
calculate the benefit rate, the input screens have not been included in this
manual since ATS personnel maintain the tables on a yearly basis.
Medical Fee Maintenance
This menu is provided for ATS customers who make
payments with the optional, add-on Medical Fee module although some of the codes for initial
treatment and managed care organizational (MCO) may be used when entering a
claim or an employer's First Report of Injury.
Each of these menu items will be covered in the
following sections:
|
Menu Item |
Description |
|
Override |
The
codes to use when a payment is different from the amount based upon the
RVS or UCR codes. |
|
DRG Codes (ICD-9) |
The
DRG or ICD-9 codes to be used when entering a new claim. |
|
Initial Treatment |
The
codes used to categorize the initial treatment that was provided. |
|
HMO/PPO |
The
HMO/PPO providers that your vendors use. |
|
MCO |
The
managed care organizational type codes. |
|
UCR Percentile |
The
usual and customary reimbursement (UCR) percentile for
specific states. |
|
Provider Specialty |
The
codes to describe a vendor’s specialty. |
ATS
maintains the tables with the Relative Value Schedule (RVS) codes and fee
schedules for the individual states so these options do
not appear on the menu.
Override
When making a payment with the Medical Fee module, you may enter an override code to
explain the reason why the amount paid is different than the amount the
provider charged for the item. The following screen is used to enter and/or
edit these codes.
DRG Codes (ICD-9)
The ATS System comes with the standard ICD-9 table that contains the physician’s diagnosis
or procedure (CPT)
codes that may be entered when making a payment with the Medical Fee module. ICD-9 codes may also be used when
tracking the care provided to the claimant with the optional Case Management module. The table also contains cause of
injury codes. The cause and diagnosis codes will both be required when
submitting a claim for a Medicare beneficiary to the CMS (Centers for Medicare and Medicaid Services).
This is a BIG table with over 12,000 records. Each
record only contains the code and description so there is no reason to search
for and/or view them. Contact ATS support if you would like a listing of the
codes.
Initial Treatment
When entering a new claim or an employers’ First
Report of Injury, codes may be specified to
indicate the type of initial treatment that was provided. A table for these
codes is maintained using the following screen.
The valid codes for reporting to the state are:
00 NO
MEDICAL TREATMENT
01 MINOR BY
EMPLOYER
02
MINOR/HOSPITAL
03 EMERGENCY CARE
04
HOSPITALIZED 24 HOURS
05 FUTURE
MAJOR MEDICAL/LOSS TIME ANTICIPATED
HMO/PPO
The ATS System allows you to maintain a list of HMO
and PPO providers that may be associated with a particular
vendor. When making a payment with the optional Medical Fee module, the program will check to see if the
specified vendor has an HMO/PPO with Valid From/Thru dates that cover the From
date in the payment record. If so, it will look in the HMO/PPO’s record for an
alternate Rate Table (the RVS
fee schedule) to be used to calculate the acceptable amount for the item that
was billed. Note that the code fields at the bottom of the screen are used in
the ATS Group Health product. A sample provider record is shown below.
Enter the data as described below:
|
Field Name |
Description |
|
Code |
The
HMO/PPO code. |
|
Description |
The
description used to identify the HMO/PPO. |
|
Valid
From/Thru |
The
range of dates covered by this provider. |
|
Discount |
Any
discount to be applied when calculating the acceptable amount to be paid. |
|
Rate
Table |
The
alternate rate table to be used when making payments with the Medical Fee module. If this field is empty, either the
table for the vendor’s state or the state
specified as the Fee State Code with the Tables-Parameters- Option/ Module
menu will be used by default. See the Medical Fee-Bill Review section for details. |
|
Message |
A
message to be displayed during the payment process. |
|
Code
Fields |
The
fields at the bottom of the screen are used in the ATS Group Health product. |
Managed Care Organizations
Managed Care Organization (MCO) codes may be specified in
the optional, add-on Case Management or First Report of Injury modules. A table for these codes is maintained
using the following screen.
UCR Percentile
The Bill Review program in the Medical Fee module may use a third party product to track
the state’s usual and customary reimbursement (UCR) percentile by zip code
instead of, or in conjunction with, the state’s RVS fee schedule. To use this
feature, a percentile between 1 and 8 must be entered for the state. (Please
refer to the Finance-Medical Fee section for detailed information on setup and
usage.)
The ATS Group Health Claims program may also use a third party UCR product to calculate benefit payments. In that
case, enter the GH Percentile.
Referral Reasons
The Reason Codes option on the menu displays the following
screen so the codes to explain why a referral has been made may be entered for
use in tracking the claimant’s medical treatment with the optional Case
Management module.
Provider’s Specialty
This standard table provided so you can enter the
providers specialty in the vendor’s record. Each record
contains a code, classification and specialization as you can see on the list.
Use the Search button if you want to view a particular item.
Industry Maintenance
Access is provided to standard industry tables that
have been purchased and converted for use in the ATS System. Normally, the
codes should not need to be edited.
SIC –
Standard Industry Classification
The ATS System comes with a table of Standard Industry
Classification (SIC) codes since the code for the
employer is often required on state mandated forms and letters. This menu option displays
the following form so you can view and/or enter the SIC code you need to
identify the nature of business in the appropriate record(s) for the employer.
If there are equivalent North American Industry Classification System (NAICS) codes, they may be entered
for cross-reference purposes.
NAIC – North American Industry Classification System
This menu
option may be used to view and/or enter the North American Industry
Classification System (NAICS) codes. The form used to
maintain this table is similar to the one shown above.
NCCI –
National Council on Compensation Insurance
The job classification codes in this table are from
the National Council on Compensation Insurance, Inc. (NCCI). They are available for use
in the Employer’s Report of Injury module.
NDC –
National Drug Code
The National Drug Code table has been provided for use when tracking
the care provided to the claimant with the optional Case Management module. Use the Search button if you want to view a particular item.
Occupation
ATS provides you with a table for storing occupation
or job codes. When these codes are associated with specific claims, reports can
be generated to determine any trends that should be addressed.
The form below is used to enter your codes. Note the
fields for some of the insurance carriers. Suppose you deal with Travelers and
need to send them data. In that case, enter the equivalent code if it is
different from the one you entered in the first field. The data export program
will check the Traveler Code field. If the field is empty, the program will
assume that it should use the data in the Code field.
This table contains the following information. If you
plan to use special carrier codes, you must use the appropriate options on the
Carrier Tables menu to enter the codes before they can
be displayed on the selection lists.
|
Field Name |
Description |
|
Code |
The
code that is used internally to identify a specific occupation. |
|
Description |
The
description used to identify the occupation. |
|
Grouper |
A
value that may be used to sort or group similar occupations for reporting
purposes. For example, occupations might be grouped by payment type (salaried, hourly…). Nurses might be
grouped by shift number and so on. |
|
Effective
From/Thru |
The
period in which the code should be on the selection list. |
|
Exclude
From Web |
A
check indicates that the code should not be listed on the Web. |
|
Carrier Codes |
The
equivalent code for the carrier(s) if it is different from the one you use
internally. |
Other Maintenance
Employment Status
A special table is provided to store the employment
status codes you wish to use. A sample is shown below.
The fields on the form are described as follows:
|
Field Name |
Description |
|
Code |
The
code for the employment status may be numbers such as 01, 02, 03, etc. or
letters like “FT” (full-time), “TEMP” (temporary), and “VOL” (volunteer). |
|
Description |
The
description of the employment code. |
|
Full
Time |
Check
this box if the code is used for a full-time position. Since a variety of
codes such as "FULL", "F", and "FT" may be used
to indicate "FULL-TIME", ATS programs will use this value to
determine whether a position is full-time for reporting purposes. |
|
Effective
From/Thru |
The
period in which the code is valid. |
|
Exclude
from Web |
A
check indicates that the code should not be listed on the Web. |
|
EDI Code |
If you are sending claims to the state via
EDI, enter an EDI code
for each code you use in-house, The valid codes are: ·
Regular Employee ·
PT Employee ·
Seasonal ·
Unemployed
·
Volunteer Worker ·
On Strike ·
FT Disabled ·
Apprenticeship ·
PT Retired ·
Piece Worker ·
Other |
Relationship
This menu option is provided so you can enter the
relationship codes you need to use when filling out a record on an employee’s
dependent.
If you will be reporting claims for Medicare beneficiaries to the CMS, enter the following codes:
Code Description
F
Family Member, Individual Name Provided
O
Other, Individual Name Provided
X
Estate, Entity Name Provided (e.g. "The Estate of John Doe")
Y Family, Entity Name Provided (e.g.
"The Family of John Doe")
Z
Other, Entity Name Provided (e.g. "The Trust of John Doe")
Location
This menu option may be used to enter the codes you
need in order to indicate the location where the accident/injury occurred. If
you produce OSHA logs, it is important to note that the
location of the accident will appear on the report.
The Grouper field may be used to group similar
locations for ad hoc reporting purposes. For example, you may have a number of register aisles with codes 18 though 24. If REG is entered as the Grouper in these
records, all the claims for accidents that occurred in any of these locations
could be grouped together on a custom report.
Litigation Codes
This menu is provided for clients who wish to use
special litigation codes in a claim. The Grouper may be used to sort records in
a custom report.
Restricted Duty
This menu option allows you to enter special codes
that may be used to describe the limitations that could apply to a claimant’s
Restricted Days due to an accident or illness.
This table contains the following:
|
Field Name |
Description |
|
Code |
A
code such as “NL” to indicate the type of restriction. |
|
Description |
The
description of the code where “NL” might be “NO LIFTING”. |
State Codes
This menu option displays the following form so you
may enter the state specific information that will be used throughout the ATS
System.
The specific fields are described as follows:
|
Field Name |
Description |
|
Code |
The
code for a specific state or province. |
|
Description |
The
name of the state or province. |
|
OWCP
Schedule |
Check
this box if the Bill Review program should compare the state schedule
with the OWCP schedule for federal claims. |
|
Fee
Schedule |
Check
this box if the state has a fee schedule. (This information is used in the
Medical Fee module.) |
|
State
Days |
The
number of days in the state’s work week which is used to calculate the
claimant’s lost work days when making time loss
(indemnity) payments. |
|
OSHA Days |
The
number of days in the OSHA week which will be used to calculate the
lost OSHA days when making time loss payments. This number should be seven
since OSHA now uses a calendar year. |
|
Waiting
Period |
The
default number of days in the state’s waiting period is 7. Verify that the
correct number has been entered for the state(s) you deal with. This
value (and the next one) must exist before the Pay Waiting Period set with the Administer-Configuration-Diary/Scan Parameters menu
will be used to generate diary entries. The
Waiting Period and Before Paid values will also be used to
determine whether the waiting period has been paid when calculating the Lost
OSHA Days for the OSHA 300 and the appropriate
dates when the Auto Compensation button has been selected to schedule new
auto payments. |
|
Before
Paid |
The
number of days before the waiting period may be paid. The default is 21. |
|
Subro Statute |
The
days before the state’s statute expires should be entered if the
corresponding field set with the Tables-Parameters-Diary/Scan menu is to be
used to generate a diary. |
|
Check
Summary |
Check this box so the program will examine
each indemnity payment and enter a transaction record whenever
there are changes in the Comp benefit period (e.g. the rate or benefit type
changed). This
feature is required to produce some state reports such as New York’s SI-4 and C8. When used, a Comp Period button will
appear in the AutoPay and History modules so you can review the changes. |
|
Region |
A
region code should be entered if the Region by State feature has been set up with the
Tables-Parameters-Option/Module menu. |
|
Hospital
Tax |
The
hospital tax percentage should be entered when required for state reporting
purposes. |
|
Care
Tax |
A
state care tax percentage to be applied when making payments with the Medical
Fee Module. |
|
Federal
District # |
The
number of the federal district in which this state is located. No Fault
Insurance Check this box if
the state mandates no fault insurance. |
|
No
Fault Limit |
The
limit set by the state. |
|
Claim
Screen |
The
name of a custom screen to use when a claim is for this particular
state of jurisdiction. |
|
ER
Screen |
The
name of a custom screen to be used to enter reports of injury for the
specified state. |
|
EDI Release |
The
number 1 or 3 to indicate which IAIABC release the state supports. |
|
EDI Sender EDI Receiver |
The federal ID number and ZIP code for the
party sending and receiving the EDI information. This
data is required in order to transmit the records electronically. |
|
EDI Trading Partner |
The
ID number assigned to you by the state. Depending on the state, this number
may be an element in the name of the export file. |
|
Employer |
Check
this box if there is only one employer in the specified state. |
|
Name Address |
The
name and address for the employer that should be used on state forms and
letters. |
|
Fed
ID # |
The
employer’s federal ID number. |
|
Self-Insured |
Check
this box if the employer is self-insured. Entering the From and Thru dates
the employer was/is self-insured is optional. |
|
Wage Statement |
The
code for the state’s wage statement. |
|
Pay
Day |
The day of the week the employees are paid
where 0=Sun, 1=Mon, 2=Tues, 3=Wed, 4=Thurs, 5=Fri, 6=Sat and 9=Any Day. If
AutoPay is used and the state record identifies the
employer, the Pay Day will determine how to schedule the print dates
depending on the AutoPay Mode set with the Tables-Parameters-Application
menu. |
|
WC
ID |
The
employer’s workers’ comp or state ID number. |
|
WC
Address |
The
worker’s compensation or OWCP address. |
|
DBA
Name |
The
DBA name of the employer if one exists. |
|
CMS Reporter ID |
The
Reporter ID if the employer is an RRE. |
|
CMS Reporting Group |
The
group number (from 1 to 12) assigned to the RRE. |
|
CMS User |
The
user responsible for creating the export files. |
|
Ongoing
Responsibility |
Check
this box if the state mandates that employers assume responsibility for all
medicals for the employee’s lifetime. |