Medical Fee Module
Each year, medical costs continue to skyrocket. Instead
of simply paying the full amount on every invoice, use the Medical Fee module, an optional, add-on product designed
to lower your medical costs. Each line item on the invoice is calculated and
either accepted or overridden based on the state’s fee schedule, the DOL’s OWCP
schedule, and/or the Usual and Customary Reimbursement (UCR) value. A vendor’s custom fee schedule may
also be used.
This module has also automated the printing of
Explanation of Benefits to the medical providers. The UCR module is an optional feature and not part of
the standard ATS/Comp Medical Fee product.
Bundling and unbundling is another optional feature
that is available. The data to implement any of these features is available
from a third party.
Setup Considerations
1. By
default, the program will check to see if the specified vendor has an HMO/PPO with Valid From/Thru dates that cover the From
date in the payment record. If so, it will look in the HMO/ PPO’s record
for the rate table to be used.
When a rate table is not specified (or found), the
program will use the vendor’s State to see if the
Schedule flag for that state has been set with the Maintain-State Codes menu.
If the vendor’s State field is empty or the
state has no fee schedule, a message will appear indicating that it will use
the Fee State Code set with the Administer-Configuration-Module Parameters menu
to calculate the amount for the line items to be paid on the invoice.
2. If UCR percentiles are to be used,
they should be stored by state with the Medical Fee- UCR Percentile menu. By
default, the program will detect that a percentile exists for the vendor’s state and use the UCR value
to calculate the amounts, based on the zip code, for the line items ignoring the $ per Unit
value in the fee schedule.
3. If the
Override State flag has been set with the Module Parameters menu, the program
will calculate the amount of the line item using both of the
above methods and display whichever amount is lower.
Making a Payment
The bill review process is quick and easy. The Bill
Review button will display a data entry screen with
two pages, the first of which is used to enter general information on the
payment as shown
below.
|
Field Name |
Description |
|
Payment
Type |
The
type of payment, either check or
voucher. |
|
Invoice |
The
number of the invoice that is being paid. |
|
Invoice
Date |
The
date of the invoice. |
|
Received |
The
date the department received the invoice may be entered for accounting
purposes |
|
Status |
The
status of the payment; either batch to be
printed later, print when the record is saved or notation only, which writes
the payment record to the check history file with a specified form number and
processed date without printing it first. |
|
Payment
Code |
The
code for the type of payment. |
|
Payment
Note |
A
note to be displayed on the check or voucher. |
|
Vendor
Code |
Enter
“C” if the payee is the claimant or press the Ellipsis button to select an
active vendor. |
|
Payee |
Making a selection will display the
name and address from the vendor’s record. |
Clicking
the Line Items button will display the page shown below.
The fields on this form are described as follows:
|
Field Name |
Description |
|
Amount |
The
amount on the invoice. The total amount that will be paid for the line
item(s) is displayed in the Payable field. The program will display a message
and adjust the amount for the line item or the amount payable if either is
greater than the invoiced amount. |
|
Service
Zip |
By
default, the vendor’s zip will be
displayed as the zip code where the service was performed. This zip code will
not only determine which fee schedule is used, but also the tax rate if tax
is to be applied as in New Mexico. |
|
ICD-9 |
The
ICD-9 code(s) from the invoice. Up to four codes
may be entered. |
|
Inpatient |
A
check indicates that the employee has been admitted in a facility and treated
as an inpatient. |
|
Item |
The
number of the line item. Use the arrow keys to enter another item or review a
previous one listed in the grid below. |
|
From/Thru |
The starting and ending date of the billing
period. (The default ending date is the same as the From Date.) These dates
will determine which particular fee schedule to use.
(It must be after the open date on the claim.) For
your convenience, the previous From/Thru dates will
be displayed as you enter new line items. |
|
ICD-9 |
A
number to specify which ICD-9 code applies to the specified CPT code for the line item. |
|
Invoiced
CPT Code |
The CPT code for the item. Normally, this must be a
valid code (in the fee schedule) in order to continue. The exception is
“00000”, which may be used to enter a miscellaneous item that is not found in
any fee schedule. Note
that the professional component or technical unit value may be used instead
of the maximum reimbursable by entering the CPT code followed by either "-26" or
“-27” respectively (e.g. 00100-26). |
|
CPT Code |
If
the UCR module is in use, the vendor’s zip code will be
used to determine the appropriate region. |
|
Description |
The
description of the procedure. |
|
Modifiers |
Up
to three modifiers may be applied to the CPT code. For example, the following modifiers may
be applied to CPT 00100. |
|
Specialty |
When
there is a specialty associated with the CPT code, it may be selected from a list of
choices by clicking the Ellipsis button. |
|
Qty |
The
number of units billed for this line item. Unit Amount The amount billed per unit is optional. |
|
Amount |
The amount billed for the procedure. If the
amount per unit has been specified, the program will multiply it by the
quantity when the Qty is greater than one and the CPT code begins with 1 or higher (anesthesia
units are billed differently). When
the following situation occurs, the invoiced amount will be set to zero. The values from the preceding Invoiced fields
will appear as soon as the Amount is entered. |
|
Accepted
Amount |
The Maximum Reimburseable
Amount (MRA) is displayed if it is less than the amount invoiced, otherwise
the MRA will appear. As the amount of each line item is accepted, the total
value in the Payable field will be incremented. Note
that if the Bundling/Unbundling feature is in use, the program will check
for major or comprehensive procedures that consist of a number of individual
procedures. For example, the CPT code 31505 (larynoscopy
diagnostic) consists of many other procedures, one of which is 36000
(microsurgery add-on). If both are on the same bill, the program will detect
that the "code 36000 is part of the comprehensive procedure code
31505" and enter ZERO in the accepted amount for line 36000. The program
will also look for mutually exclusive procedures (e.g. 27177 and 11010) that
are not allowed on the same bill. |
|
Override |
An
override code to explain why the amount to be paid is different than the
amount billed. Press the Ellipsis button for the user-defined choices entered
with the Tables-Medical Fee menu. |
|
Futures |
The
amount available in the claim’s (future) medical reserves. See below for
details when the amount is insufficient to cover the payment. |
|
Payable |
As
line items
are entered and
accepted, the program
will adjust this
value accordingly. When the record is saved, this amount will be used
to update the paid to date and future reserves in the claim. |
|
Rate
Table |
The
program will display the name of the fee schedule table in use. |
If
you are in the Override field and want to enter another line item, press
<Page Down> to increment the Line Number by
one and move the cursor to the next From field. By default, the previous From/ Thru dates will be displayed for your convenience.
Saving the Record
After all the line items have been entered, save the
record. The program will verify that the future medical reserves will cover the payment. If the futures are not
enough, the program will check the Negative Reserves value set with the Module Parameters menu.
If the Negative Reserves value is "Y", the entry is allowed
and the future reserves in the claim will become negative. If the
value is "N", the program will check the Stair Step Reserves value that was set using the Application
Parameters screen.
If the Stair Step Reserves value is “A”, the incurred amount in the claim
will automatically be increased to cover the payment. Otherwise, the Edit Reserves
dialog may be used to increase the reserves. (All changes depend on the
operator's reserve limit.) Clicking Close without
making a change will decrease the amount to equal the future reserves.
At this point, the payment will be batched, printed, or manually posted
to history depending on how the Status field is set.
Note that the payment will be pended if it is over the operator’s
check writing limit. (Pended payments must be released using the File menu in
the Batched Payments section of the Process module.)
After the record is saved, you will be asked if you
want to input another payment for this claim. If you click Yes,
the form will be cleared so you can start again. Otherwise, you will be
returned to the main menu.
The Bundling and
Unbundling Feature
When this optional feature is in use, the program
will check for mutually exclusive procedures (e.g. 27177 and 11010) that are
not allowed on the same bill. It will also look for major or comprehensive
procedures that consist of a number of individual components
or procedures. For example, the CPT code 31505 (larynoscopy
diagnostic) consists of many other procedures, one of which is 36000
(microsurgery add-on). If both are on the same bill, the program will detect
that the "code 36000 is part of the comprehensive procedure code
31505" and enter ZERO in the accepted amount for line 36000.
Using Custom Fee Schedules
The ATS system supports multiple fee schedules; federal (DOL), state, and
the usual and customary reimbursement (UCR) schedule. In that case, the
program will display the amounts in the different schedules so the user can make a selection.
Discounts and/or custom fee
schedules can also be setup for specific vendors.
(Without this ability to use custom schedules, invoices for vendors that use
their own service codes could not be reviewed.) After custom schedules have
been setup, their use is transparent during data entry unless the code on the
invoice is found in multiple schedules.
If you would like to use this feature, please contact
ATS support as the procedure is beyond the scope of this manual.
Printing the Explanation of Benefits
The Explanation of Benefits (EOB) is normally printed at the
same time as the payment. A special menu option is
provided for those clients who export their payments to be printed by a foreign
system and/or want to print them again later.
An option on the Financial menu may be used to print
the EOBs any time after the check or voucher payments have been printed (not
while they are still batched). When the report screen appears, enter the
specifications to meet your requirements.
|
Field Name |
Description |
|
Provider
Code |
A
specific provider (vendor) code. Leave this
field empty to include every provider that received a payment within the specified range of dates. |
|
Display
By |
The
EOBs will be sorted by provider code and then by either the claimant’s name
(the default) or the claim number. |
|
Starting
Date |
The
first payment date to be selected. By default, this is the
date that was used the last time the forms were produced. |
|
Ending
Date |
The
date of the last payments to be selected. |
An
example of the standard EOB has been included below.
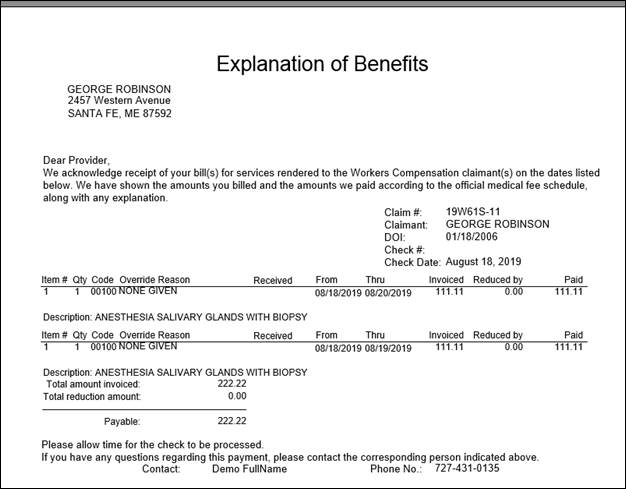
Figure
6‑3: Sample Explanation of Benefits